Washi Tape Fun

(Washi Week 2017 is a blog series by Halley, my 13yo daughter.) Hello there! Welcome to day three of washi week, and today's topic, washi tape fun!  I apologize that this is a day late a storm knocked out our internet:( There are so many fun things to do with washi tape. It doesn't have to serve a purpose. As long as it's cute, it is worth making!

These are American Girl doll-sized folders and textbooks. The washi tape not only holds them together, but it makes them cuter, too!

Use washi tape and paper to make doll folders and notebooks!

A better view of the insides...

Washi tape doll crafts

For Operation Christmas Child last year we made play scenes out of Altoid tins. The washi tape just made the outside cuter. You can read more about them HERE.

washi tape covered altoid tins - so easy and cute!

Here are some scrap-booked picture frames that only need a little strip of washi tape make them look cute. Tapes with phrases on them are my favorite to use for things like this. (See more frames HERE.)

washi tape words and saying on picture frames

The star box below was taken from my mom and washi taped with a set of washi tape I had bought.

Washi tape is the fastest and easiest way to decorate boxes!

As you can see, my sisters ruined it by drawing all over the top of it.

Cover boxes with washi tape- easy kids craft!


There are so many different thing to do with washi tape, these are just a few. So here is a list of some more ideas I have tried:

  • Washi tape popsicle stick bracelets
  • Washi tape covered staplers
  • Washi tape on pencil sharpeners
  • Hanging things (walls, lockers, etc.)
  • Sealing notes
  • Covering books

There are plenty more, but these are the ones I can think of off the top of my head.

If you want to pin it for later...

Fun Washi Tape Ideas for Kids!

Thanks for reading my post, I hope you liked it. Be sure to stay tuned for tomorrow and if you haven't already, please read the previous posts from this week. You can find them all HERE:

Washi Tape Crafts and Ideas

Washi Tape School Supplies

Hello! It's me again. I'm back for day two of Washi Week, and today's topic is school supplies! So, whether it's pencils, notebooks, binder clips, scissors, or just a strip along a binder, it's bound to be cute with washi tape on it. (If you haven't read yesterday's, you can click HERE to read it.)

Here are some of the pencils I made. They look cute, don't they?! All I did was use a strip (or a few depending on the width of the tape and the pencil) and cut it to the length needed. As you can see, I didn't really do a good job at that. Also, when sharpening, an electric sharpener is what I recommend using.

Washi tape makes cheap pencils instantly cuter!

Here is another shot of the pencils...

Washi tape makes boring, yellow pencils adorable!!!

Here are some journals my mother made for a local MOPS meeting craft. She bought a scrapbook paper pad to use on the covers and she made little cut-outs and stamps to customize it. I like how the washi tape really stands out on the and the little sayings are really perfect for this.

Scrapbook Paper Covered Journals

This picture gives you a good look at the back of the notebooks.

Recovered journals- MOPS craft idea

To do the notebook activity, mom decided to mark her scissors so she wouldn't get them confused with other people's scissors. Even something so simple as this helps keep a classroom organized.

Put washi tape on school supplies so that they don't get mixed up!

Even a small amount of washi tape can make regular binder clips a cute classroom accessory. I just used one strip and wrapped it along the top. Smaller prints will work better, that way you get to see more of it. The middle clip has a big floral print, you can only see like half of the the tape's pattern.

Washi tape on binder clips makes them extra cute!

Thanks again for reading one of my posts. More creative crafts are on the way for the rest of Washi Week, so stay tuned!

If you want to pin it for later...

How to use washi tape on school supplies...

(If you haven't read yesterday's, you can click HERE to read it.)

Washi Tape Cards

Hi! I'm Halley, and I'm here for Washi Week. Since I know many people have absolutely no idea what washi tape is, let me explain: washi tape is decorative paper tape that comes in SO many different sizes and prints, and you can do just about anything with it. I am basically the expert of washi tape in the family. I can't tell you how much I love this stuff. I may or may not have an obsession :) My parents (mostly my dad) say I have a real problem. I started with only 2 rolls from last Easter, and now I have  A LOT! I counted 79 this morning but I know I am missing at least 15. Anyway, I am super excited to tell you about my best Washi creations, and we're going to start the week off with my favorite... CARDS! The thing I love about making cards is there is so many things you can do with them and so many occasions you can make them for! Christmas, birthdays, weddings, thank you cards, or even just random cards to give to friends (those are my favorite!). Just like my amazing mom, I love Pinterest!!! Many of my cards are Pinterest-inspired.

With this card the sparkly card stock background gives a "happy" look to it, perfect for a birthday card.

Canlde Washi Tape Card

I love this card! It was made for my sister who was going to be starting kindergarten, and she needed to get pumped up about it. What better way then using a card!?! All I did was cut a paper bag to size and glued it on. Then, using thin washi tape, I ripped off pieces to look like pencils then drew the tips So simple, yet so cute!

Washi Tape Pencil Card

This card was my first, but I don't like it because I can't decide which way to hold it!

Cute flower embellishment on a blank card with washi tape!

A lot of times when I buy my washi tape, they come in matching sets of two or three. Below are some of the tapes I matched together and and used on the cards. Some of them don't have their "caption boxes" yet, but usually if it's a taped background, I use a solid colored circle to surround the caption box, and if it's a solid background I include one of the tapes on the card to surround it.

Simple washi tape cards- so easy and fun!

And Some More Cards...

Washi tape cards that anyone can make!

I made these cards just recently using cards that I bought and, some metallic washi tape to really set them off.

metallic-washi-tape-cards

If the card isn't cute enough already you can add something simple and adorable to spice things up. All you have to do is border the envelope with one of the washi tapes used on the card. You can even add a strip on the front of the envelope to add a little extra cuteness to it. It just makes people more excited to get it in the mail!

Use washi tape to decorate envelopes!

Thanks so much for reading my post. I hope you liked it! Be sure to stay tuned for the rest of Washi Week!

If you want to pin it for later...


Use blank cards and washi tape to make cute greeting cards for any occasion!

Scrapbook Paper Picture Frame Tutorial

April is generally the craft month for our MOPS group. We wanted to come up with something that every mom could use... picture frames! At the March meeting we set up a photo booth with two background choices: an aqua sheet thumbtacked to the divider with THIS pink and yellow bunting or a navy sheet thumbtacked to the divider with some yellow stars that are part of our "Starry Eyed" meeting decor. They were simple, but beautiful (and FREE!) One of our steering team members is also a talented photographer. She has a good eye for capturing those special moments. She photographed the moms as they came in with their little ones and we got free 4 x 6 prints through the Shutterfly app printed before the April meeting. We figured if there was a picture to put in the frame right away it would be used.

Cute and easy MOPS craft with picture frames!

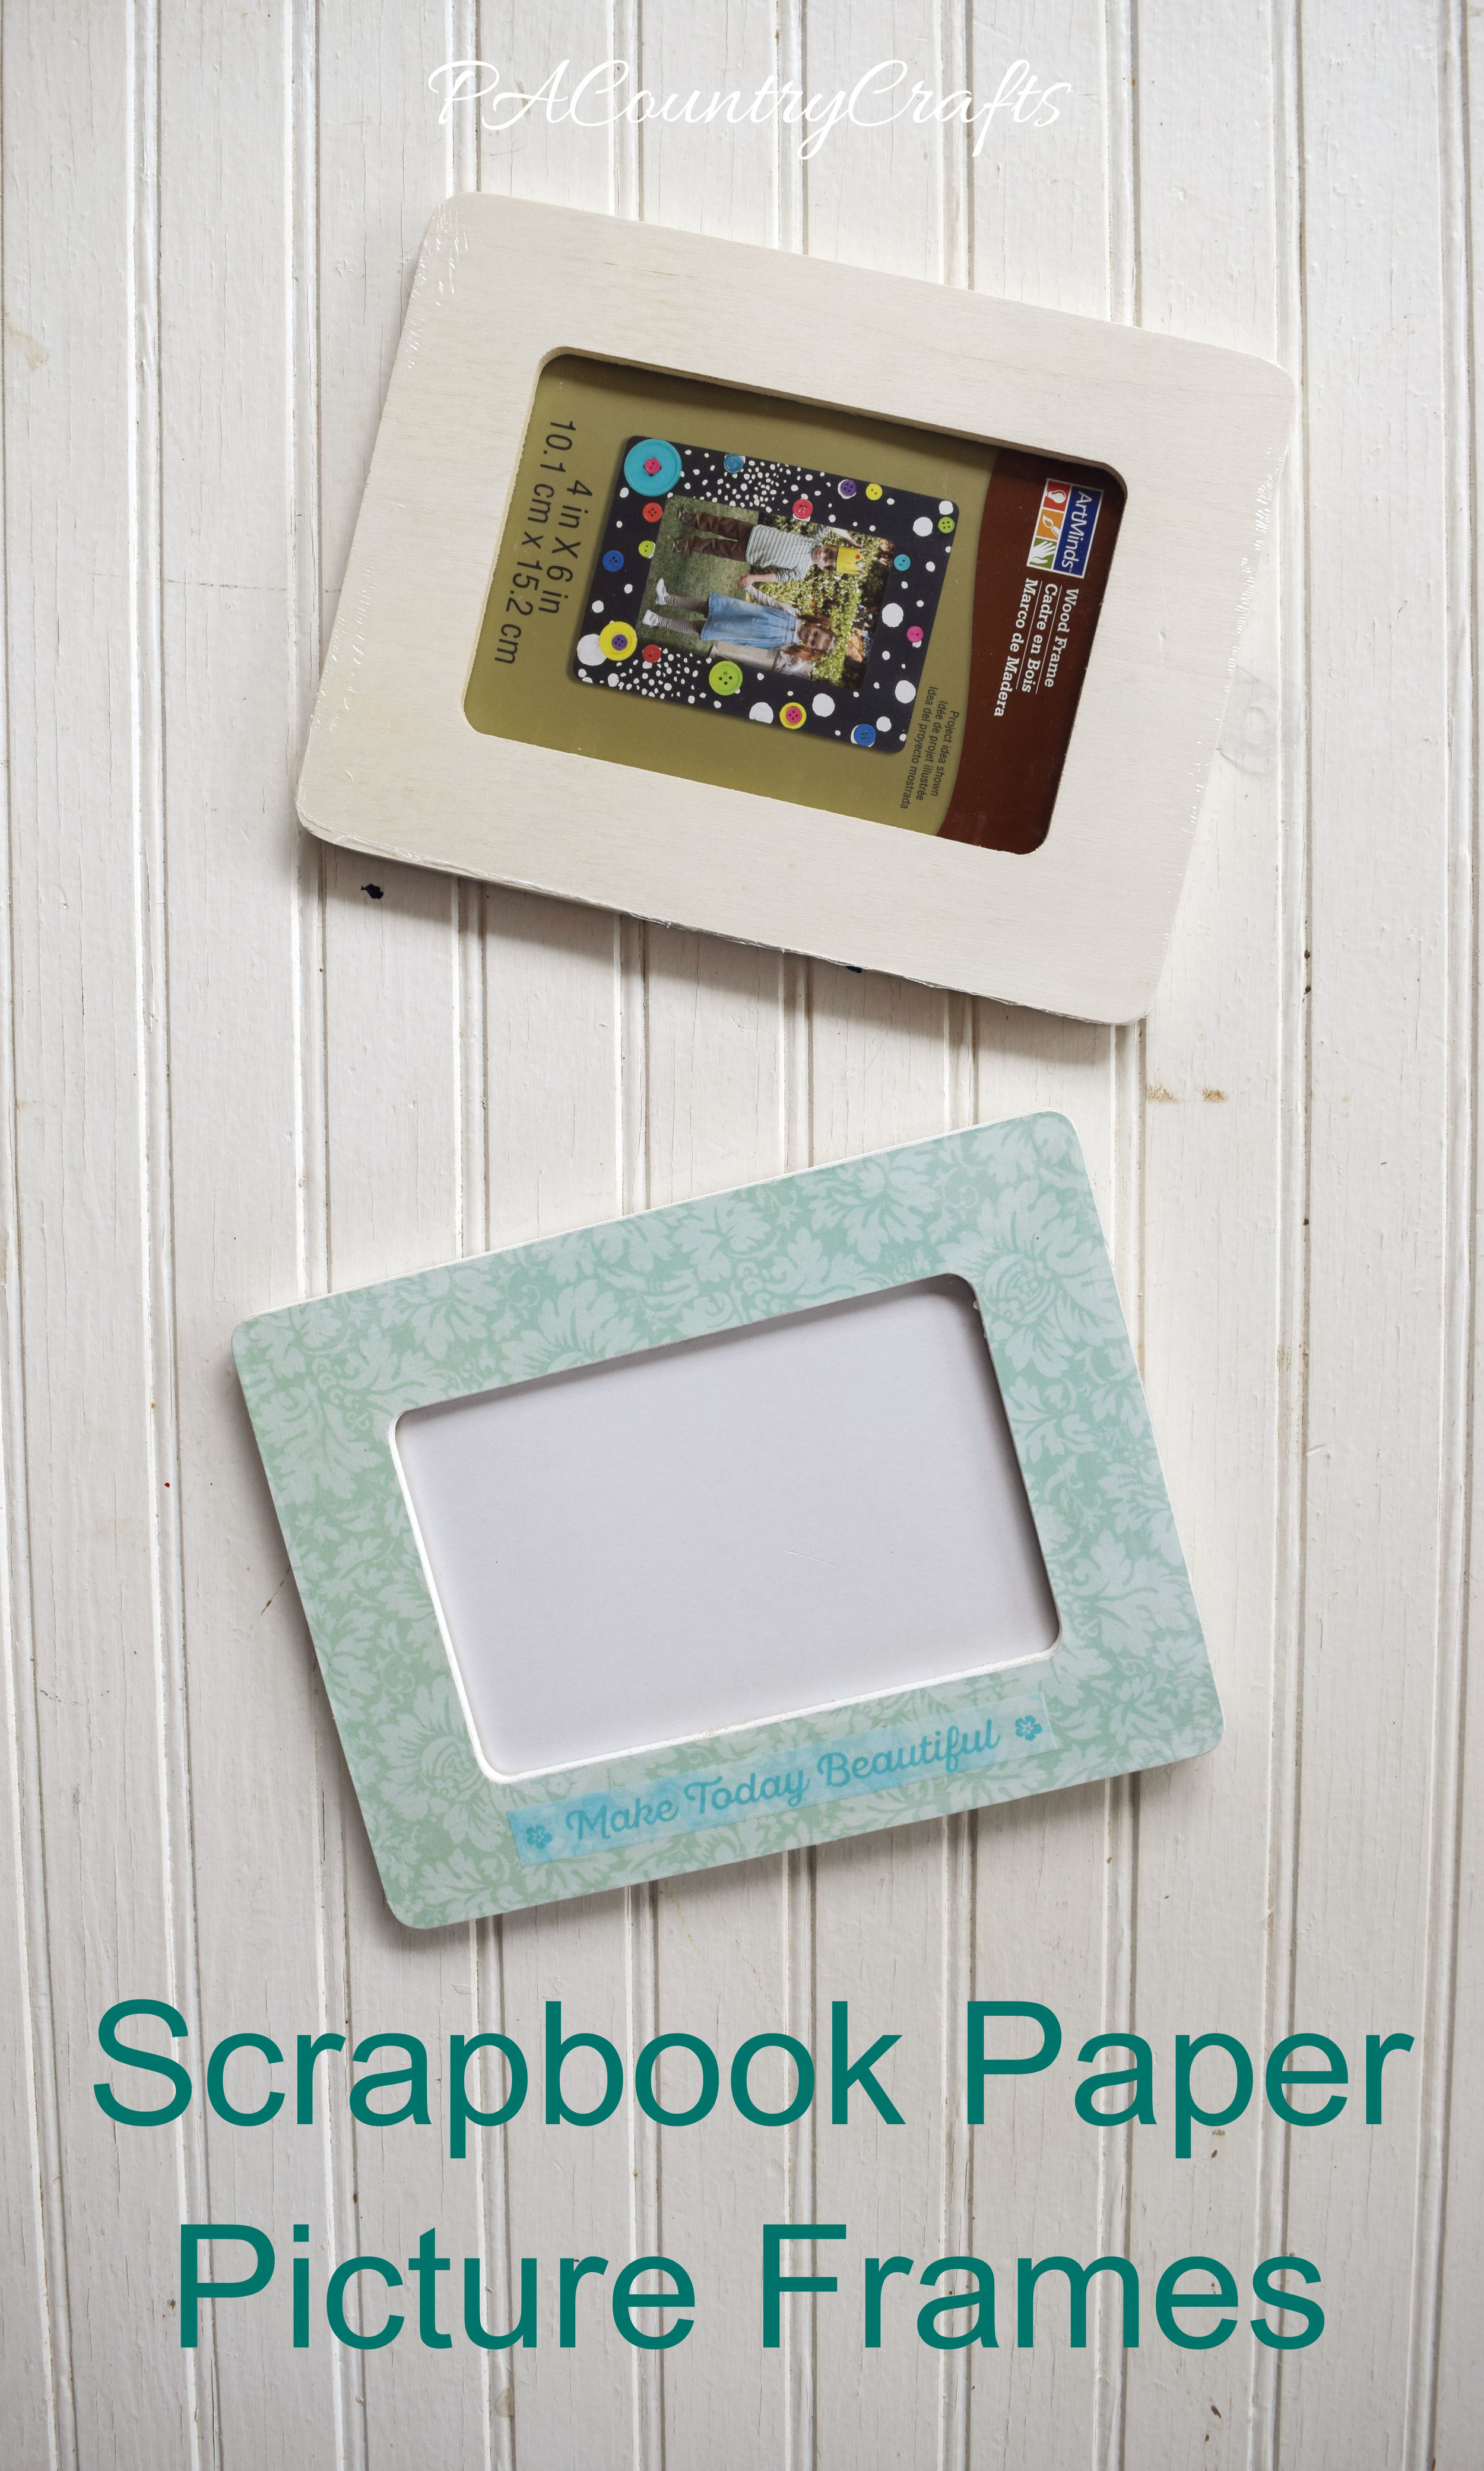
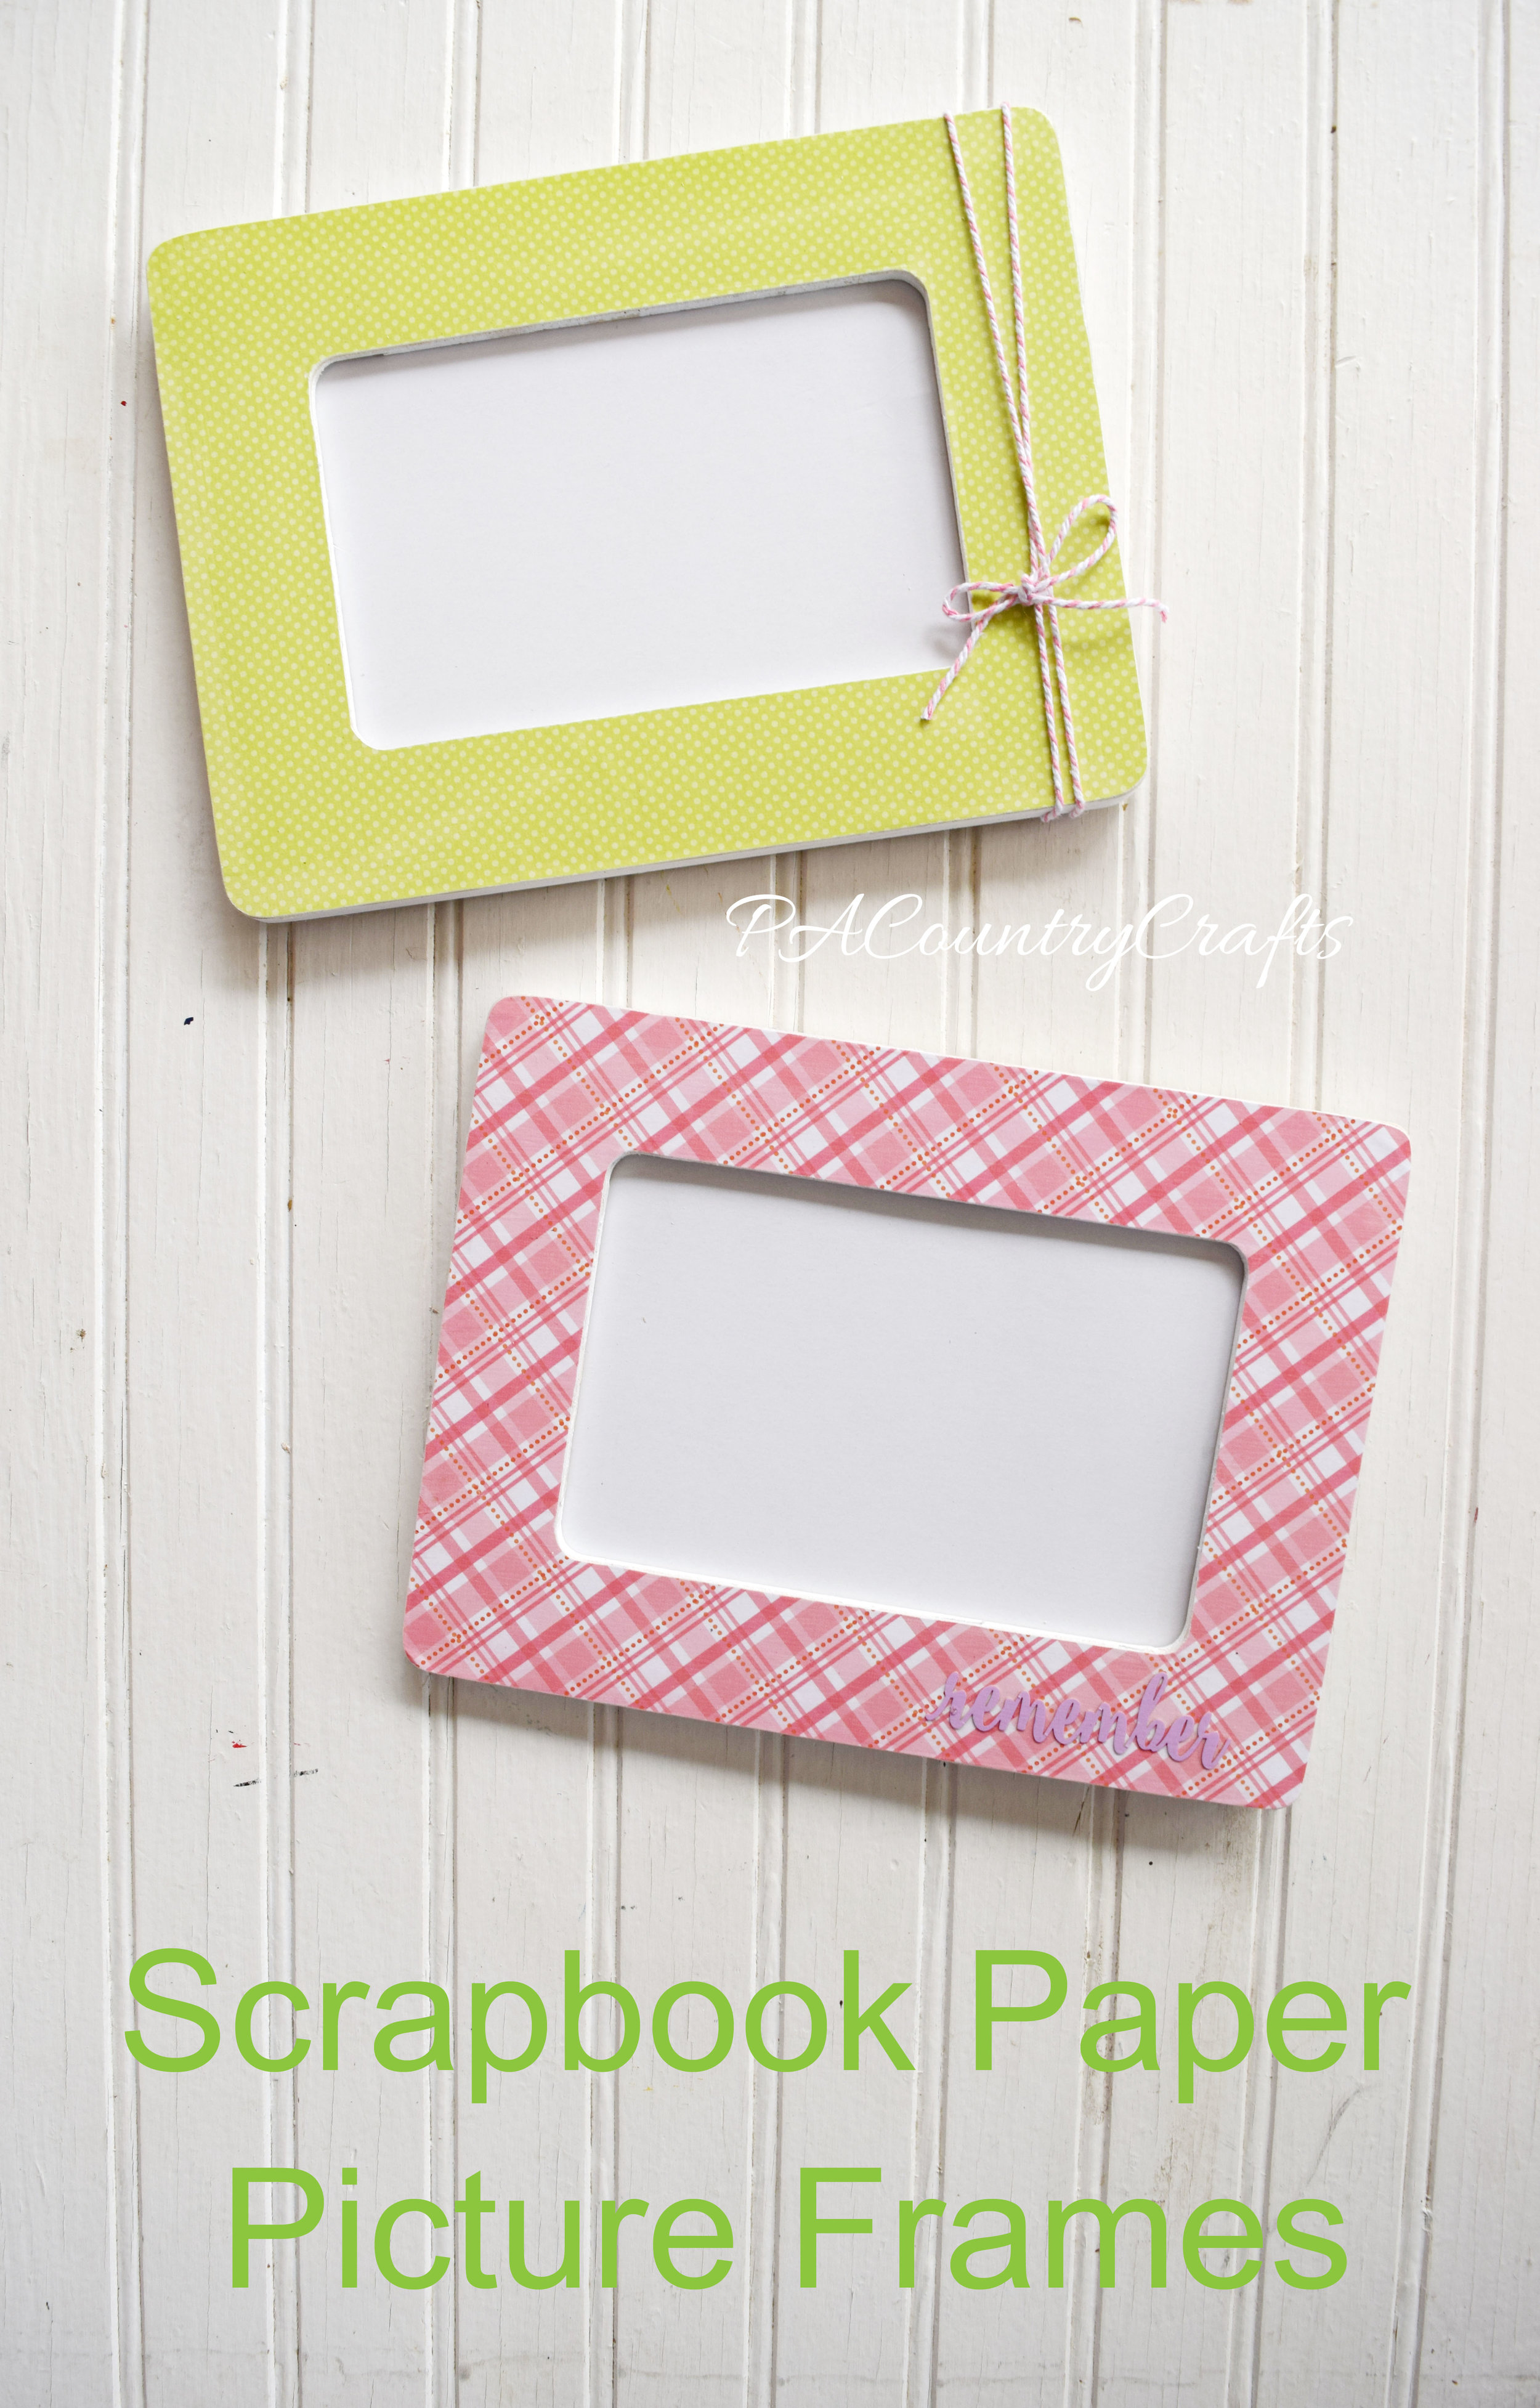
The frames were easy and inexpensive. I got them at Michaels and used a 30% off your entire purchase coupon so they were only 70 cents each. We also used up leftover paper from our journal craft in September (see HERE). I picked up some more scrapbook papers in neutral and blue colors that would be better for pictures with the navy background.

DIY book page picture frame

Scrapbook paper over a wood frame...

MOPS photo booth and picture frame craft

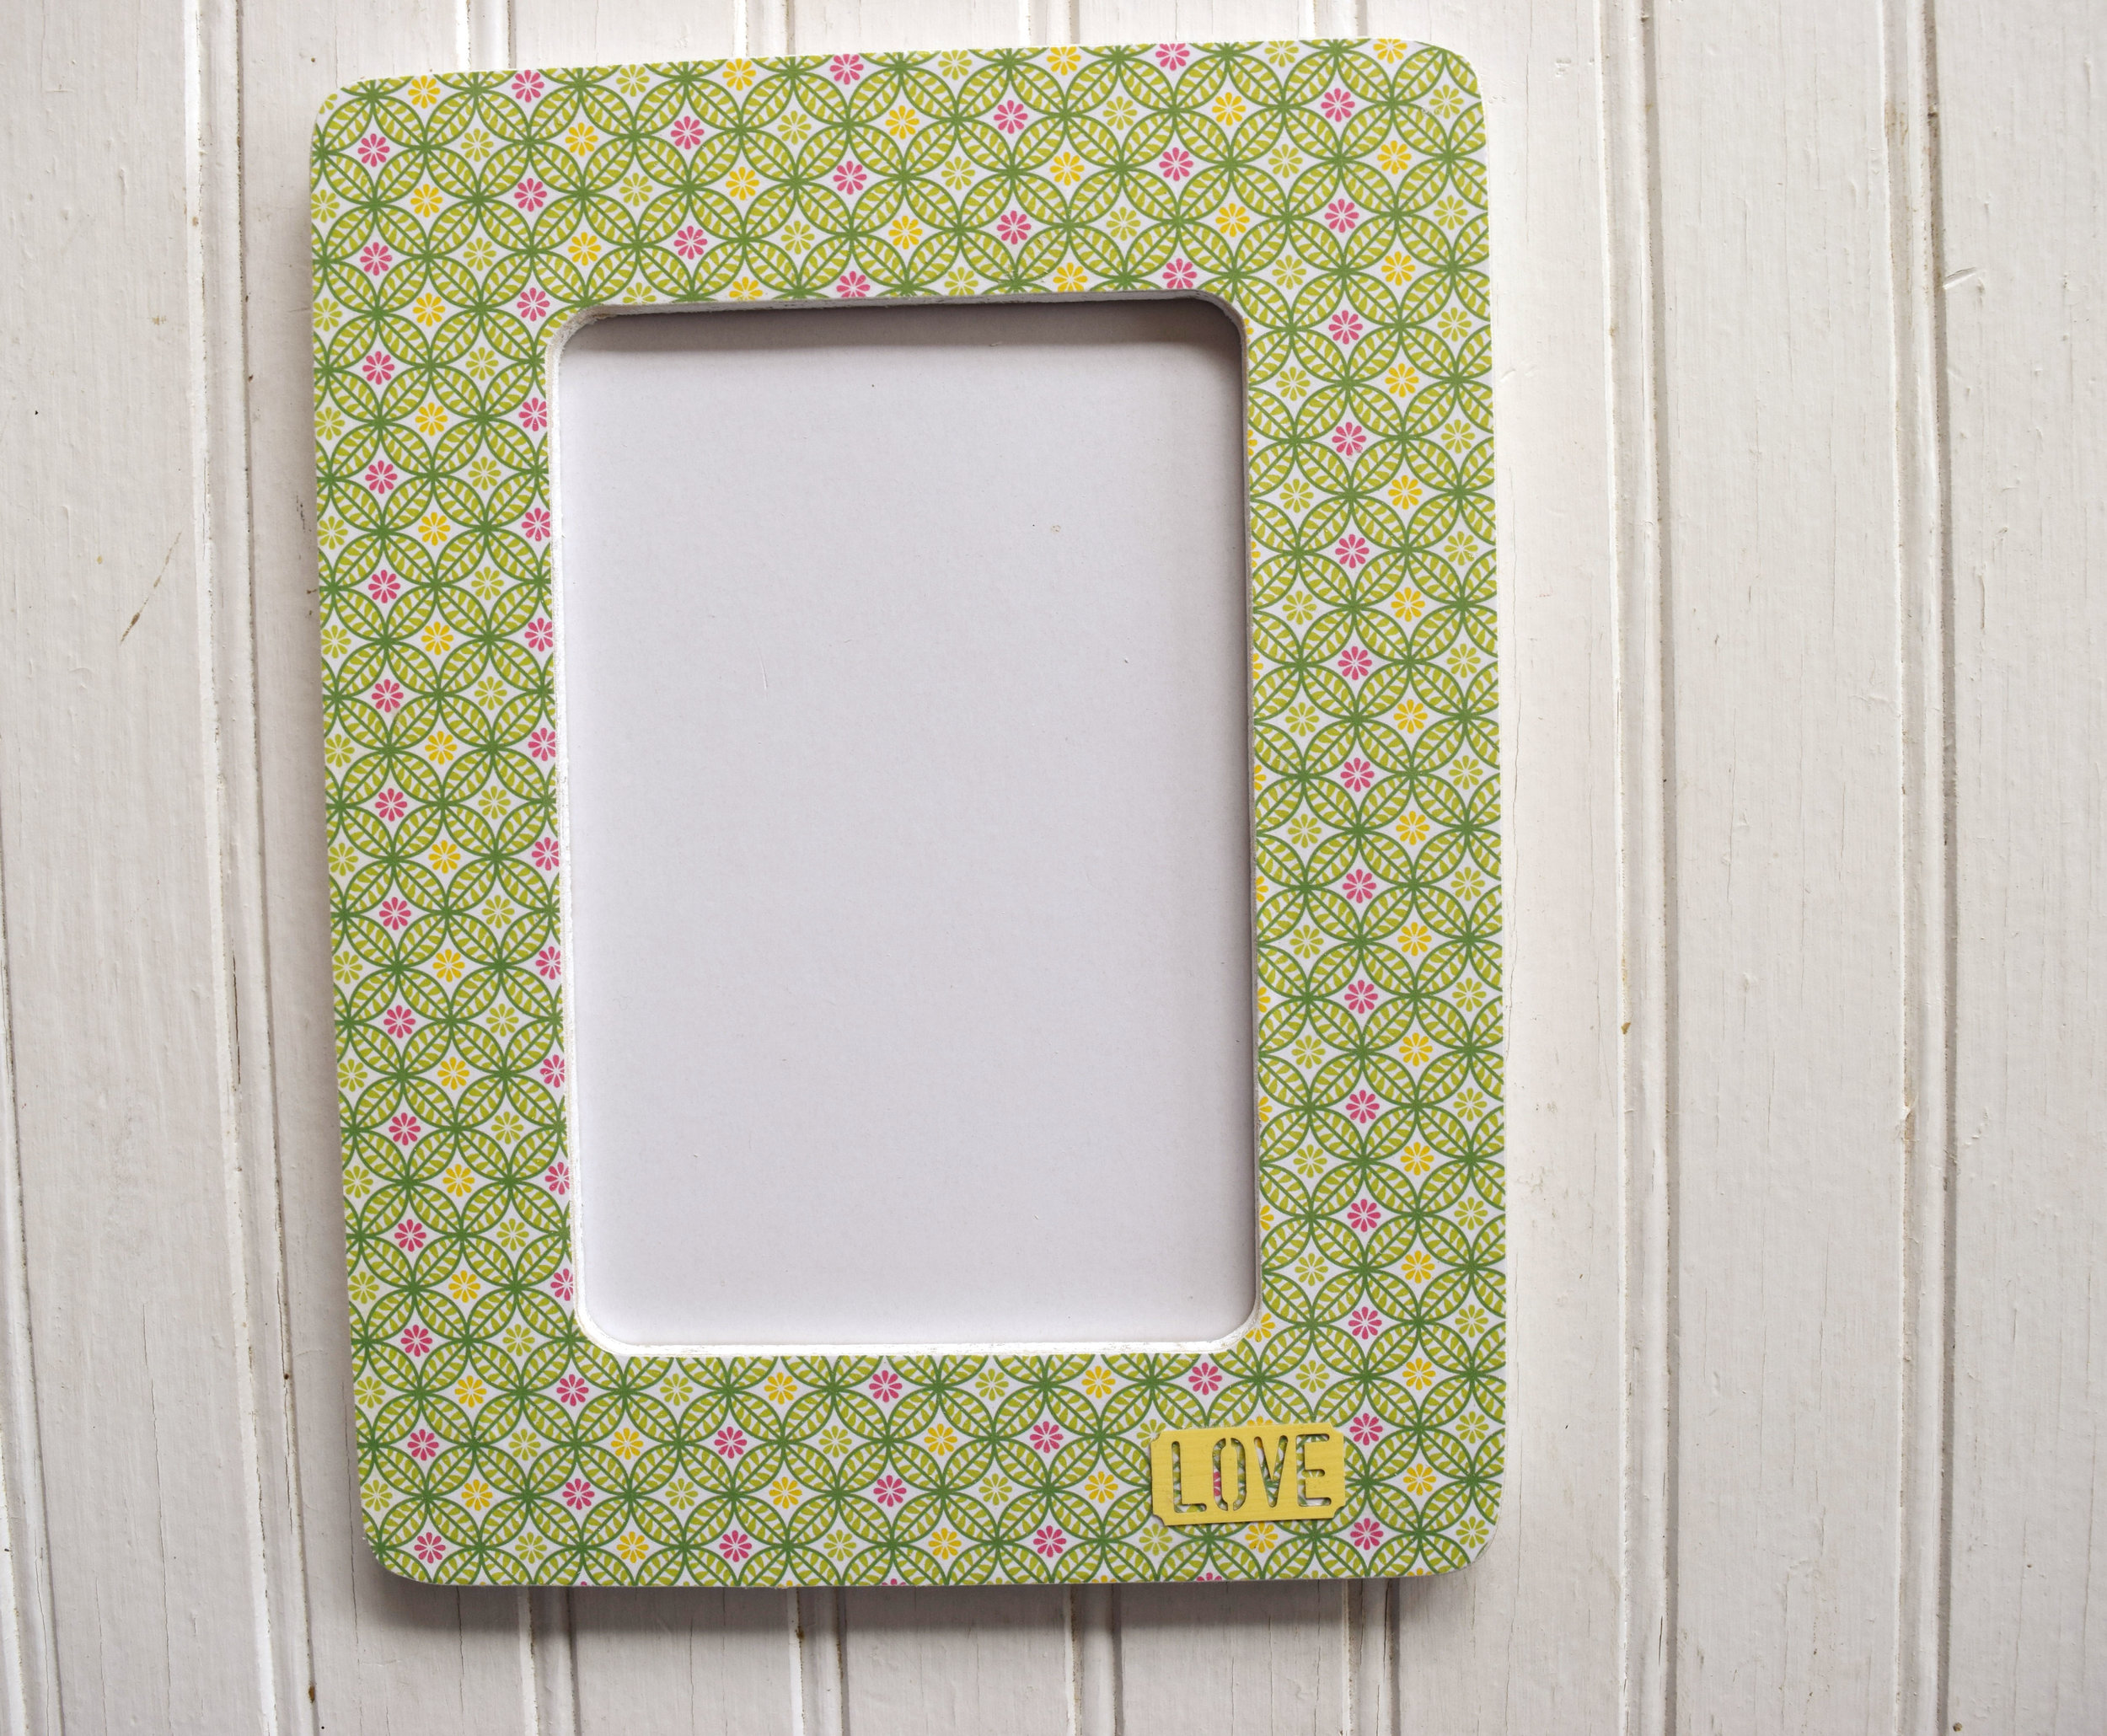
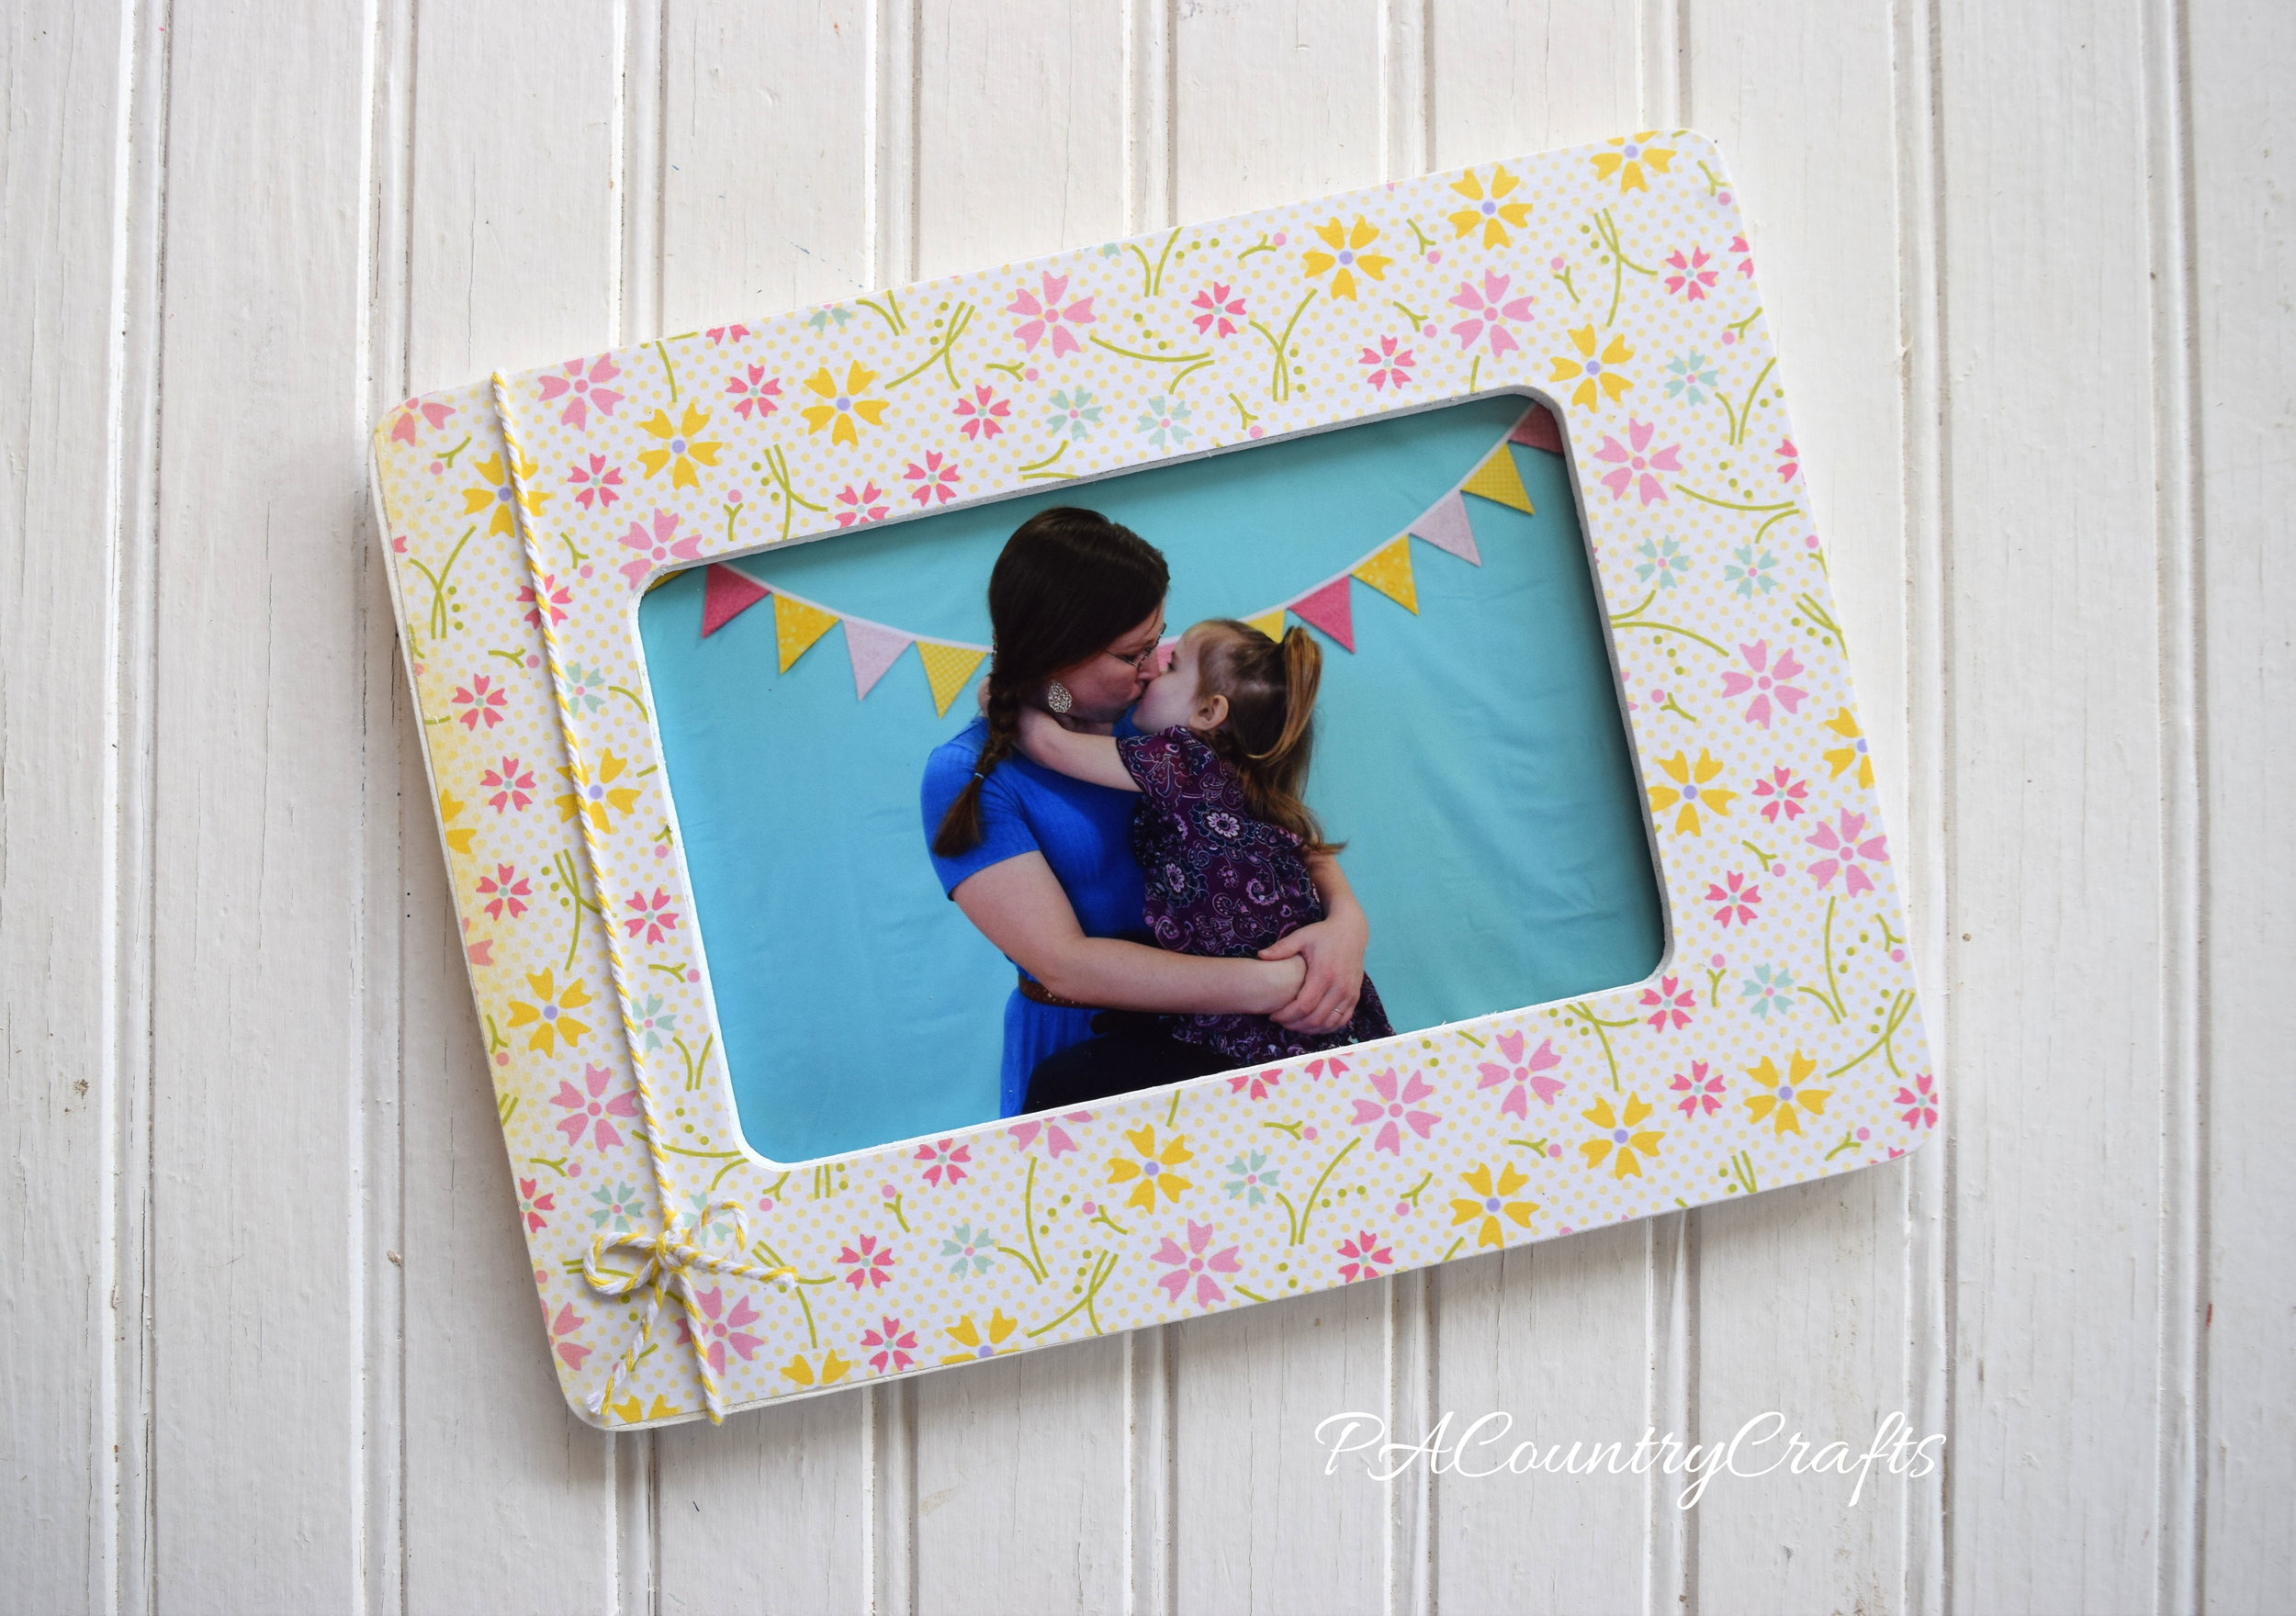
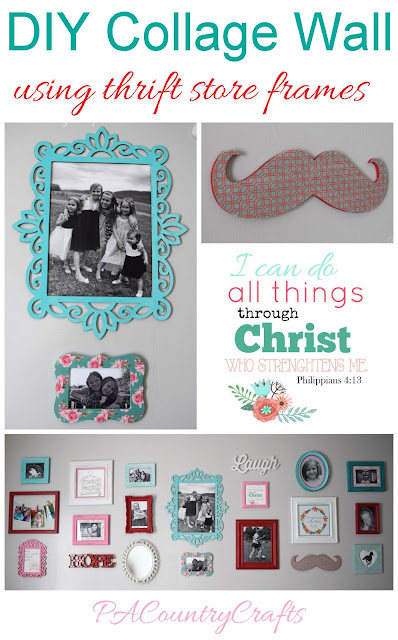
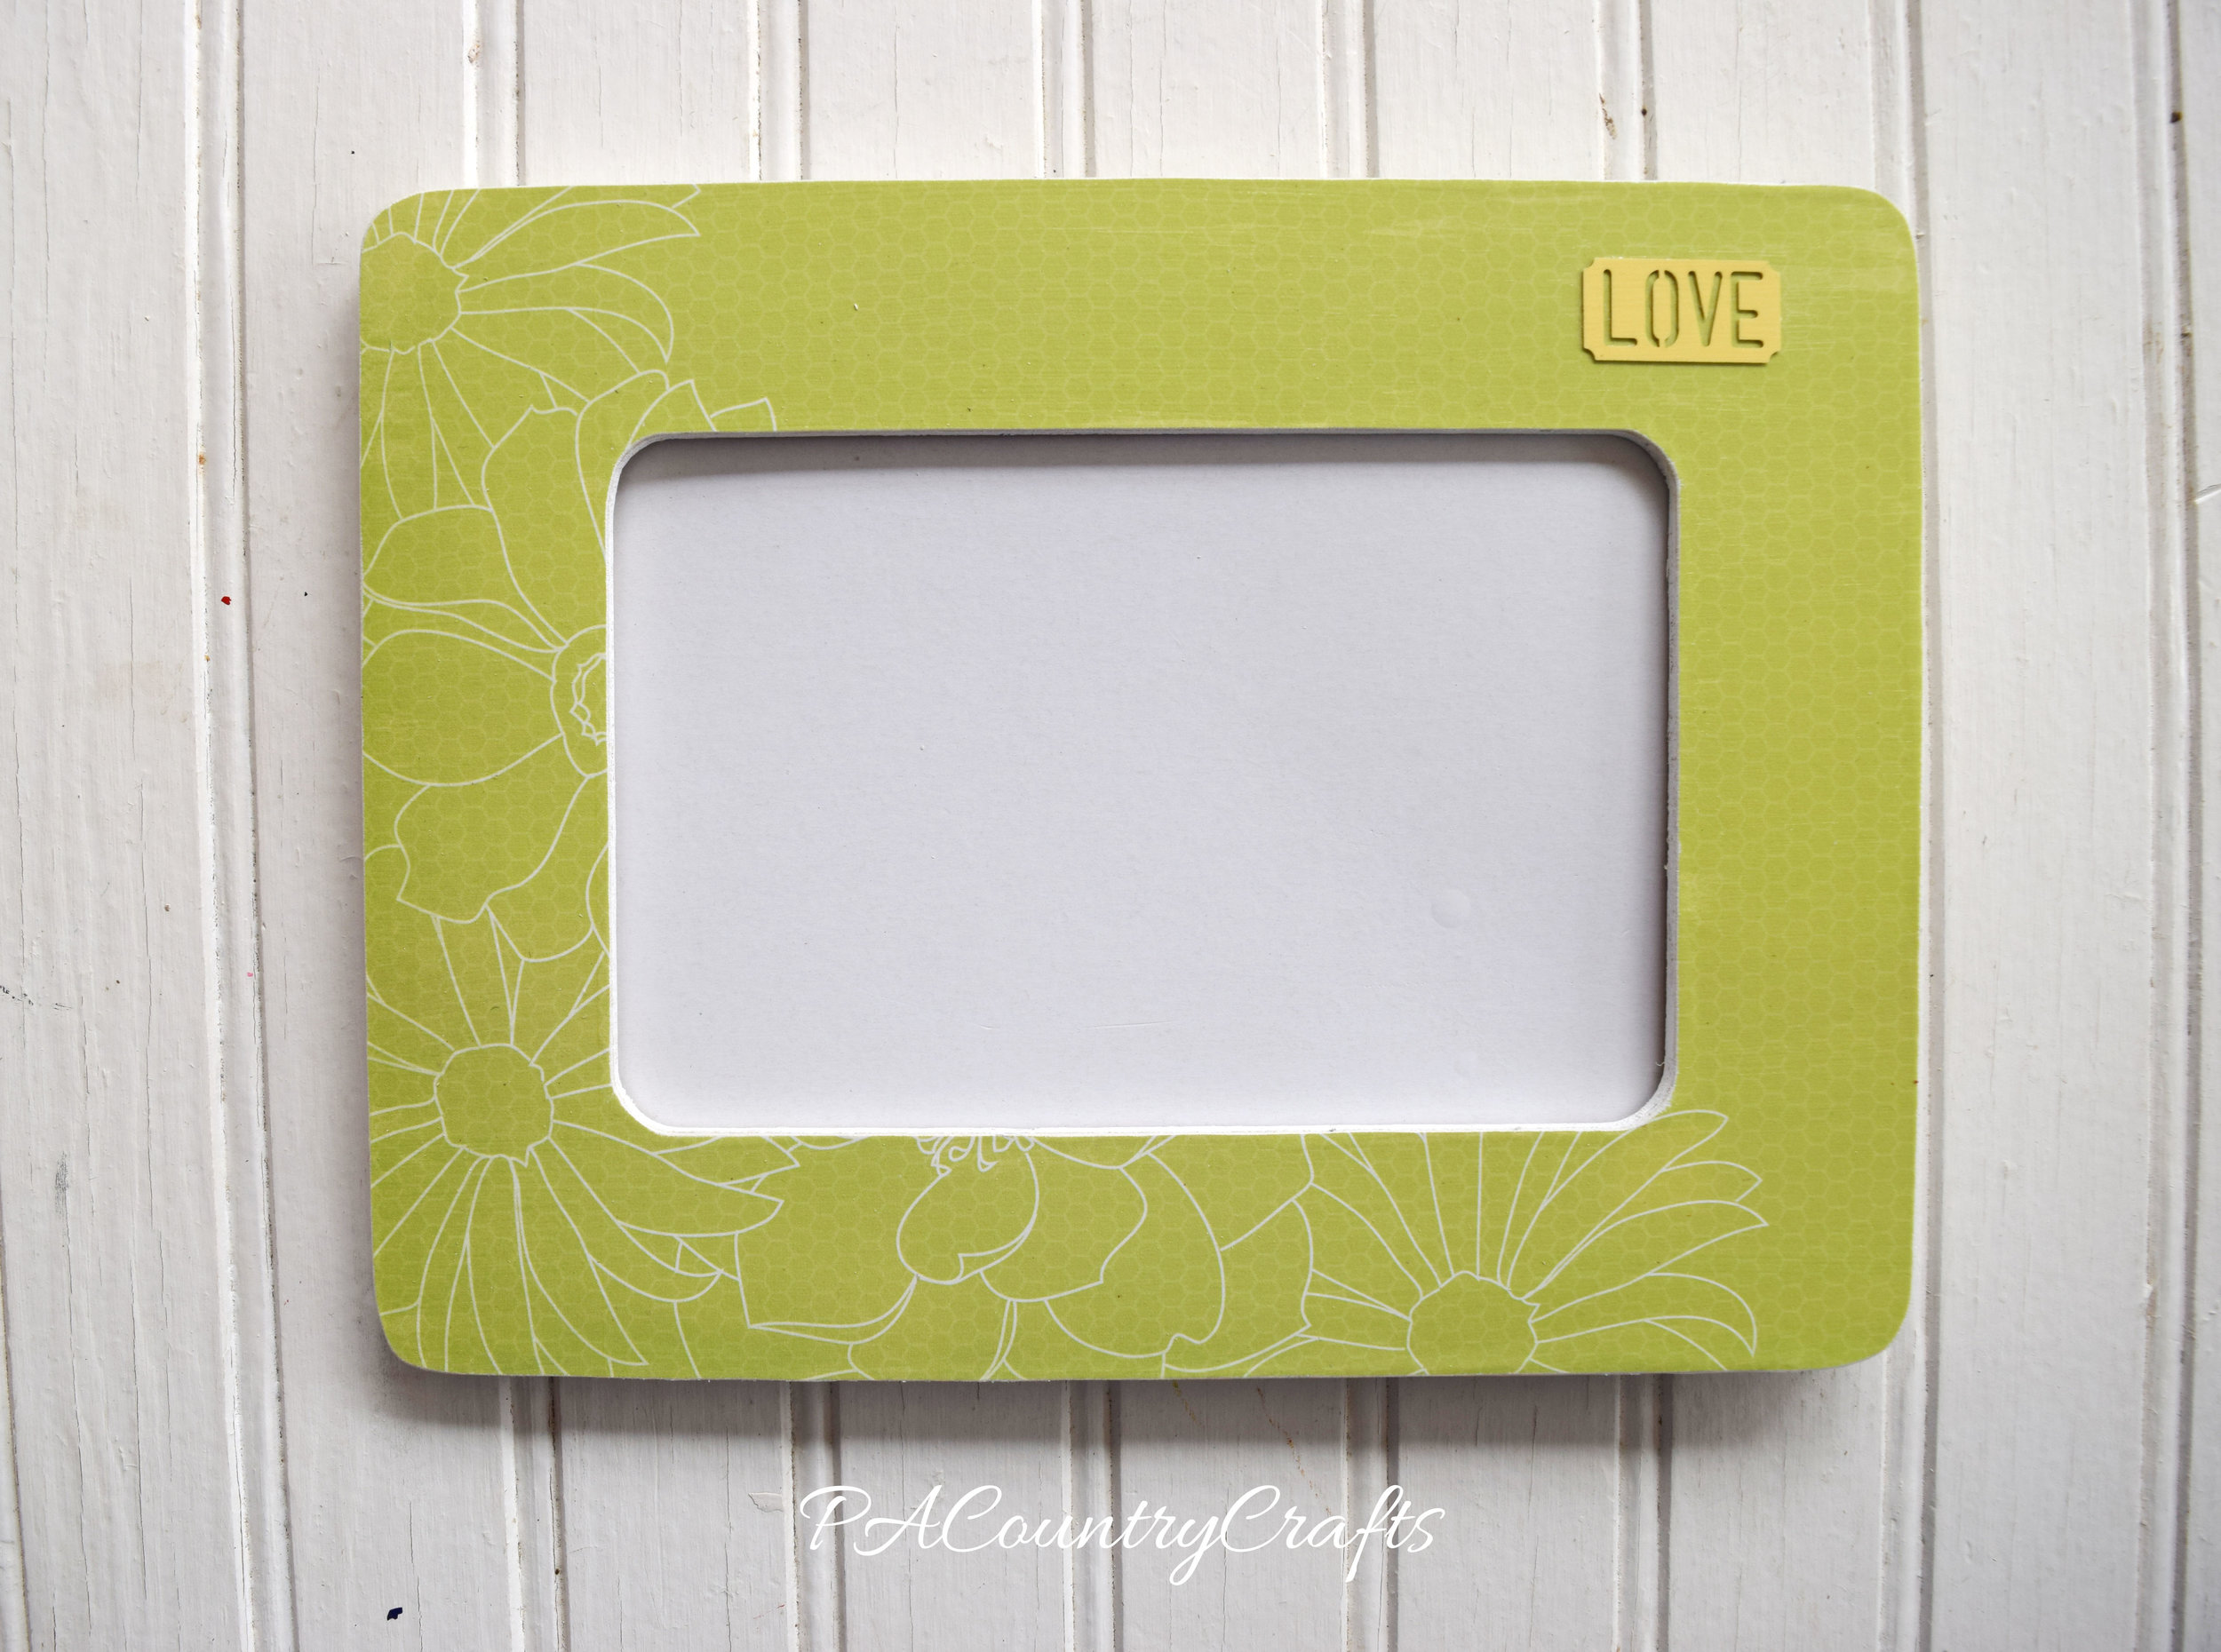
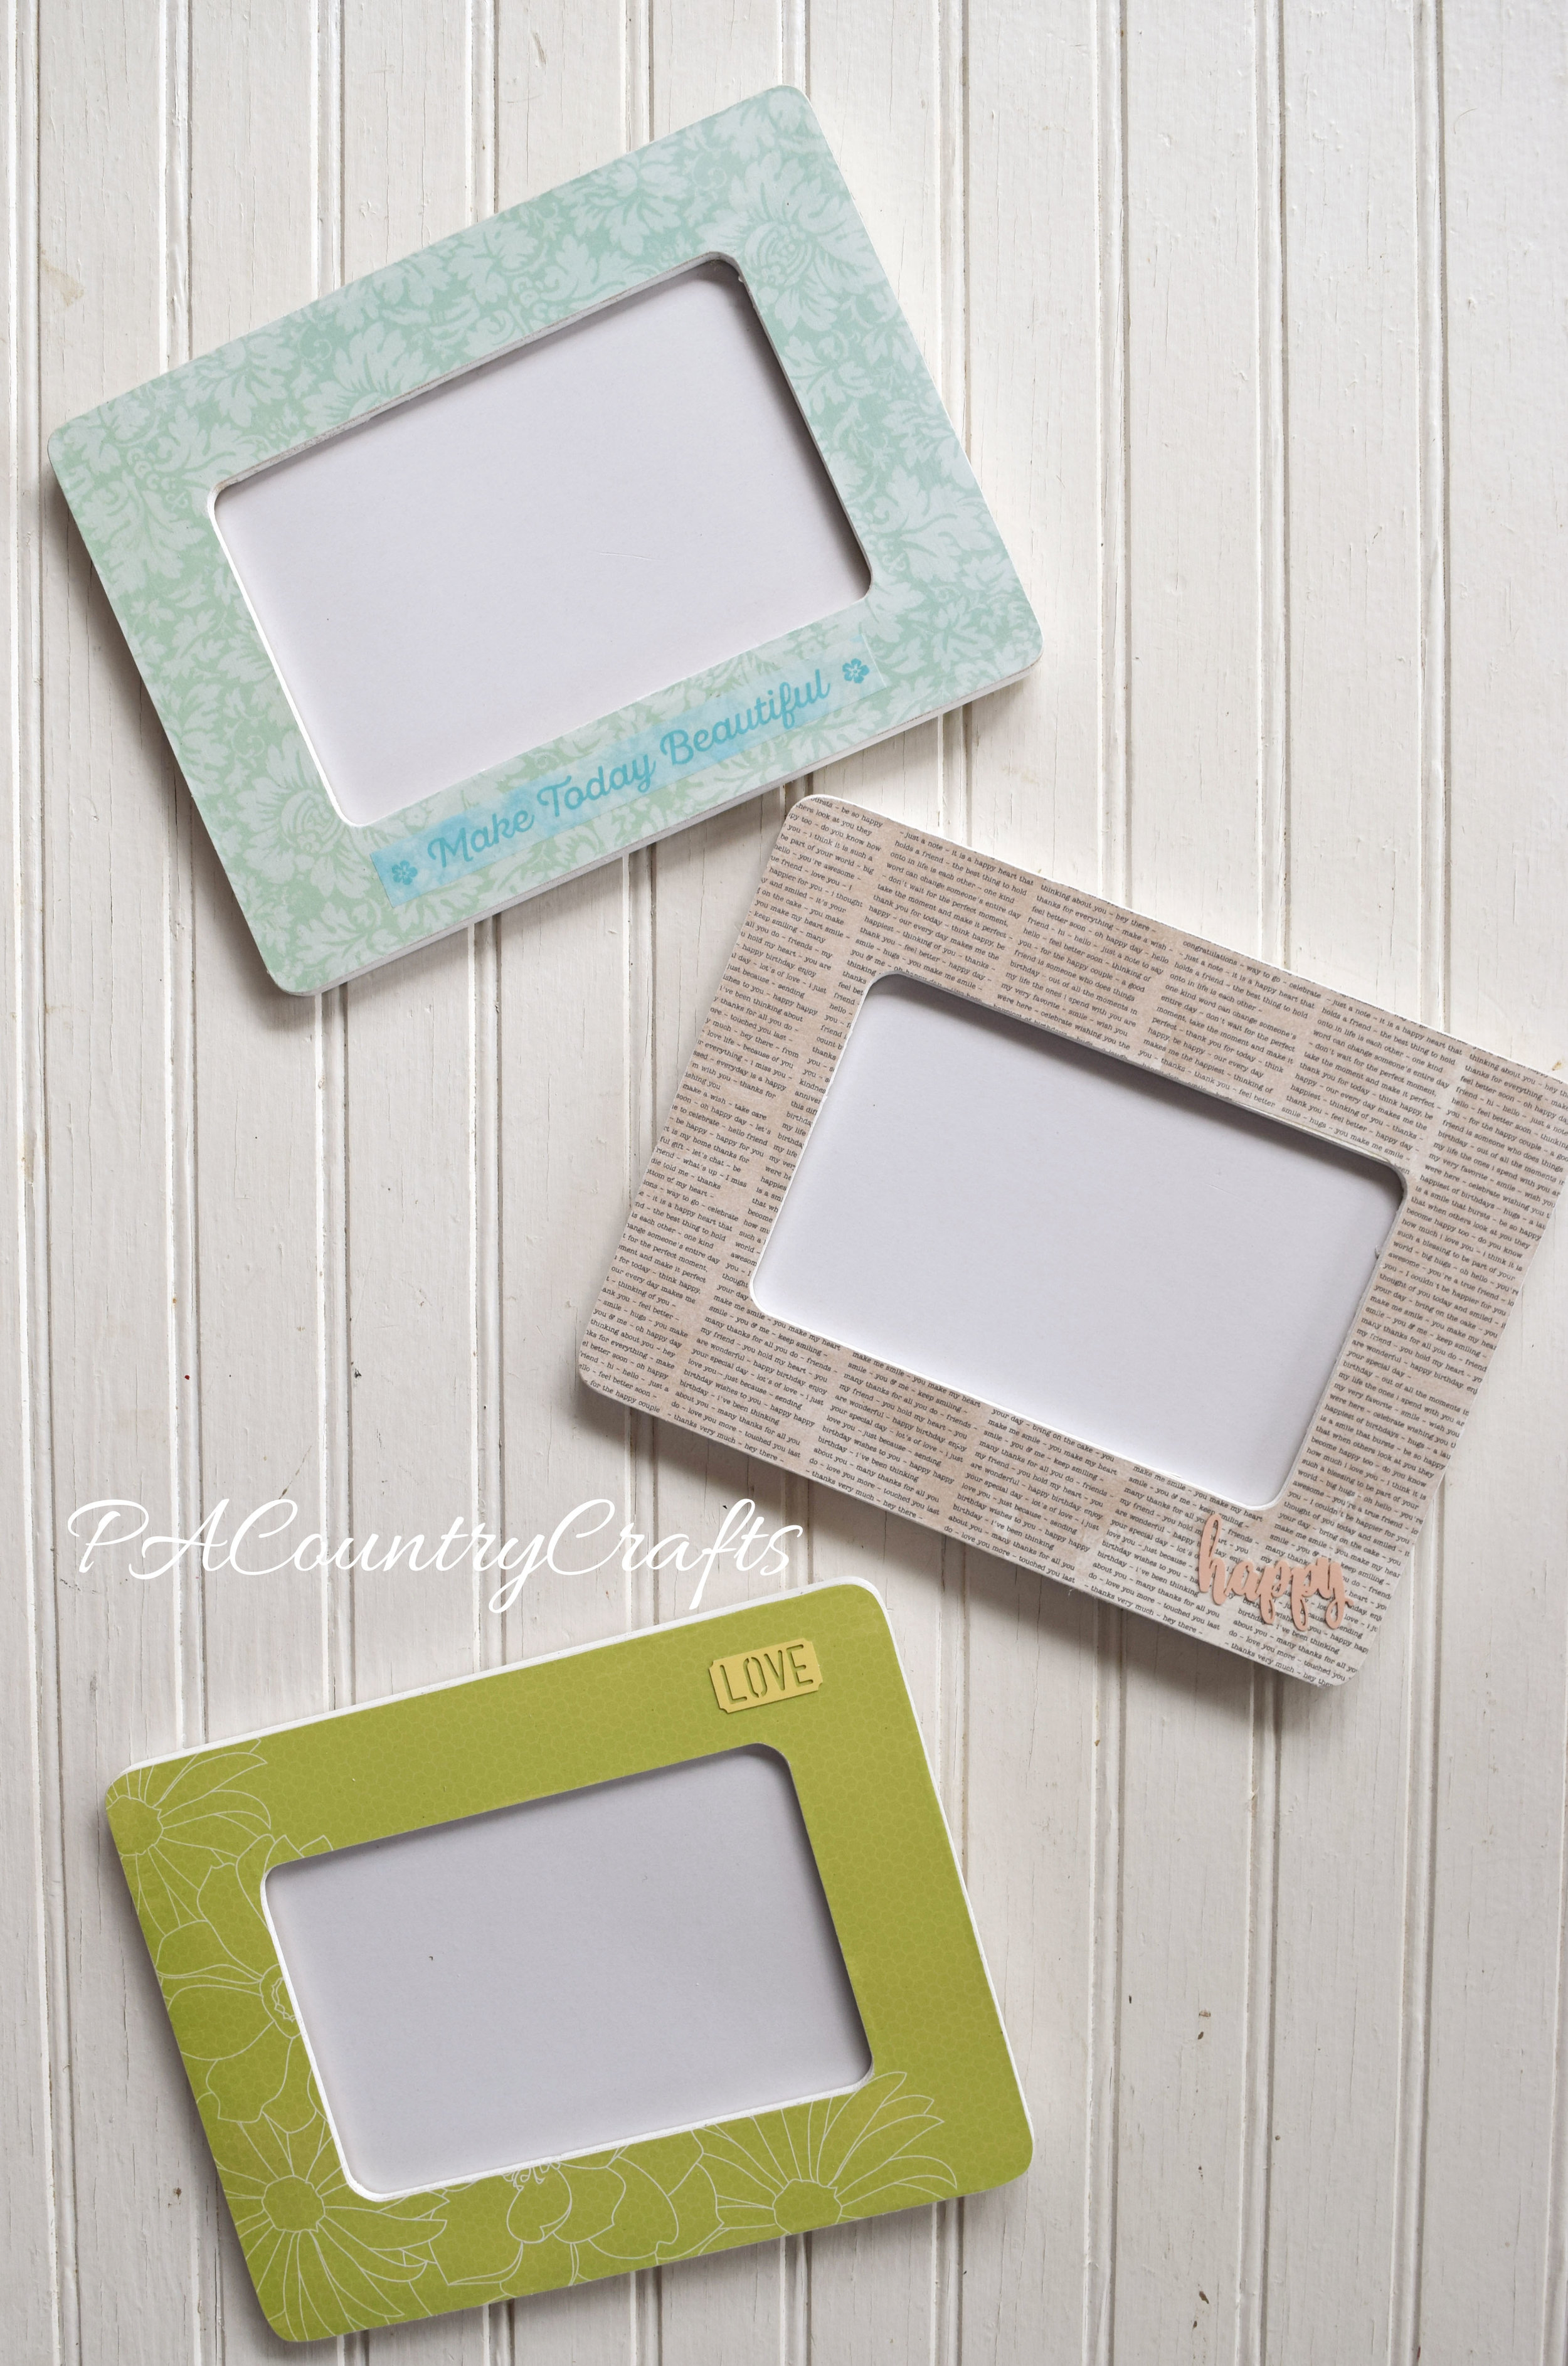
I have made these frames before and you can see some of them in my daughters' collage wall HERE. It is the perfect craft for a ladies night or a group. You can add little embellishments like baker's twine, washi tape, fabric flowers, die-cuts, etc. so they will all be unique. In addition to flat frames like these, you can use this same technique on any flat wood surface. I made a mustache for the collage wall, too!

Easy group craft- scrapbook paper covered picture frames!

Here is what you need:

~wood frame ~mod podge ~foam brush ~sandpaper ~scrapbook paper ~scissors ~pencil ~embellishments (optional) ~paint (optional)

Easy DIY frame craft with scrapbook paper, cheap wood frames, and mod podge.

I began by painting the edges of the frames just to make the finished product a little nicer. I used white acrylic.

Paint the edges of frames for a nicer finish

Lightly sand the frame to remove any rough edges or extra paint. (My craft table is a disaster! #keepitreal)

how to prep a wood frame for decorating

Trace the frame on the wrong side of the paper (so you don't see pencil marks in case you mess up).

how to make scrapbook paper frames

Cut out the frame shape you traced, but leave a little extra outside the pencil lines. Always go big, not too small!

Cute paper to cover wood frames

Brush a layer of mod podge onto the frame. It should be a fairly thick layer, but it should all be smoothed out- no runs or lumps.

mod-podge-frame

Lay the paper on top of the frame, lining up the center opening and edges as best as you can. There should be a little extra all around.

How to cover a wooden frame with paper

If you get big wrinkles, you can take it off and redo it, but only if you are fast about it. Some wrinkles can be pushed out by hand, or you can even try scraping with a credit card. Just smooth it all out the best that you can and let it dry. We did our "speed friending" activity awhile.

Then, it is time to sand the extra paper off of the edges. Make sure to use a perpendicular, downward motion (if you have ever done Jamberry nails it is the same technique!) Don't ever push the sandpaper back upward or you might lift the paper. Just keep scraping down at as close to a 90 degree angle as you can. Use some muscle! It takes a bit of pressure to make it work. The paper will begin to loosen and peel off.

This tip helps you sand extra paper of the edges of mod podge frames for a clean finish.

The secret to getting perfect edges on mod podge picture frames...

Don't forget the inside, too. It looks very crisp and neat when you are done! Nothing at all like my messy table.

How to get clean edges on a paper covered frame

It is a good idea to seal it by brushing on a thin layer of mod podge. If you want to add embellishments, just brush a little mod podge on, stick it on top, then just brush over the whole frame.

Cute embellishments on a DIY frame. Mod podge is great!

See? It dries clear.

Easy picture frame craft project!

You can also add washi tape to a dry frame and lightly seal over that.

Washi tape on a DIY picture frame

Pretty easy, right? I think the sanding is the trick to this. And now, on a nicer background than my icky table...

Mod podge, scrapbook paper, and washi tape make this cute frame!

There is a lot that you can do with these. They don't take too long and don't cost much to make. If you mess up and get too many wrinkles, you can always rip the paper off, sand, and try again. Or, you can call it "texture" and just go with it. No one will see small wrinkles from across the room. Just you.

scrapbook paper mod podge frames

Feel free to pin it for later...

Use scrapbook paper and cheap wood frames to make a cute craft - perfect for craft nights and groups!

You may also like...

composition-book-journal

Felt Penguin Dress-Up Busy Bag

A few weeks ago I was talking to my sister about how to keep the kids occupied when you are trying to get something accomplished that requires a little more concentration and brain power- like taxes. One thing that I like to do is to keep certain toys and activities out of reach so that they have that novelty factor when I do pull them out. It can be puzzles, play-doh, or a box of toys with tiny pieces that I do not like cleaning up. Sometimes I also look for busy bag ideas on Pinterest. I found a cute felt penguin idea HERE so I decided to make my own. Of course, I over-achieved a little bit and made the accessories more detailed. All it took was some felt scraps, hot glue, and a few googly eyes.

DIY felt penguin dress up game

felt dress up penguin busy bag

felt penguin dress up game

Try this easy toddler felt penguin busy bag!

It is fun to mix and match, but it can also be used for color sorting.

Toddler activity- play dress-up with felt penguins.

Everything fit inside a regular sandwich bag, so I just keep it in a drawer to pull out on special occasions when I need a few minutes.

felt penguin busy bag

felt penguin dress-up busy bag

If you want to pin this one to save it for later...

Make this penguin dress-up toddler busy bag.

If you are super ambitious, I have lots of quiet books I have made that you can see HERE.

If you are looking for some easier ideas, try these...

DIY I Spy Bottles MOPS Craft

No-Sew Felt Play Mat ~ Great kids craft!

Easy Ribbon Wands Tutorial

LOVE sign

I painted a sign last fall, but I didn't like it. Not everything that I make is beautiful and blog-worthy. Some things are kind of a flop, but I am usually stubborn enough to keep on trying. (There is your crafting tip for the day: Be stubborn sometimes.) So, because I felt like it, I painted over the whole thing in red and made a giant LOVE sign for Valentine's Day. It was actually really easy- simple, white block letters and lots of sanding to distress. I didn't worry about perfect lettering because the entire thing was meant to be rustic. All of those layers of paint underneath from the sign I didn't like show through from sanding and just add to the character.

rustic valentines day porch love sign
rustic painted letter L on red and white sign

I am not really big into Valentine's Day decorations, but the bright pop of red really stands out and adds a little something cheerful to all of the drear of winter. And the sign I didn't like has been turned into something that I LOVE. (cheesy pun intended)

Turn and old board into a hand painted LOVE sign for your porch.
Valentines Day LOVE porch sign

You can see more Valentine's Day ideas here: