The Flower Girl Dress

I actually made three of them, but I don't feel comfortable posting other people's kids' Β pictures on my website, so I only have pictures of the one that my daughter wore. As with any sewing project, there is more to the story. My niece asked my daughter to be a flower girl and also asked if I would sew the dresses. I love sewing pretty little girl dresses- especially matching ones- so I was excited about this project! Except, I procrastinated. Yes, I use that "P" word an awful lot here on the blog. Part of my excuse was waiting for a swatch, part of it was waiting for our difficult summer vacation to end, and part of it was other commitments that had earlier deadlines. But, really, most of the problem is my indecision.

I overthink just about every decision. I make things entirely more difficult than they need to be. Finally, when I have no time left to change my mind yet again, I just get it done. (Project Run and Play was a great exercise in this area!) So, after much debating, I went back to my original plan and sewed like the wind a few days before the wedding.

Not everyone has such confidence in my procrastinatory sewing. The bride herself, was amazingly cool about it. A few other people close to me expressed their doubts, if only in the realm of "what if you fall down the stairs and break both arms and can't sew." (Duh! That is why I teach my kids to sew!) For some reason, I was not AT ALL stressed about it. I was completely cool and confident. (A certain someone called me cocky.) Anyway, they really ticked me off!

I know that I am rude and inconsiderate for stressing other people out who may not understand who they are dealing with here, and for that, I am sorry.

But everything went FINE! I only made one, tiny, easily fixable mistake in the entire process. All three dresses were the same size, so I did them assembly line style. All of the tops were finished in about 4 hours Wednesday evening. I leisurely completed the skirts Thursday. I even threw in a bonus mother-of-the-bride dress hem. All of them fit perfectly. So... :p to those who doubted!

My rant went a little long there.

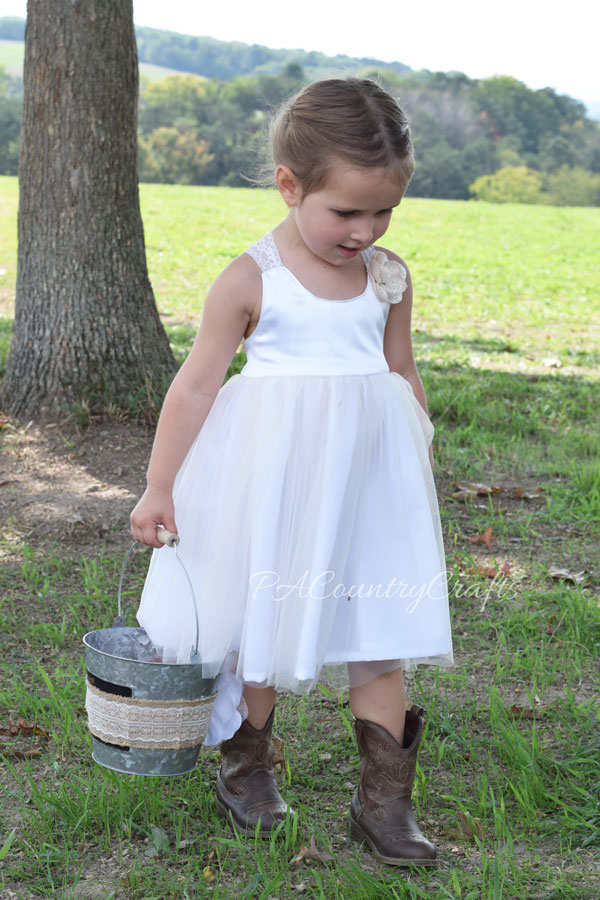
I loosely followed the Cairo dress pattern from Violette Field Threads. I own the tween pattern so I sized it down to a 3T on my own. I also wanted these to be simple, flowy, and short to complement the boots and bridesmaid dresses. So, the skirt is a layer of lining and a layer of gathered eggnog tulle.

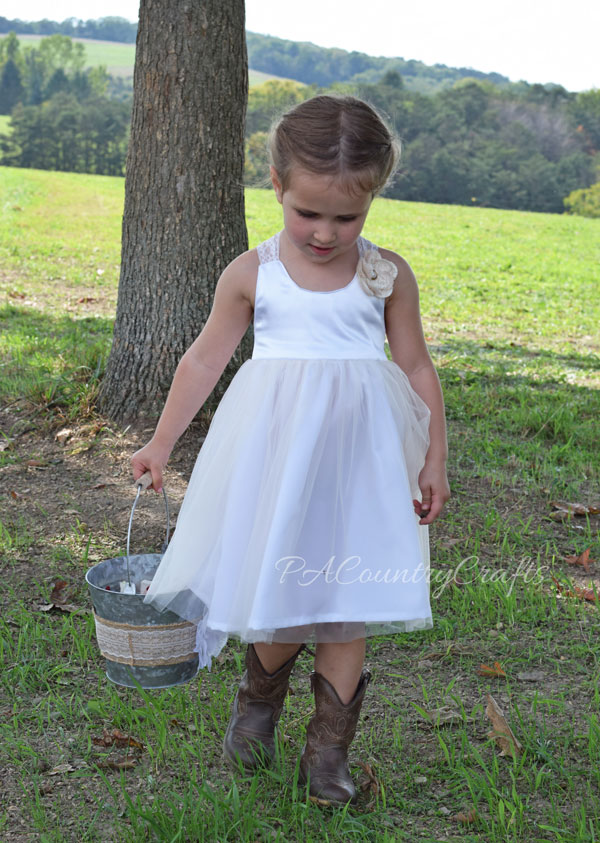
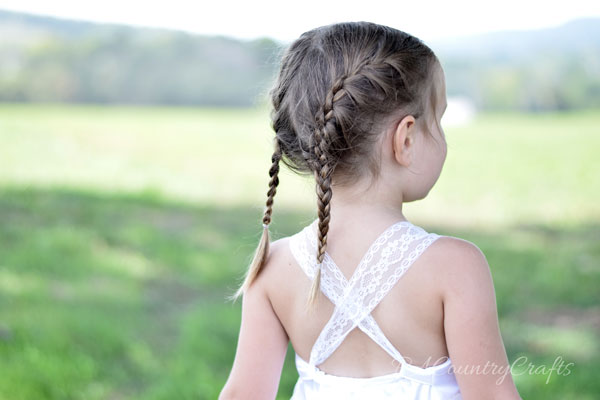
The top is made of a satin remnant and lining fabric. I handstitched the linings closed so the elastic back is only sewn to the inside. The lace straps are from packaged hem facing. Finally, I glued a flower from the scrapbook section to felt circles and pinned it to the dress to coordinate with the wedding theme even more.


Congratulations to my niece and her new husband! Thank you for having confidence in me and letting me make these adorable dresses!!!

Rustic Chicken Wire Photo Display

I think my 17yo son inherited some of my crafty genes. When I took him school shopping he asked to go to craft stores to get inspiration for his girlfriend's birthday gift. I didn't mind. ;) They are renovating her bedroom, so he wanted to make something for her new room. He combined inspiration from a few different pieces that we saw, made a small tray for a practice run, then built the final product.

Rustic chicken wire photo display made from lath

He chose the paint colors (the aqua will match her decor) and did everything by himself. The back of the display is made of plaster lath so it has a rough texture that looks really rustic when painted.

Paint strips of lath for a rustic photo display

His sisters also wanted to make something for her birthday. They insisted that I was not allowed to help them, but somehow blamed me when things didn't work. (You can't hot glue shells to wet sand!) On the third attempt, after much fighting and drama, they finally succeeded.

Sand and seashell frame kids craft

Hopefully she likes to decorate with pictures. :)

Zucchini Carrot Casserole

Our summer vegetable garden is pretty much an overgrown weed patch. Seriously. It is the weediest it has ever been and the little that was planted got out late. It is so bad that we just got our first zucchini of the year last night. Most people I know have been drowning in zucchini for weeks, so this is embarrassing. Usually by this time of year, the kids are all sick of the many zucchini recipes I try, but now they are really excited! They are requesting zucchini alfredo, zucchini gratin, and zucchini chocolate cake. I am hoping for a good zucchini crop so that we can make all of those, but last night I decided to make zucchini carrot casserole.

Easy summer side dish- zucchini carrot casserole

I haven't shared this recipe on the blog before and it isn't something I make an awful lot because I don't usually buy the key ingredient- stove top stuffing mix. Yes, we try to make food from real ingredients most of the time, but sometimes, like when the summer has been a long and challenging one, I just don't care anymore. This casserole is so easy and that is pretty much my game plan these days.

In a baking dish (mine is 9" x 13") mix cooked zucchini and carrots, sour cream, and a can of cream of chicken. I peeled the zucchini before I cooked it 'cause some of us are picky.

I love this easy zucchini carrot casserole recipe!

Sometimes I make the cream of chicken myself, but I just lack the ambition right now. I am dragging myself to the finish line of summer vacation here, people.

Mix it all up. Don't bother dirtying another bowl. It was bad enough that I used two pots to cook the vegetables.

This is so rich and creamy! Zucchini Carrot Casserole

Finally, prepare stove top stuffing according to the package directions and spread it on top of the zucchini mixture. Bake at 350 degrees for 15 minutes, or until everything is heated through and the stuffing starts to get a tiny bit crispy on the edges.

Stove top stuffing over a zucchini carrot casserole

Yummm....

stuffing-top-squash-cassero.jpg
stove-top-zucchini-casserol.jpg

If you have lots of zucchini, this is a good recipe to use some up. It would also work well to take along to a potluck or picnic.

If you want to pin this…

Zucchini Carrot Casserole Recipe

Zucchini Carrot Casserole

6 c. cooked zucchini
4 c. cooked carrots 1
pint sour cream
1 can cream of chicken
1 box of chicken stove top stuffing, prepared

Mix zucchini, carrots, sour cream, and cream of chicken in a 9" x 13" baking dish. Top with stuffing. Bake at 350 degrees for 15 minutes or until casserole is heated and stuffing is lightly browned.

Here are some more zucchini recipes you may like:

Mod Podge Toy Doghouse

My parents have a great tradition with the grandchildren. When they reach a certain age, they are treated to a birthday dinner out/shopping spree/sleepover. My kids really enjoy it. They love having some one on one time with them and getting a break from their siblings! Last year, my dad helped my 9yo build a toy doghouse for some stuffed animals she chose on her shopping spree. She brought it home to have me help her decorate it. We finally got around to it a year later. I am going to let her tell you about it!

mod-podge-toy-doghouse

Scalloped Mod Podge roof made from scrapbook paper circles

Cut out flowers from scrapbook paper to use in mod podge crafts!

Cute kids craft using paint, scrapbook paper, and mod podge!

Wood play doghouse with removable side

~~~~~~~~~~~~~~~~~~~~~~~~~~~~~~~~~~~~~~~~~~~~~~~~

Hi! I'm Lydia. I have 2 stuffed dogs named Sky and Rose. My PappyΒ and I built a doghouse for my dogs.

Wooden Toy Doghouse
 

Then, my mom helped me decorate the doghouse and it wasΒ looking pretty good! First, I decorated the roof. We punched circles out of scrapbook paper. Then, we used Mod Podge to glue them on the roof.

paper-punch-scrapbook-roof
 

Some of them stuck out over the edge so we had to sand them off.

Sand paper edges when using Mod Podge!

how-to-make-a-scalloped-pap
 

Next, I painted the outside of the house red and the inside aqua. Then, we cut out windows, flowers, and butterflies from the leftover paper. We used Mod Podge to put them on, too.

brush-mod-podge-on-wood

lydia-mod-podge-flowers

how-to-make-a-paper-window
 

Last, Mom painted grass, stems, and leaves on the sides of the house.

Use floral scrapbook paper to create flowers with Mod Podge!

My doghouse turned out beautiful!

lydia-with-doghouse

circle-punch-mod-podge-roof

mod-podge-window

Kids craft toy doghouse makeover

~~~~~~~~~~~~~~~~~~~~~~~~~~~~~~~~~~~~~~~~~~~

Thank you, Lydia! The before and after is pretty impressive. I was glad that we could work together on this. It is sometimes hard for me to let go of my perfectionism and let the kids have control of the craft projects.Β She did a great job!

If you want to pin it for later...

Wow! Look at this toy doghouse makeover!

You may also like...

hippo

no-sew-felt-play-mat

scrapbook-paper-frame