The Last Easter Dress

Vote for the final round of Project Run and Play Season 13 HERE!

the-last-easter-dress

When I found out that I was having my first daughter I went out and bought the sweetest little pink dress I have ever seen! I was so excited to get to dress her up in adorable little girl clothes! When her first Easter came a few months later, although I know that has nothing to do with the true meaning of Easter, I was super excited to go out and buy another pretty new dress- this time in yellow. My life has been overflowingly full of sweet little girly things for the last 13 years!

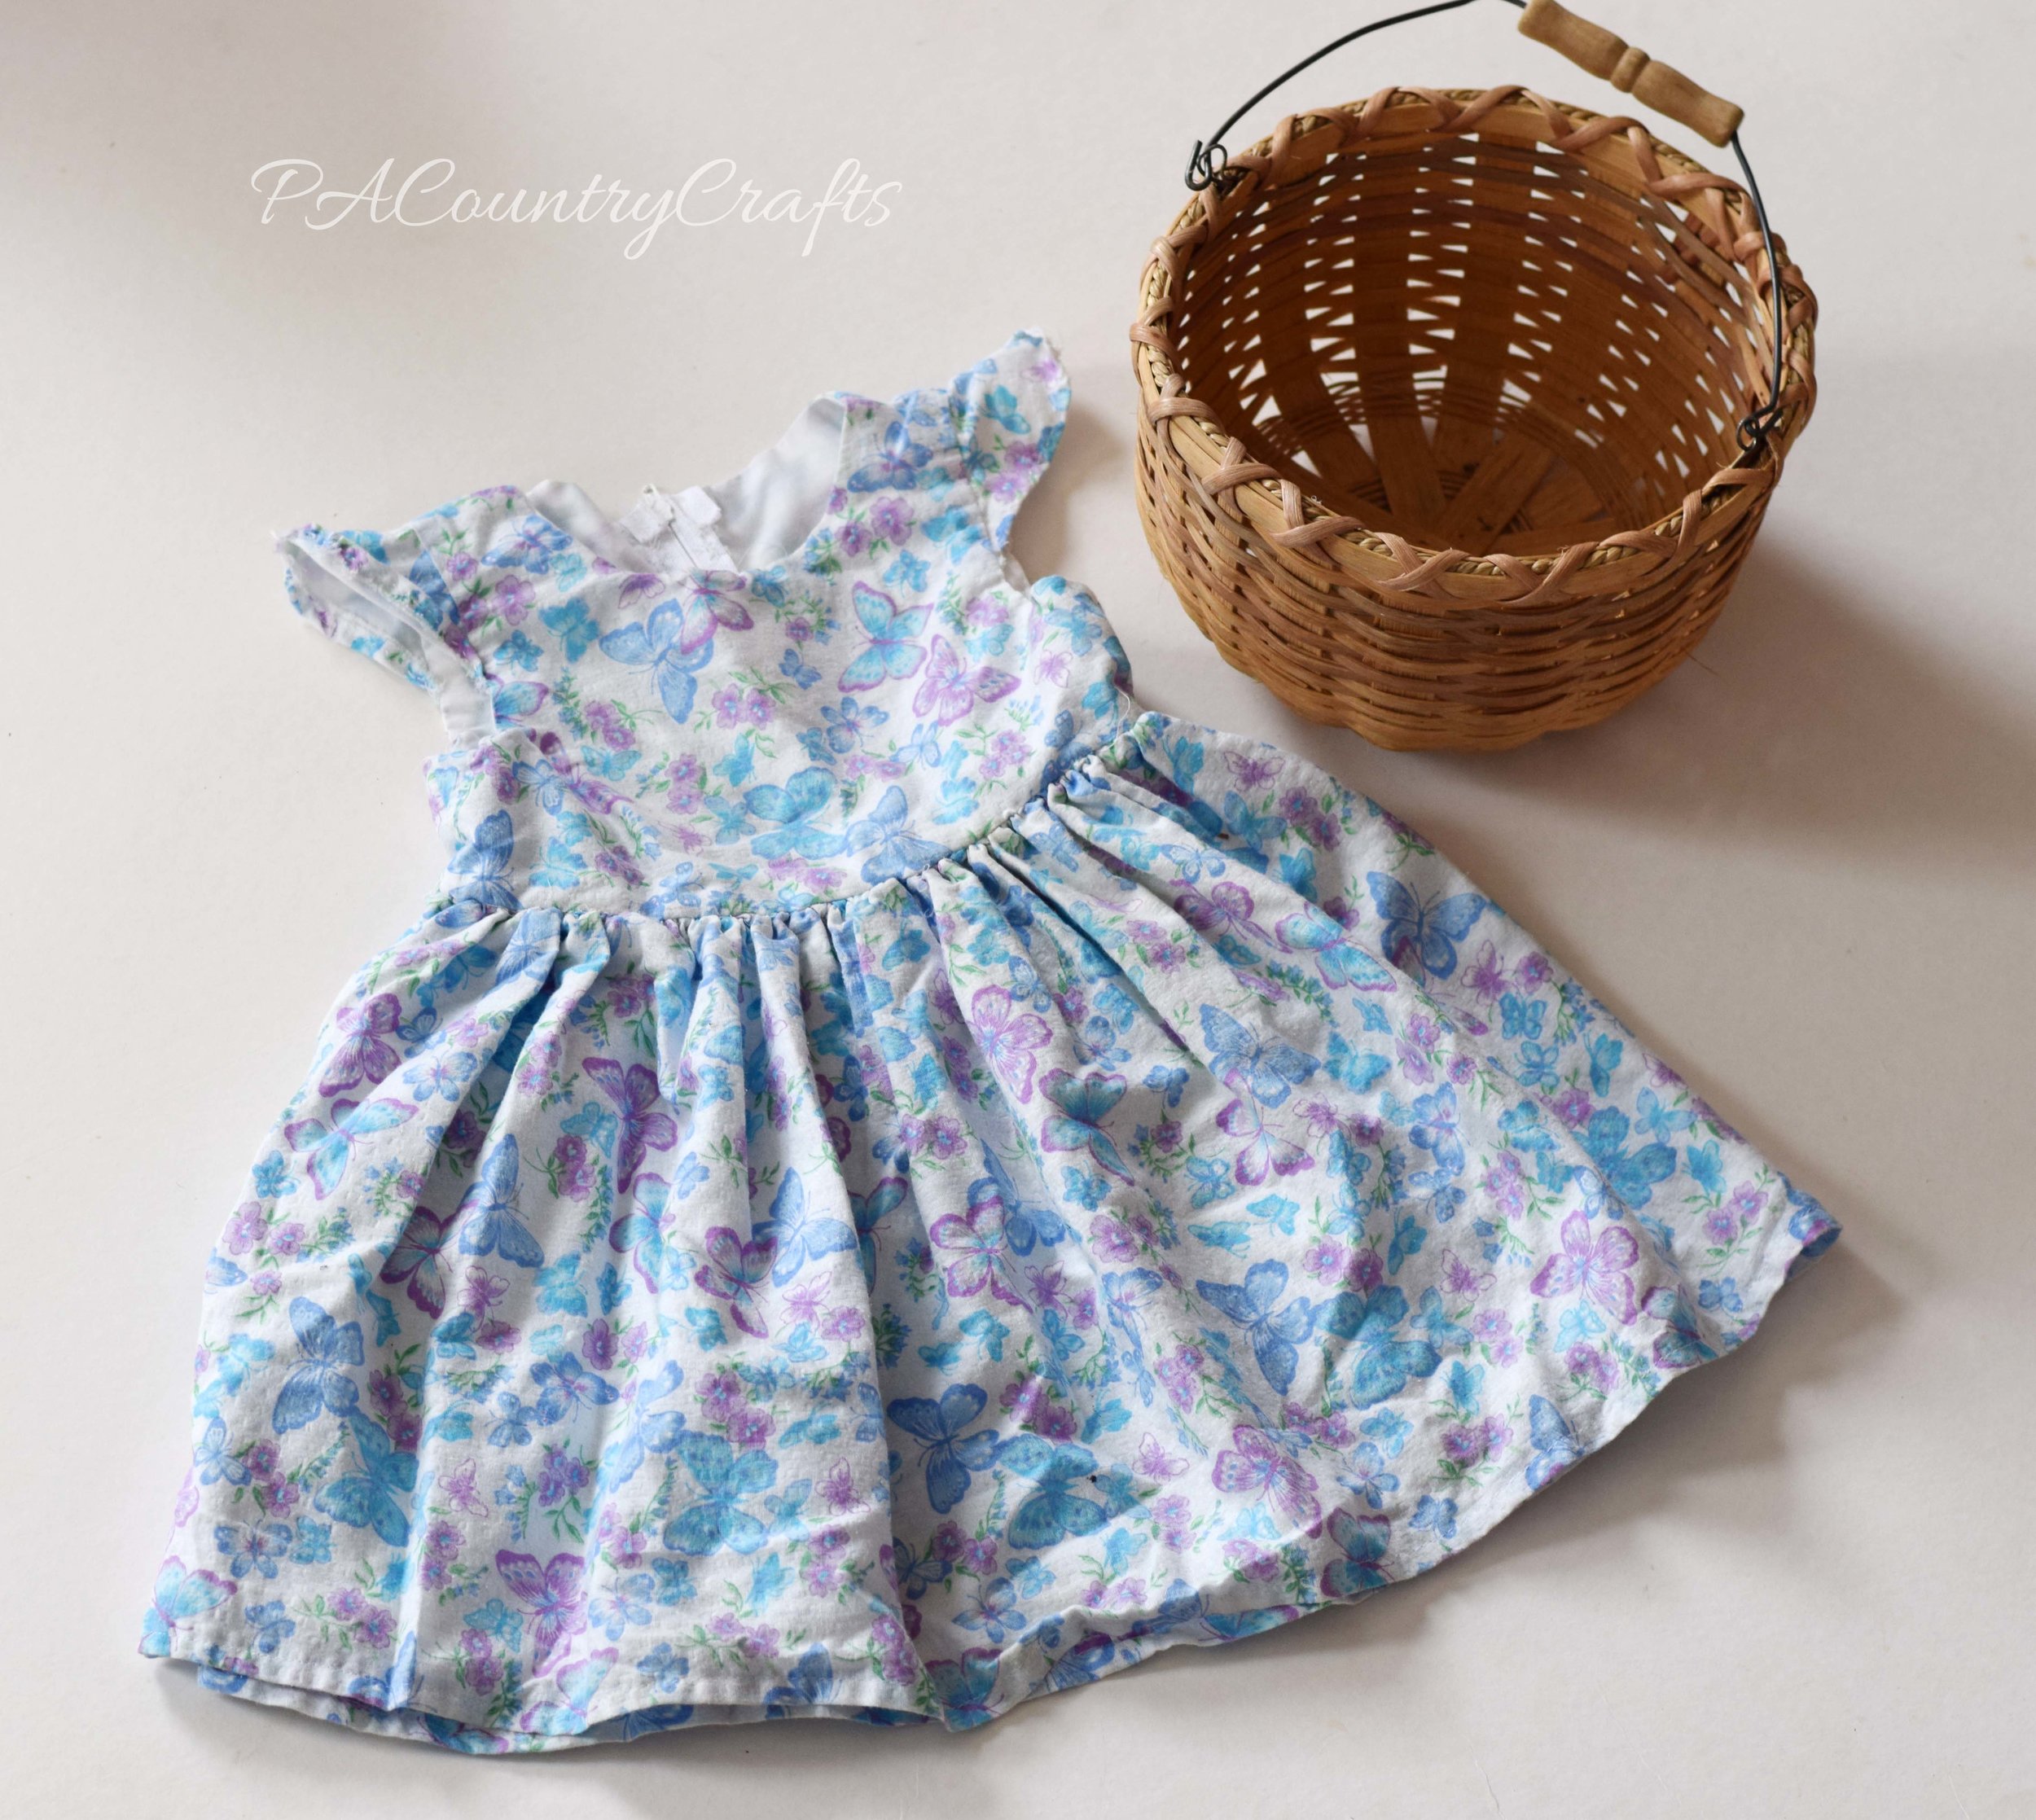
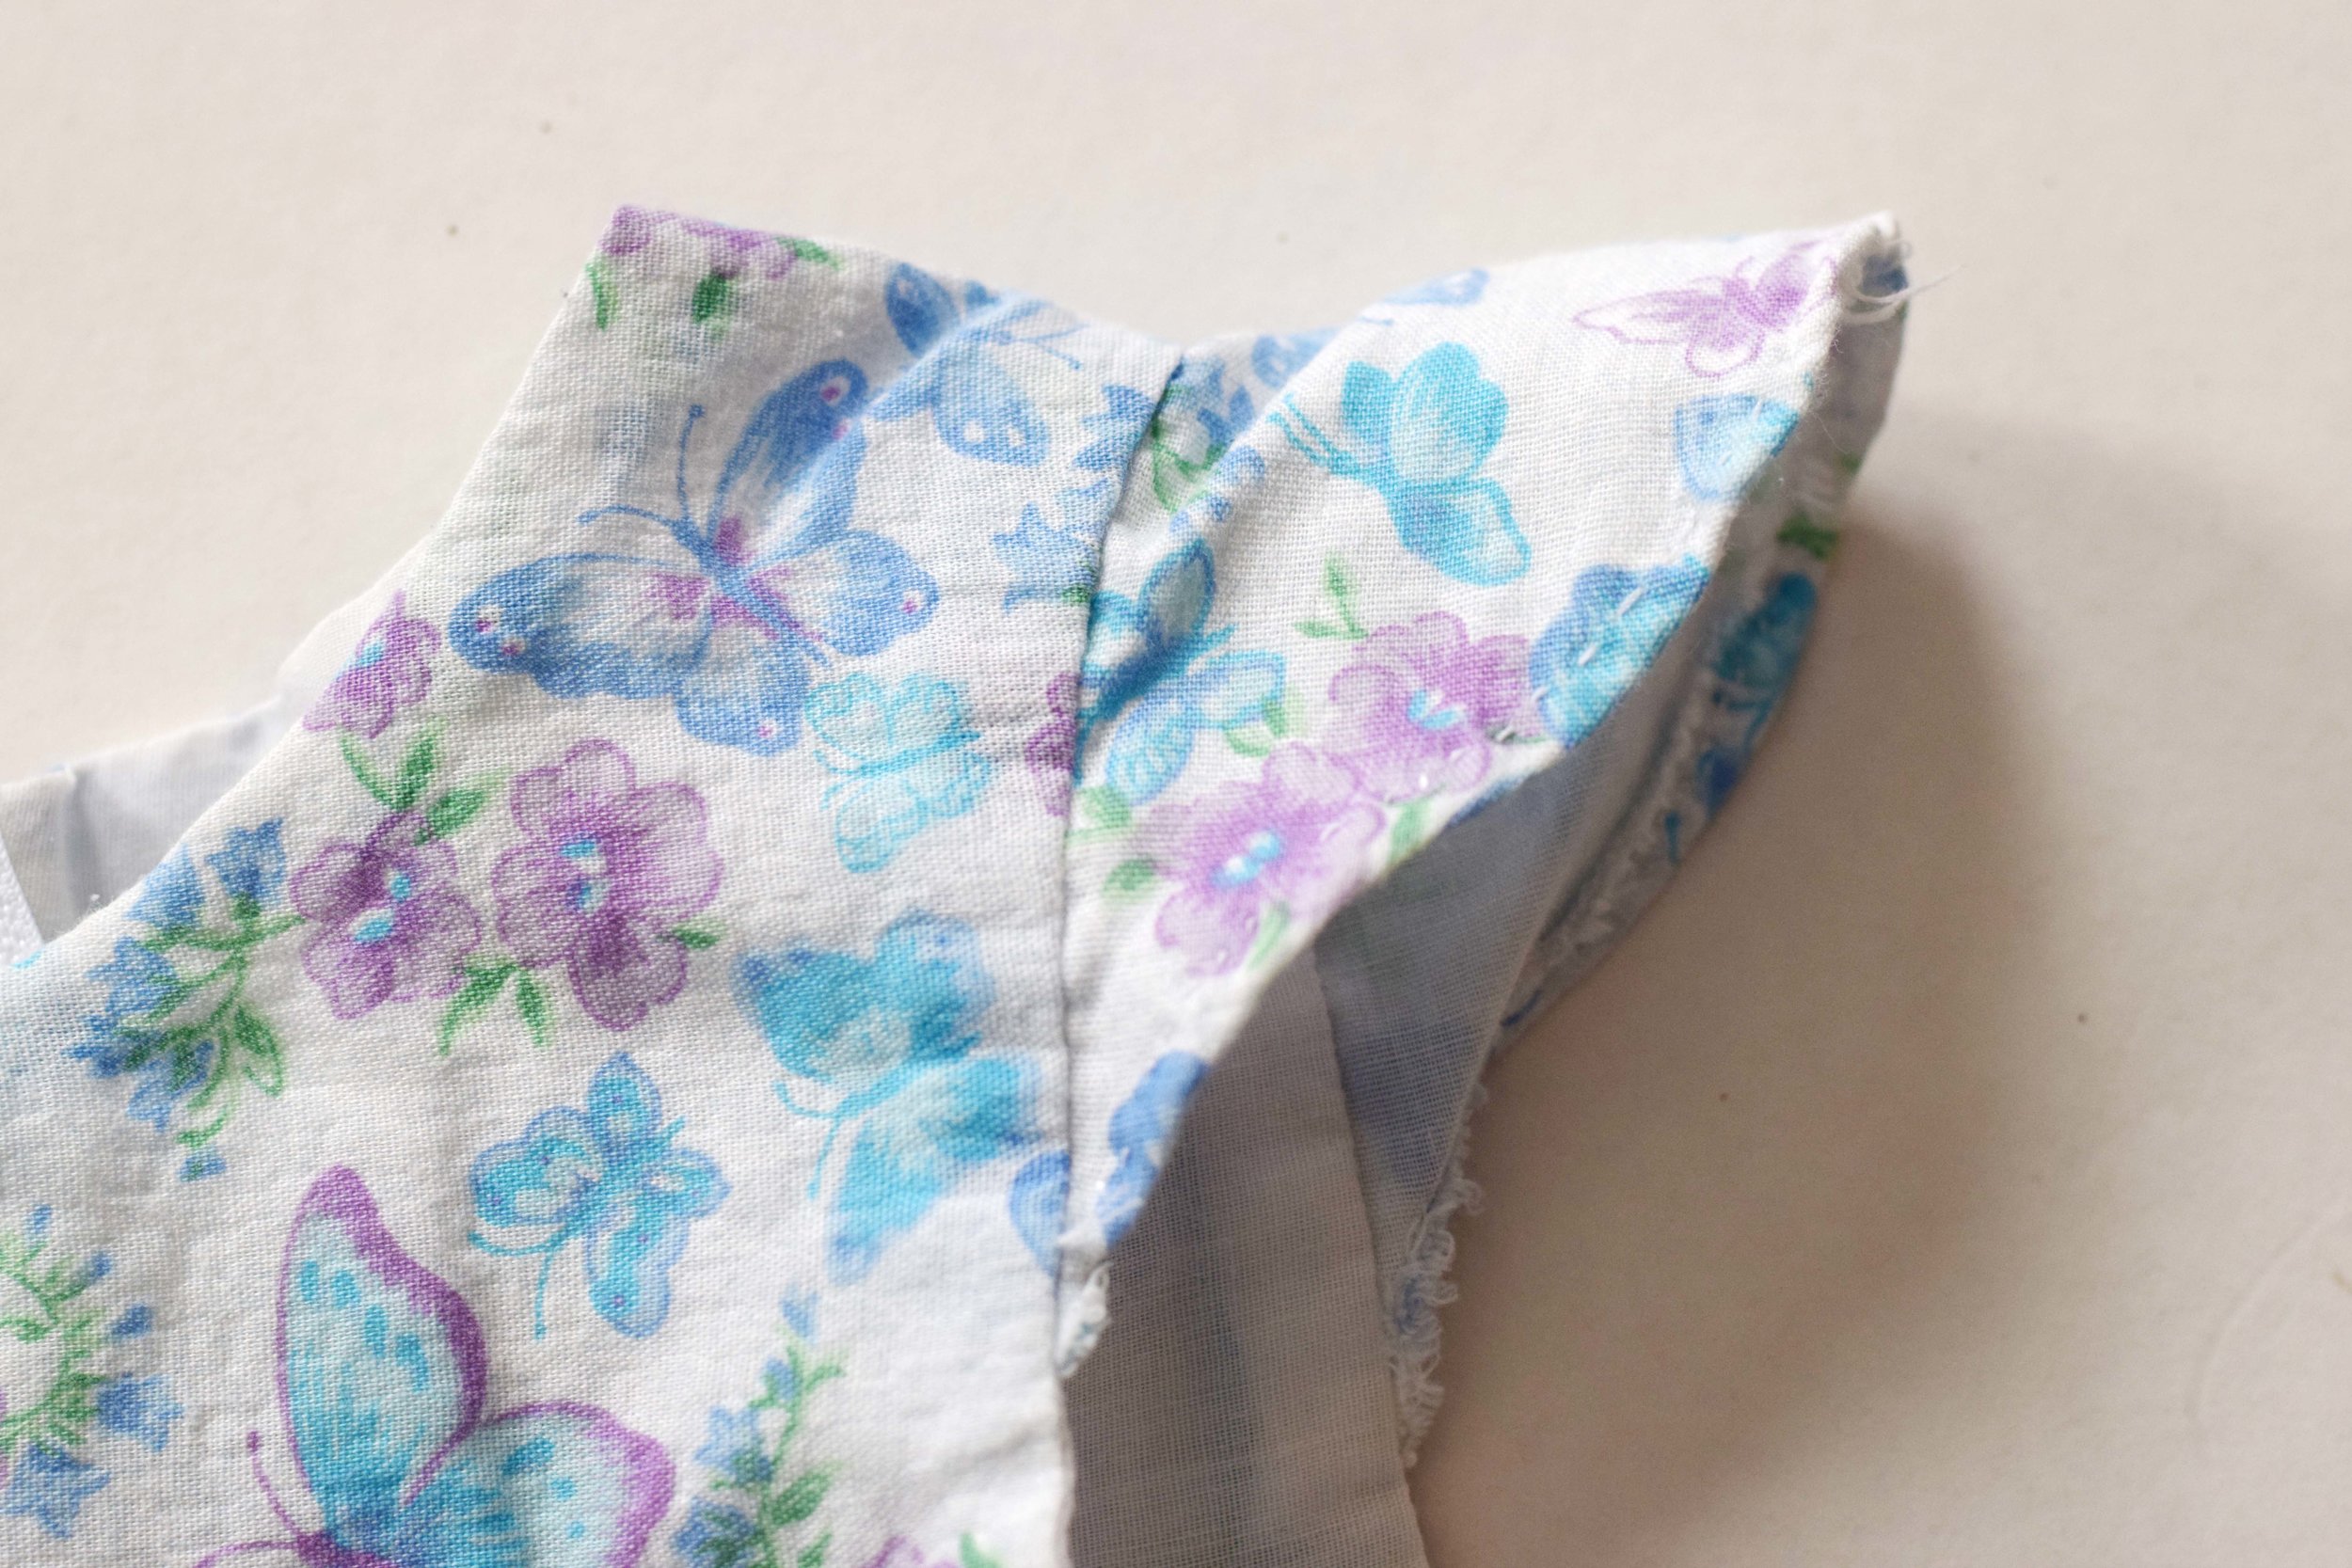
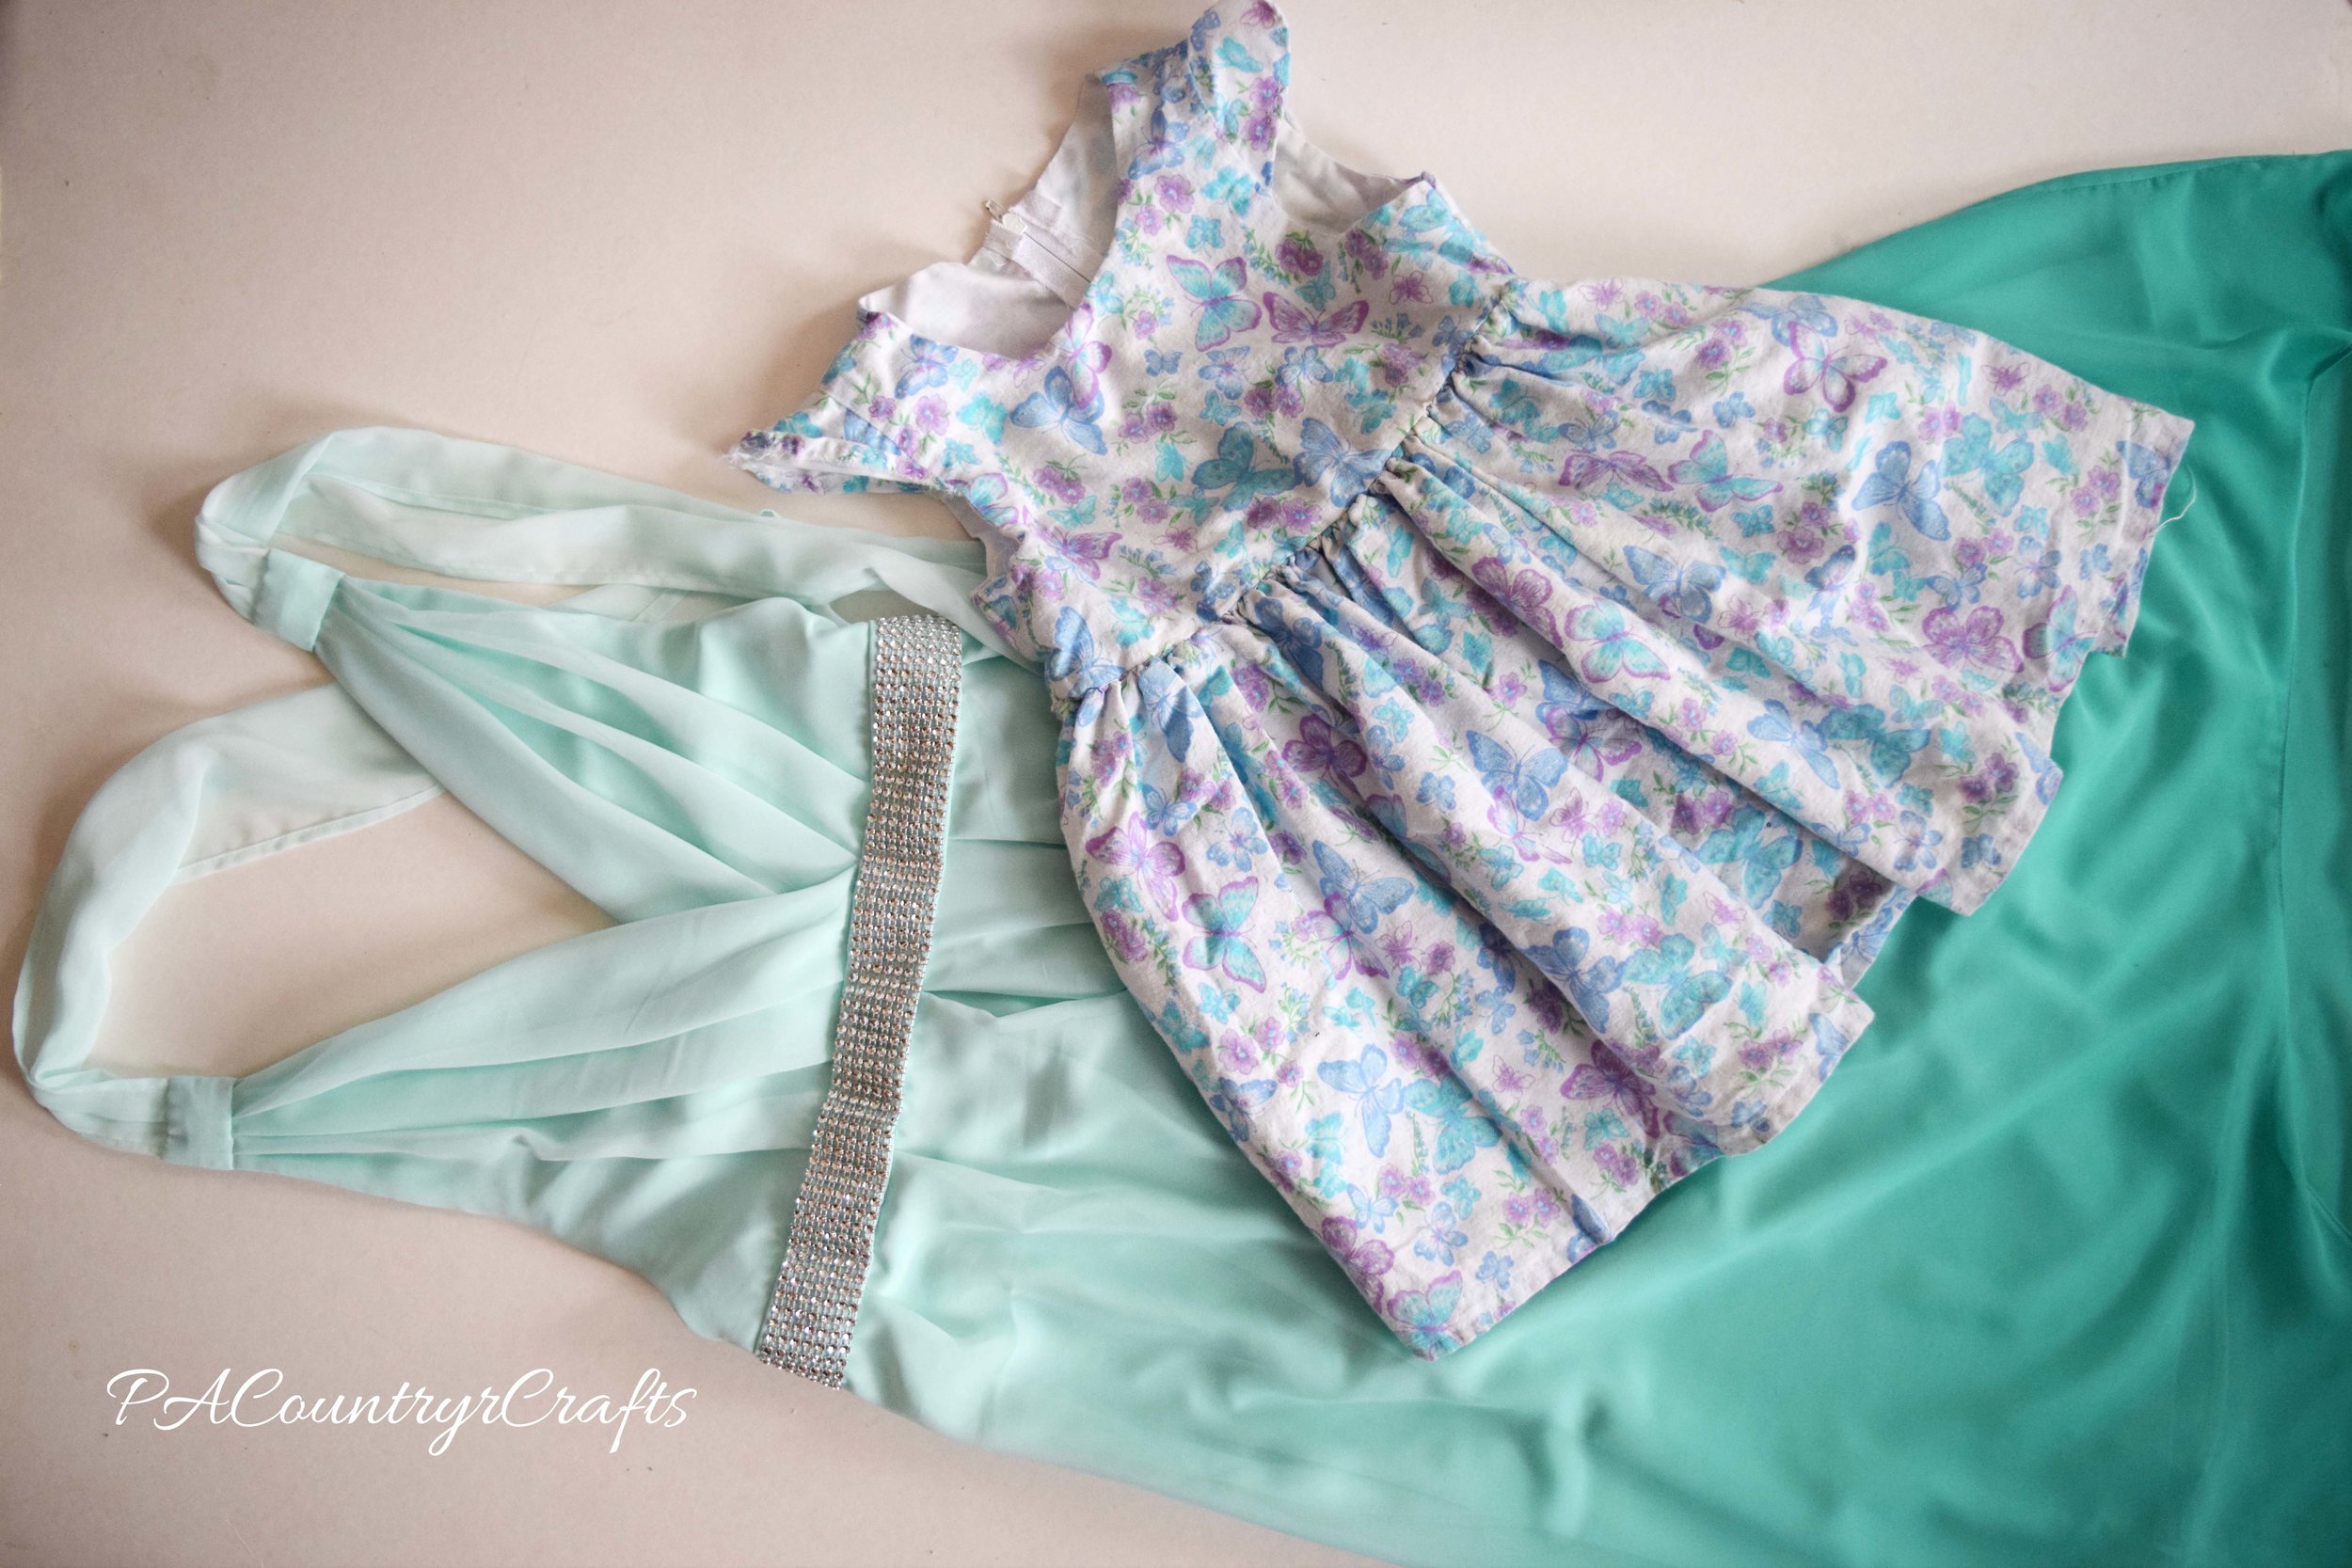
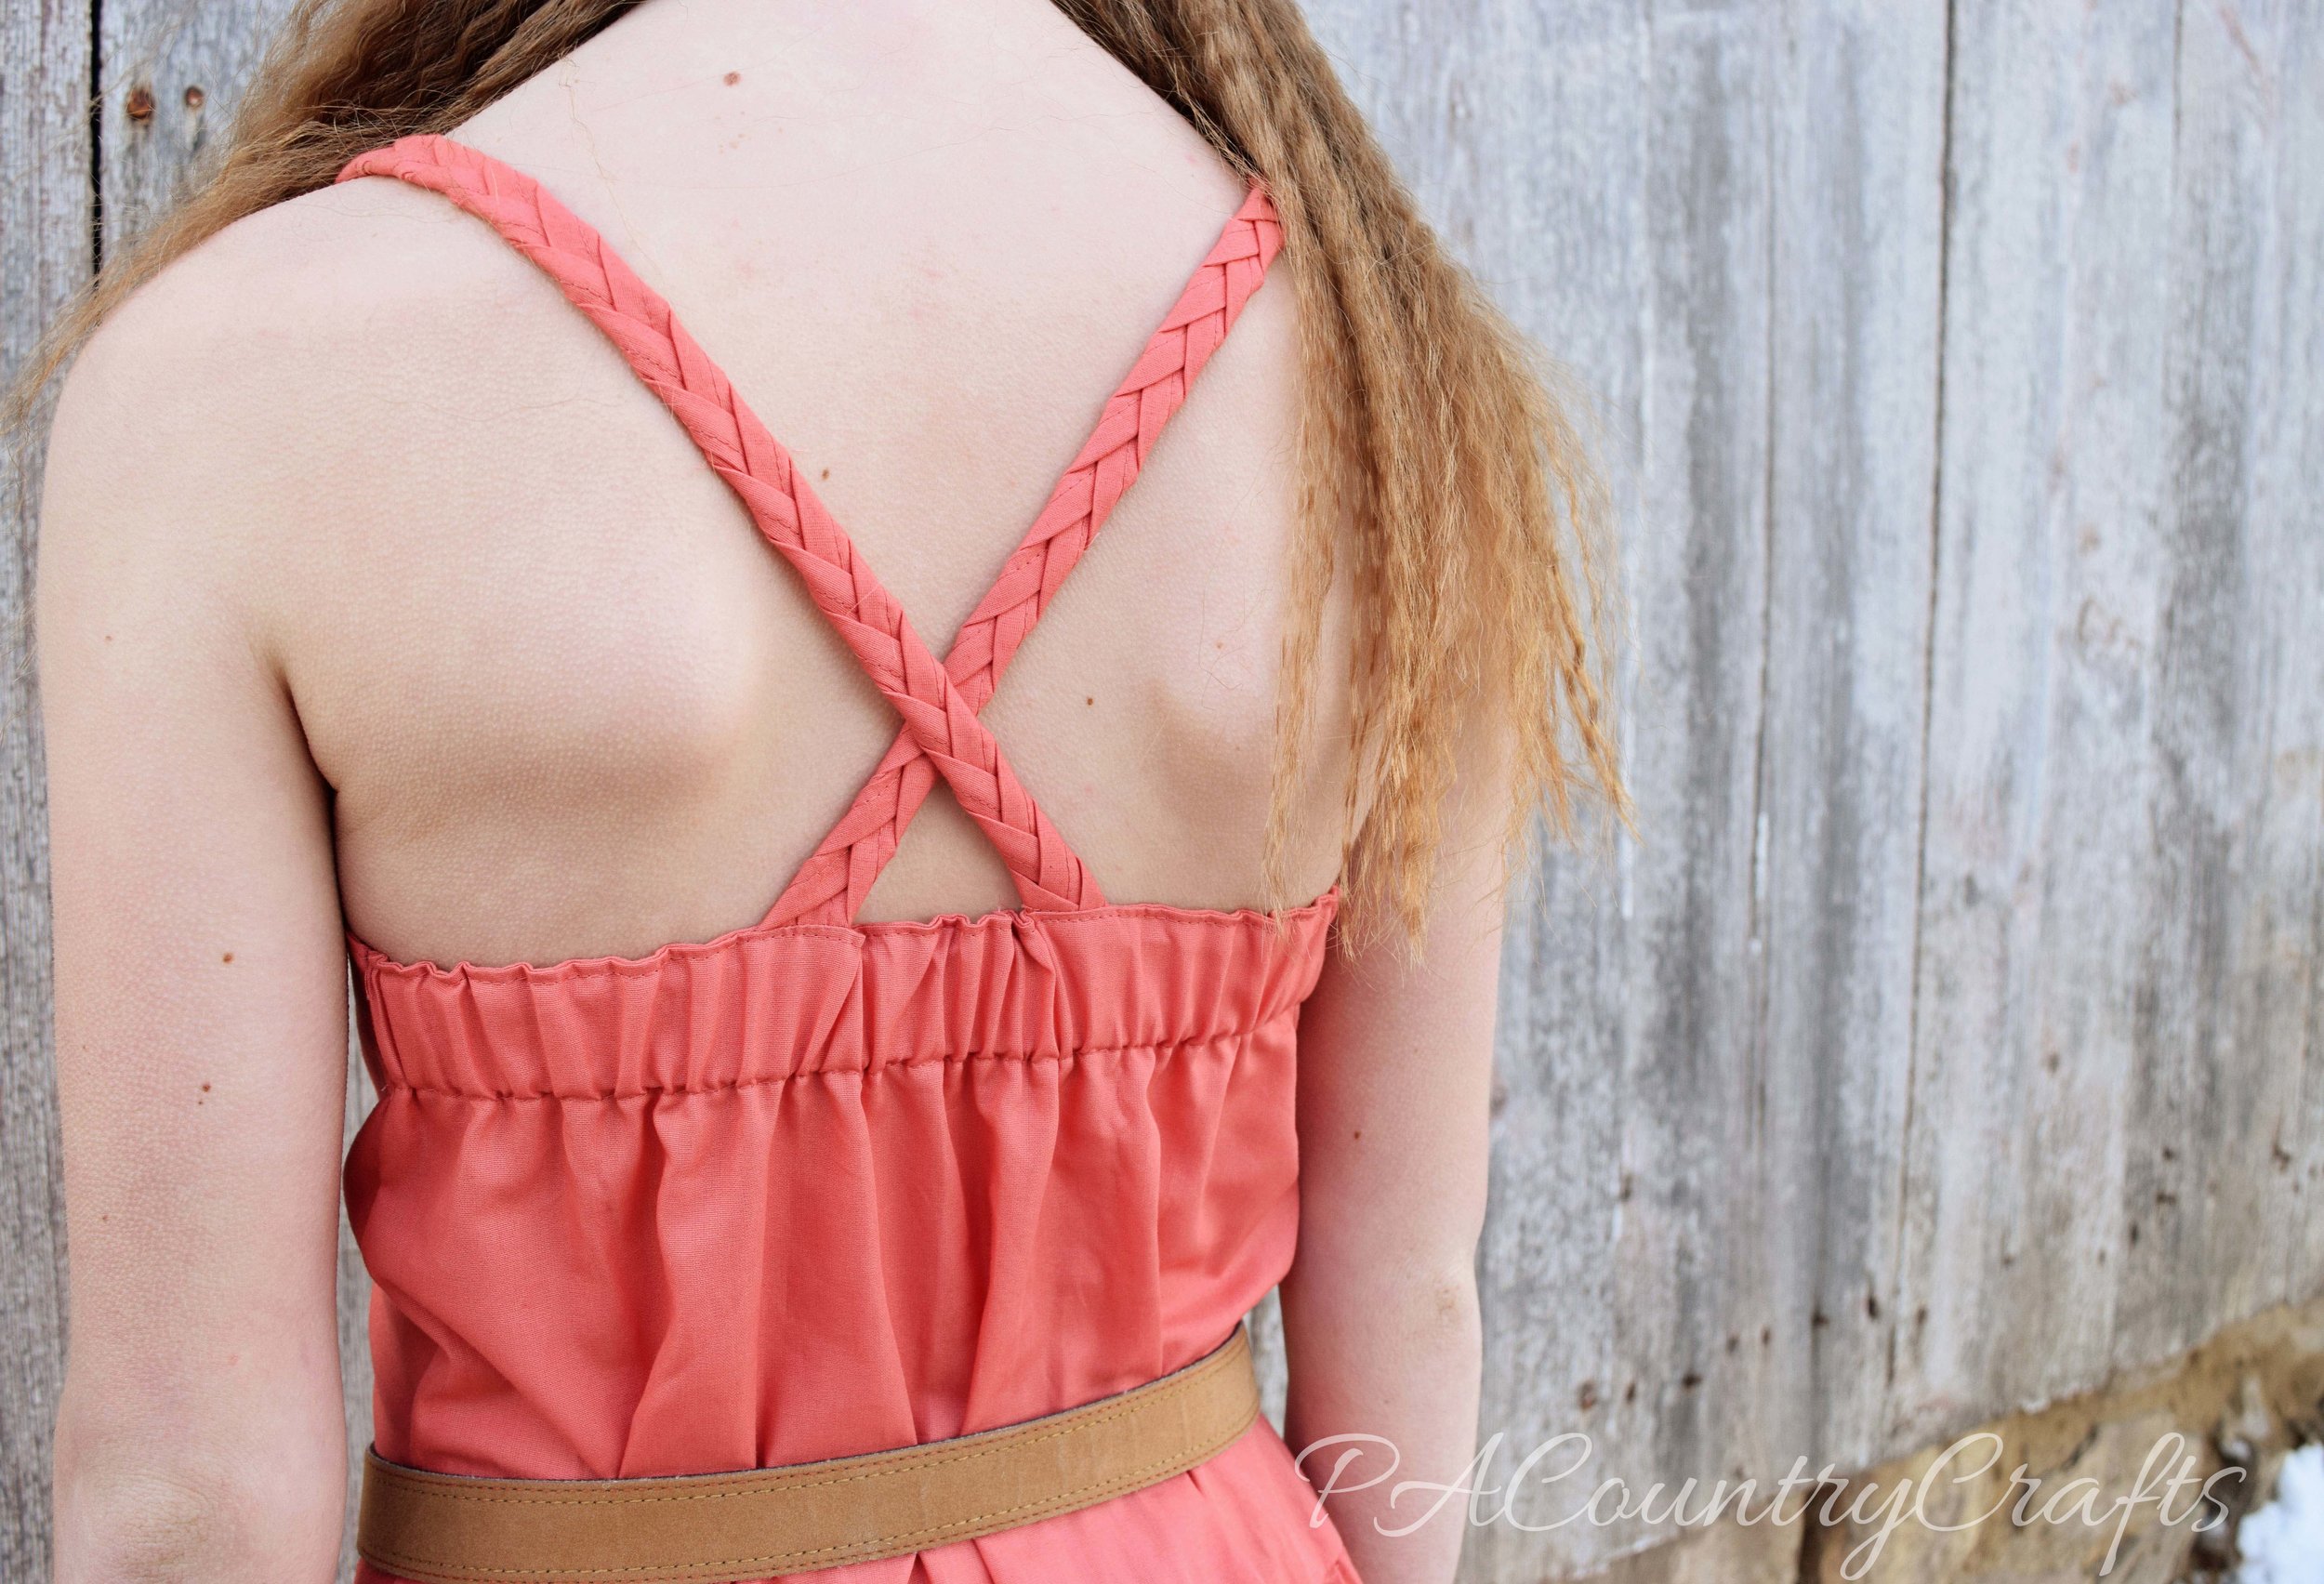
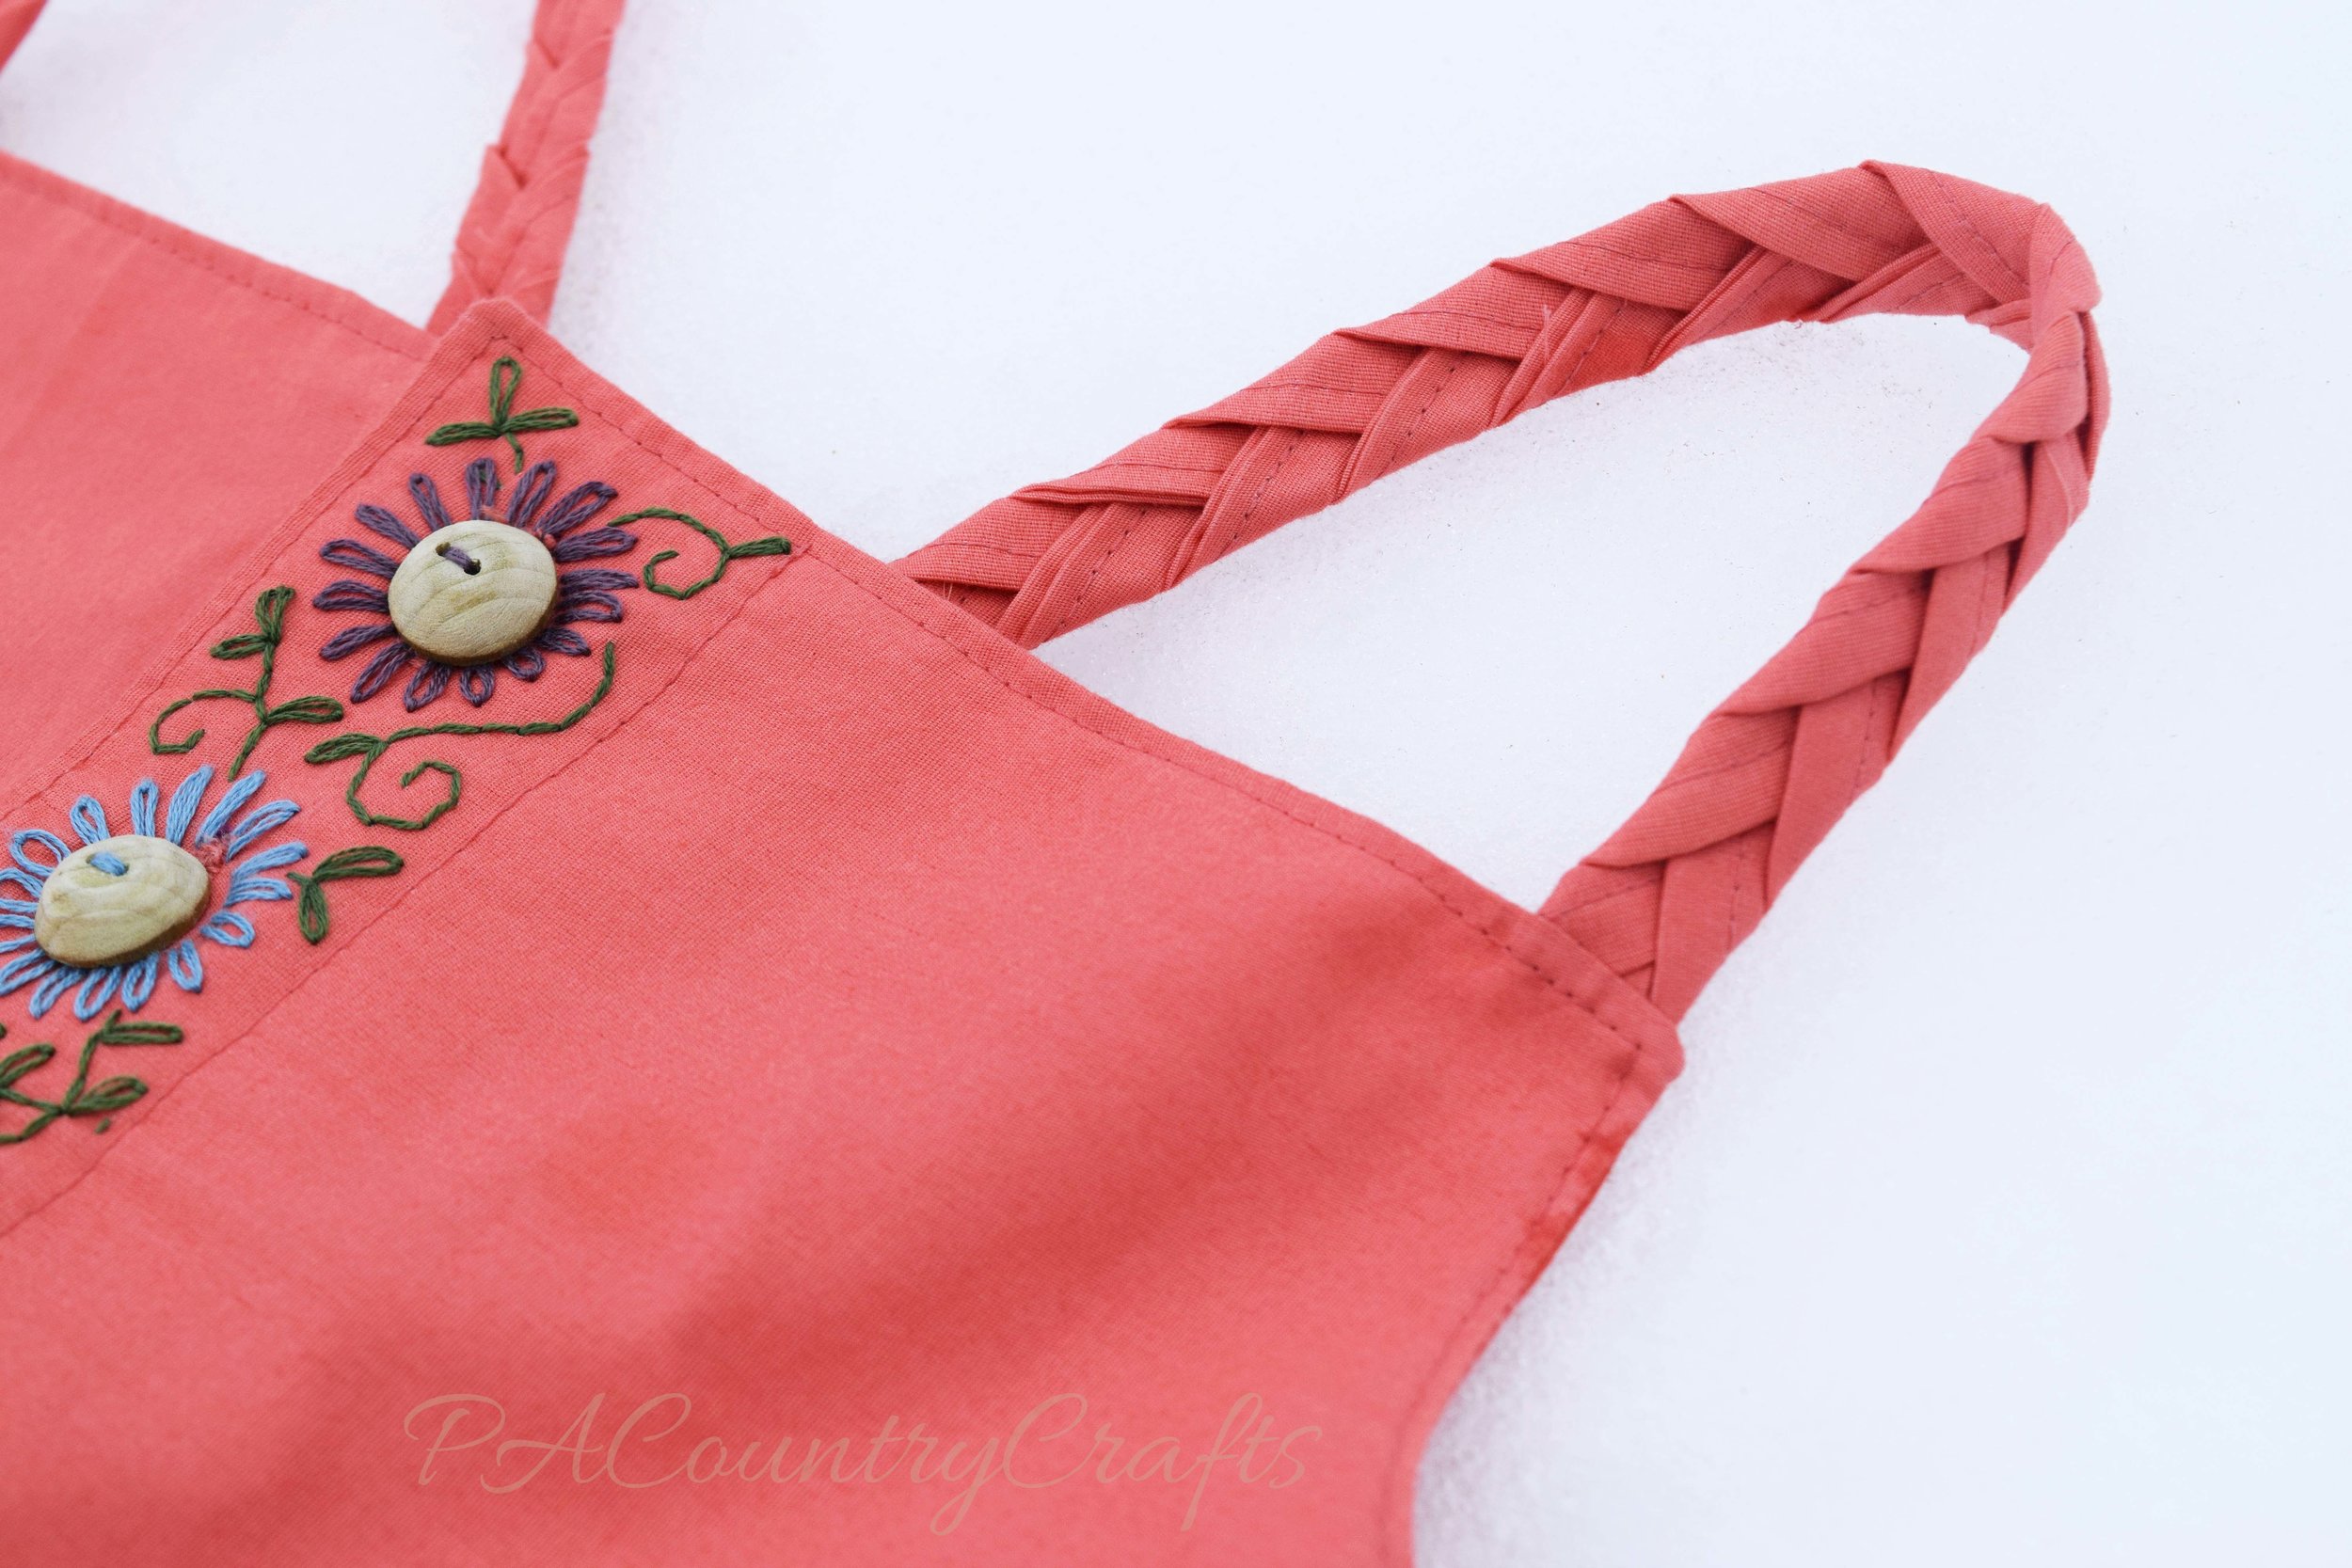
By the time her second Easter came, I was ready to try something different! My mother-in-law sewed coordinating Easter dresses for her girls and I thought that was a nice tradition. I was adjusting to being a stay at home mom and sewing was a good mental challenge for me, too. I went to Walmart and bought a pattern and some pretty purple and blue butterfly fabric that matched the basket I had made for her first Easter. I struggled so much with that pattern and I called my sister-in-law to ask a lot of questions. (Google wasn't much help back then because craft blogs hadn't taken off and we had dial-up so it was faster to use the telephone.) She showed me how to cut a pattern out and how to do gathering stitches. I really had NO idea what I was doing! When I put the cap sleeve in, I was confused because the directions had me sew the end that was going into the arm hole. No, I just put it in backwards! I hemmed the sleeves by hand because I didn't figure out what I did wrong until years later. The zipper is awful and I didn't finish the waist inside, but that dress has been worn by five girls and has lasted 12 years. I was so proud of myself when she wore that first dress, and the sizing was terrible so she was able to wear it for a few years, too!

first-easter-dress

terrible zippersleeve put in backwards(The really sad part about all of this is that I do not have a single picture of my daughter wearing that dress! It was in the days of 35mm film so either I didn't take one or it didn't turn out. I am certain to do full "photo shoots" when I make dresses for my girls now. I am so thankful for digital cameras!!!!)

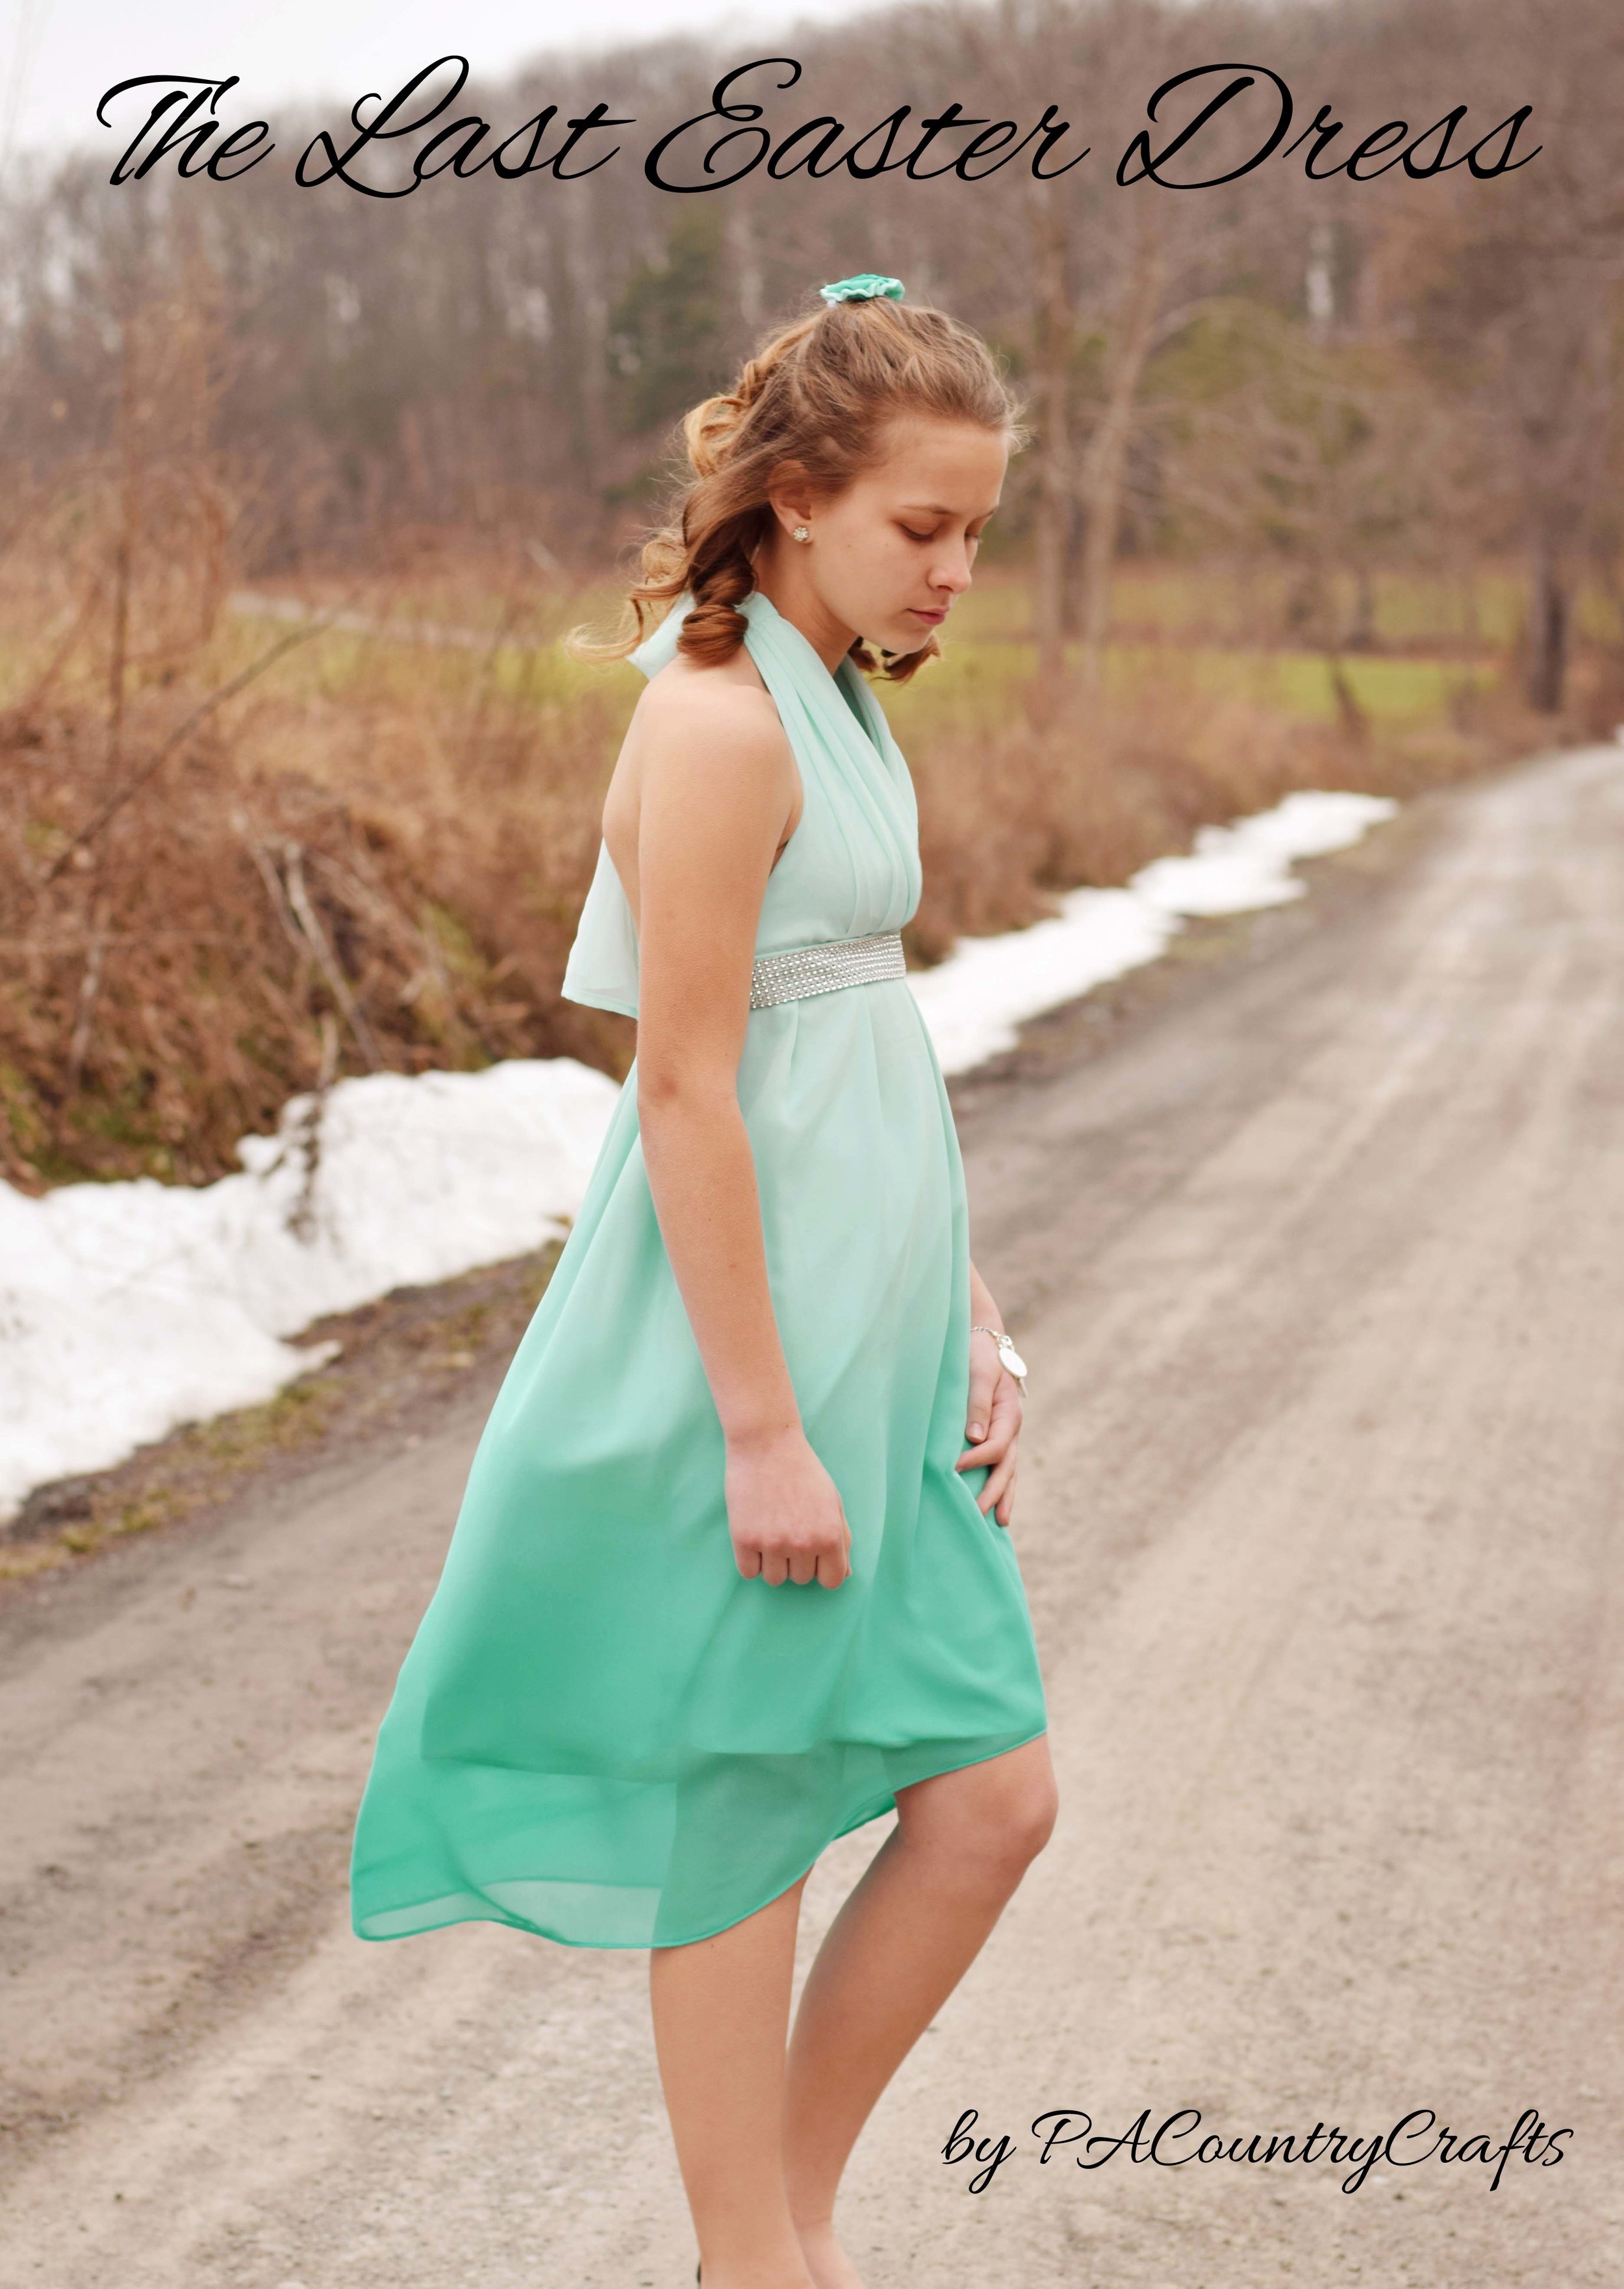
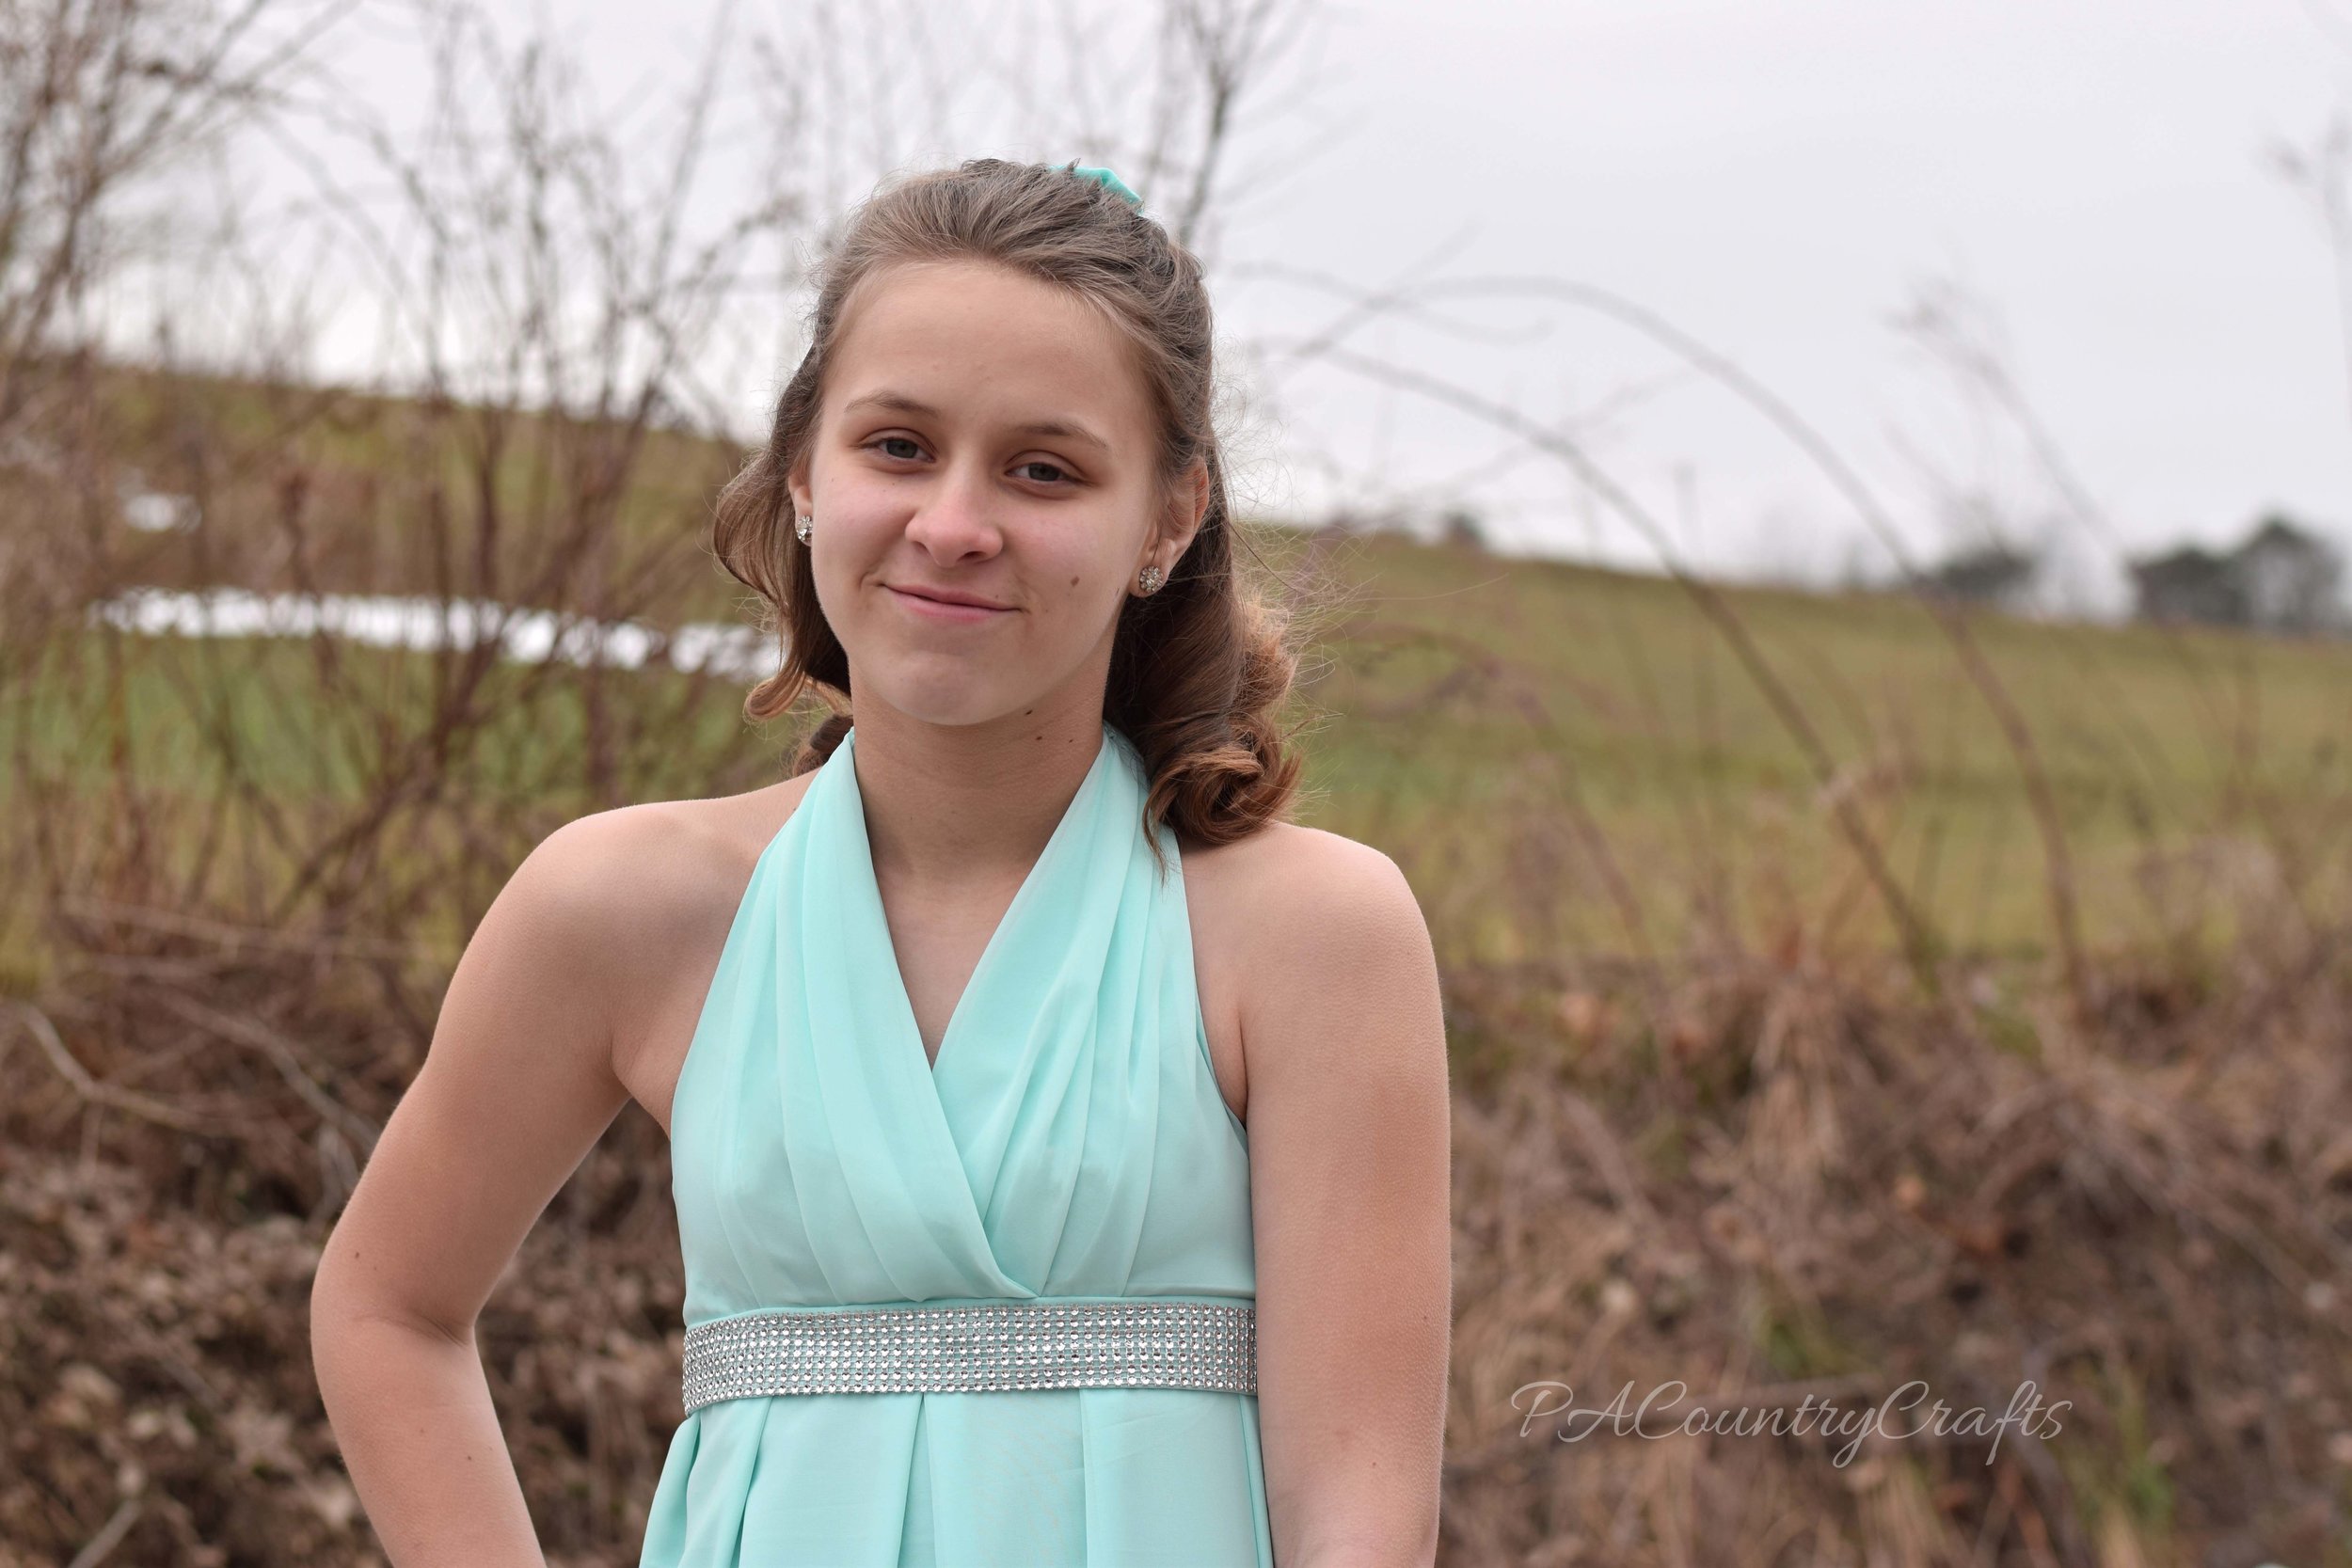
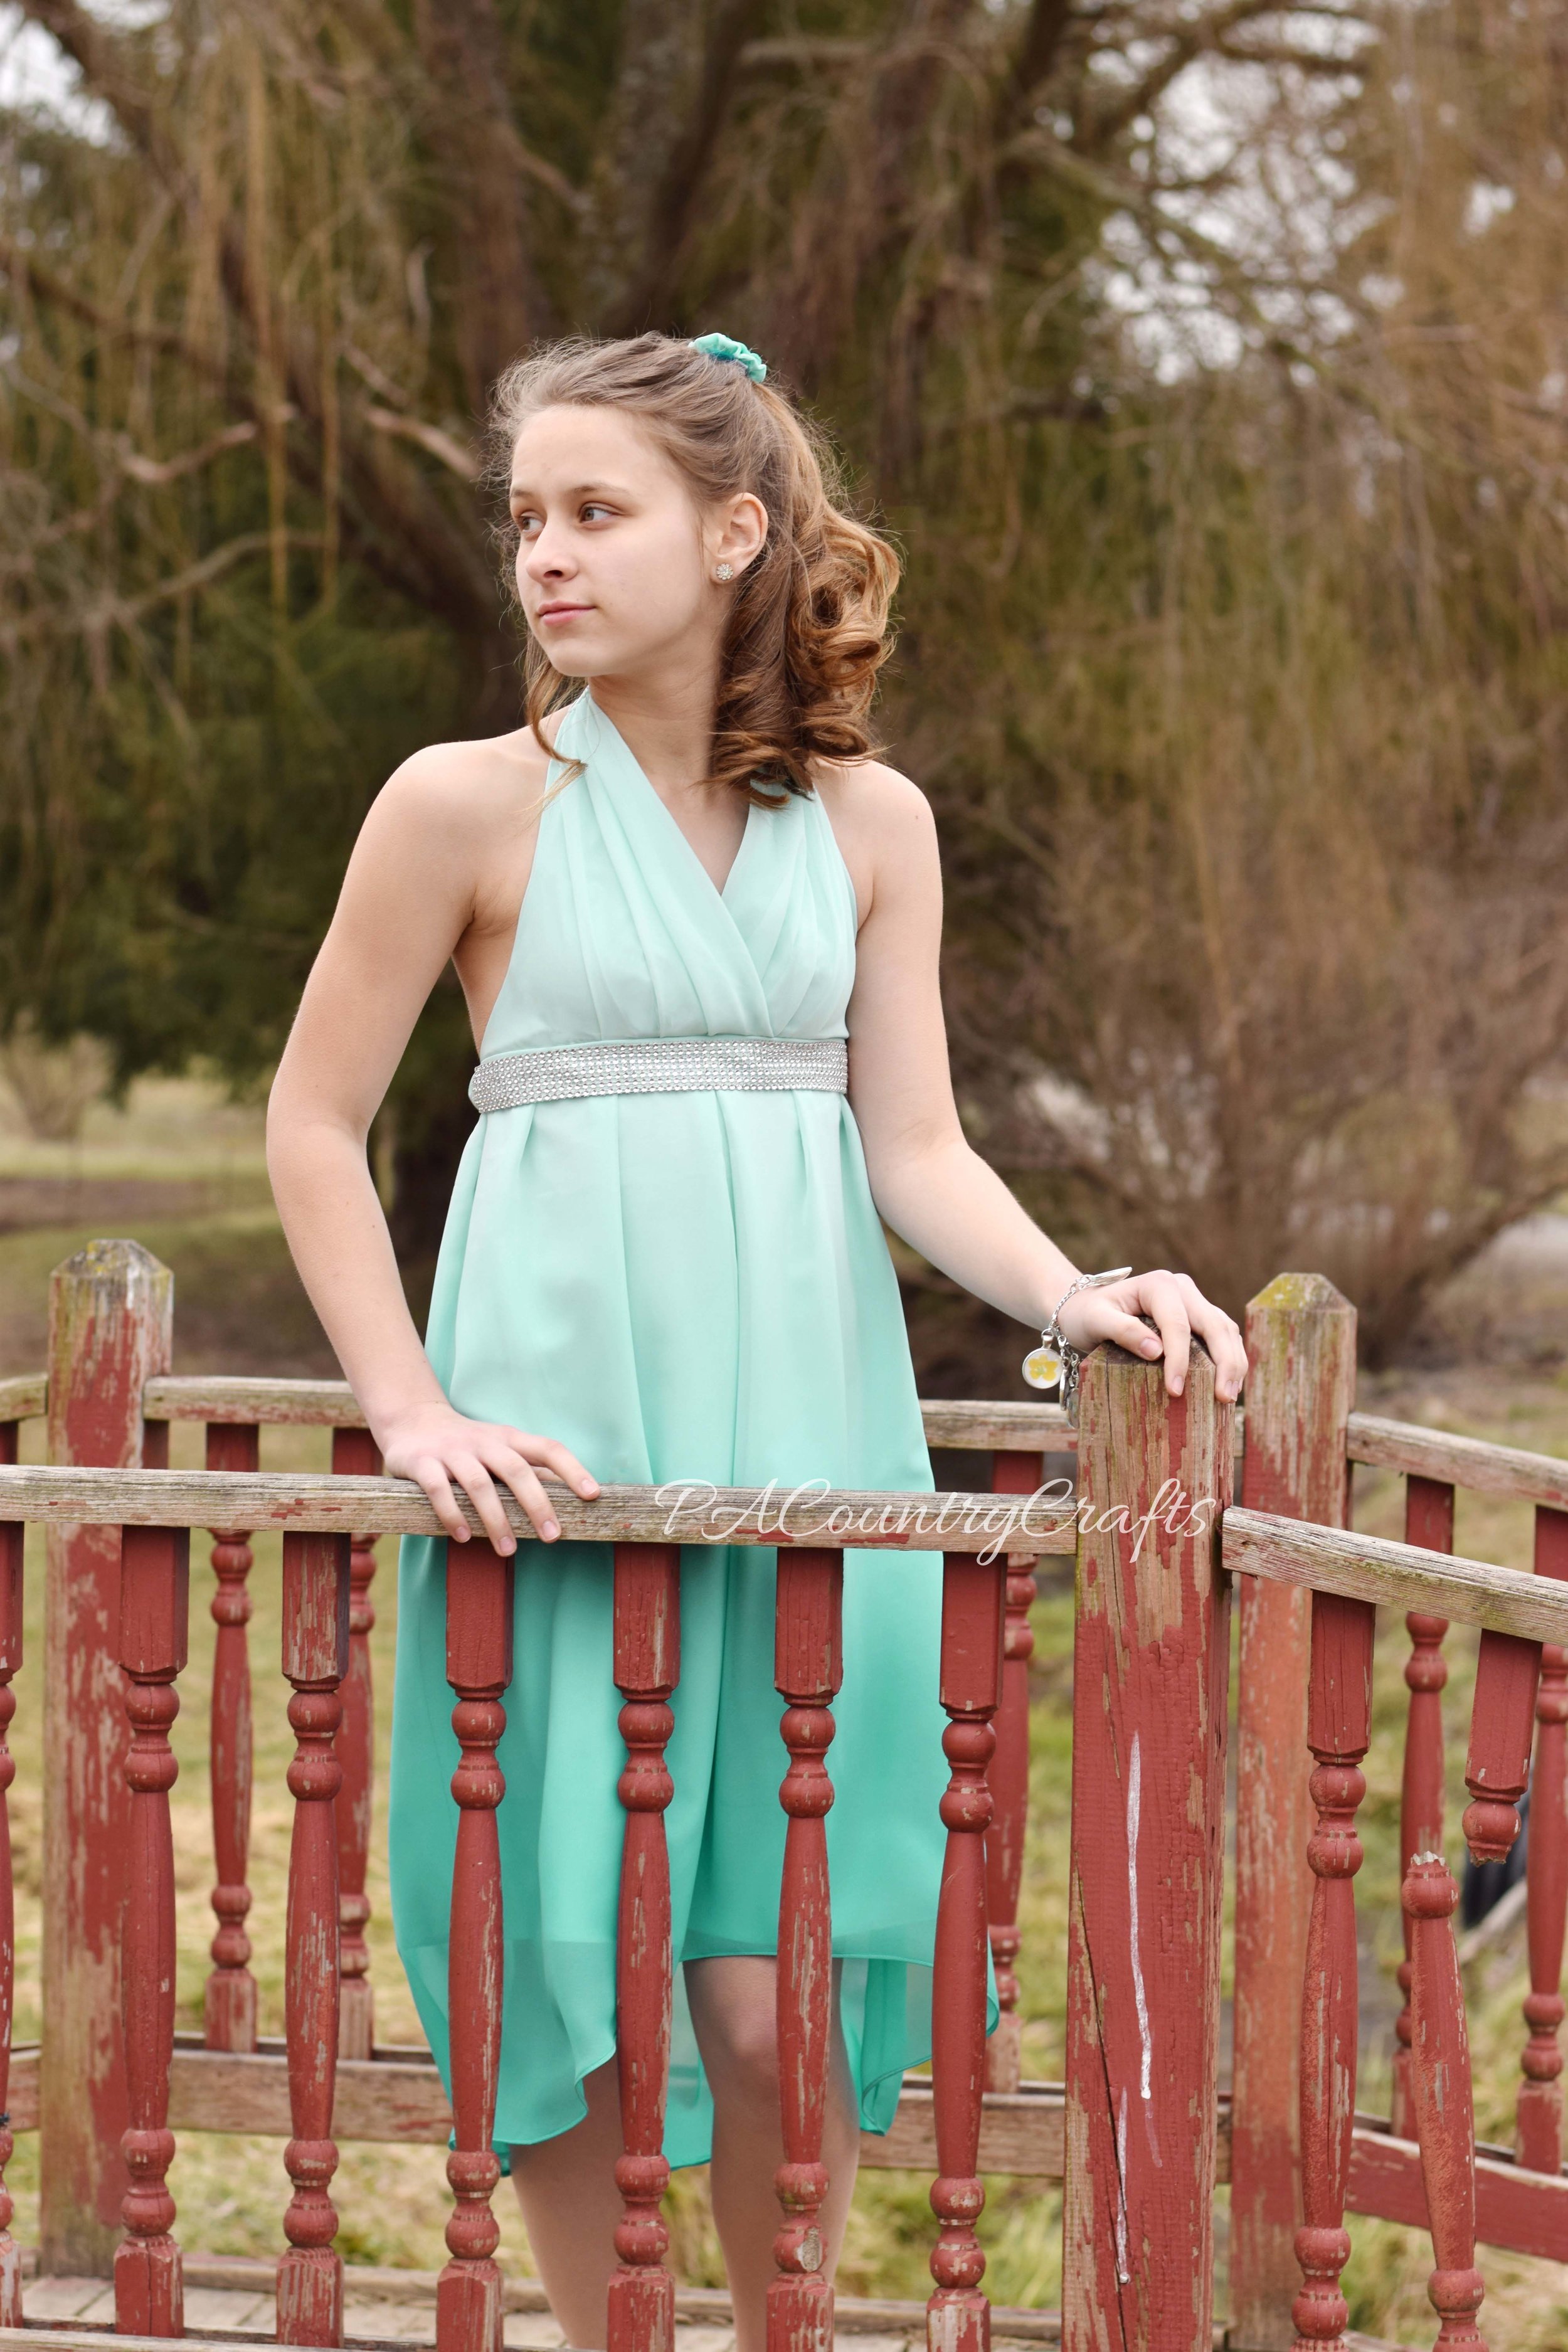
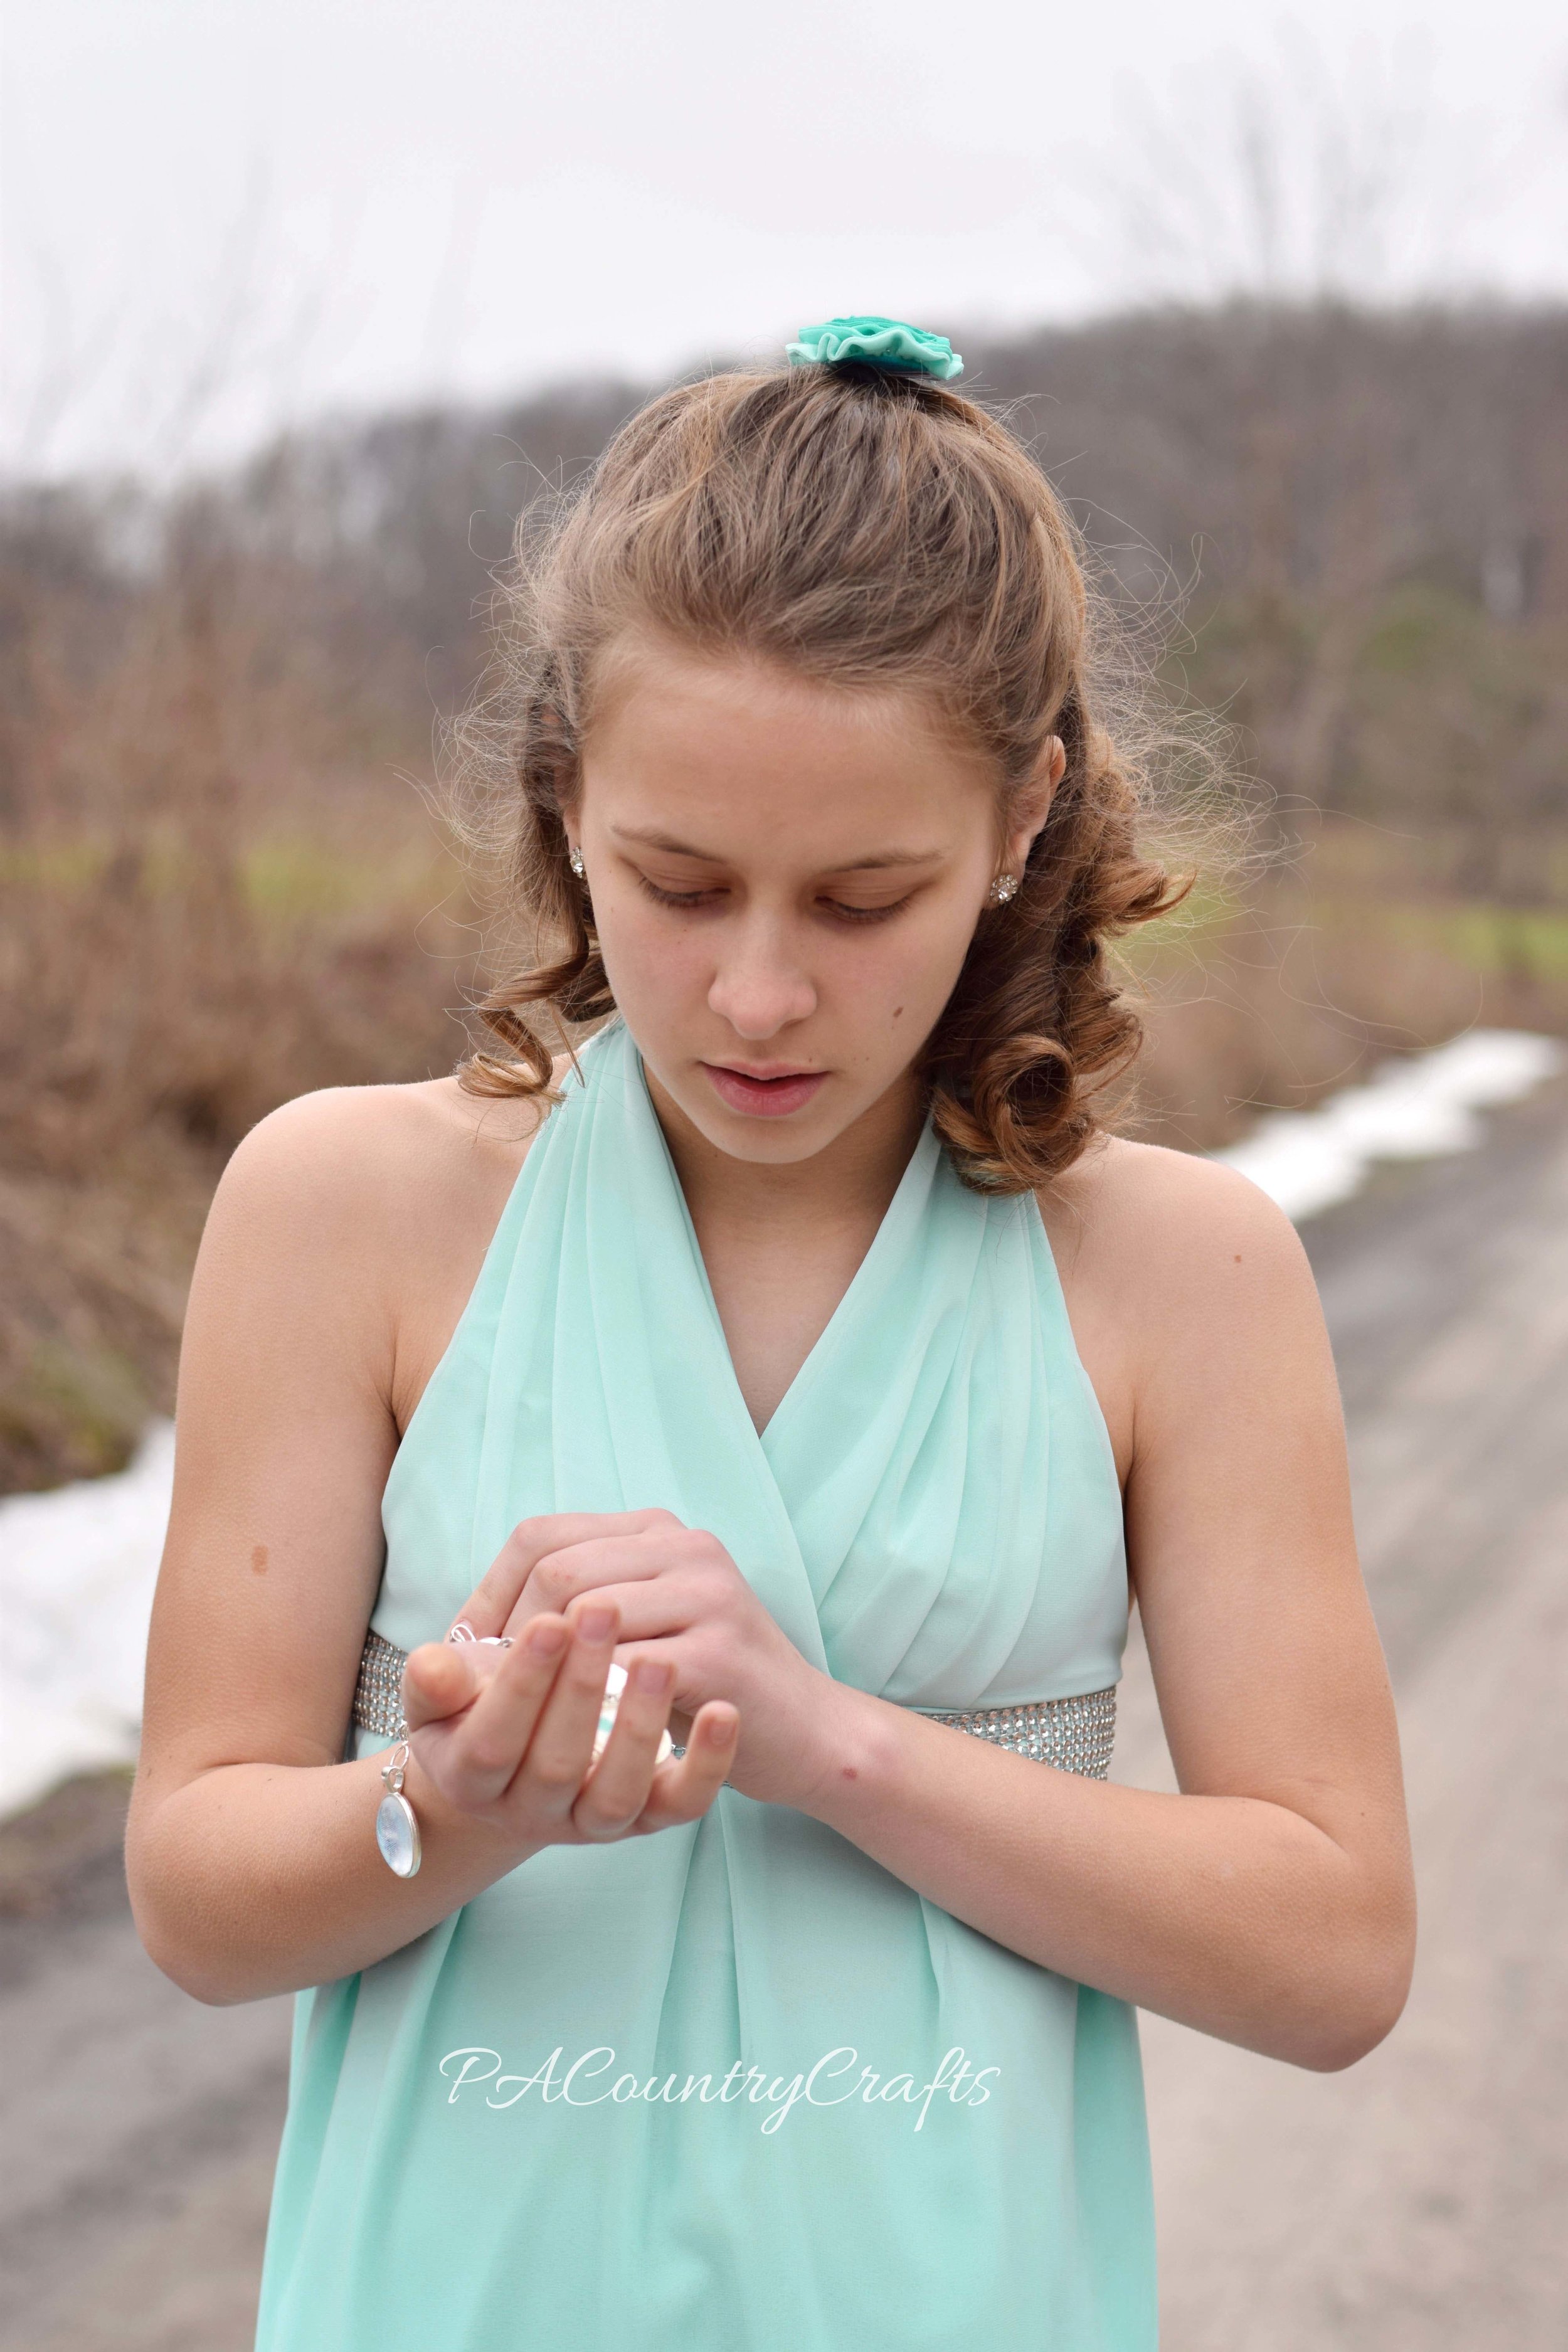
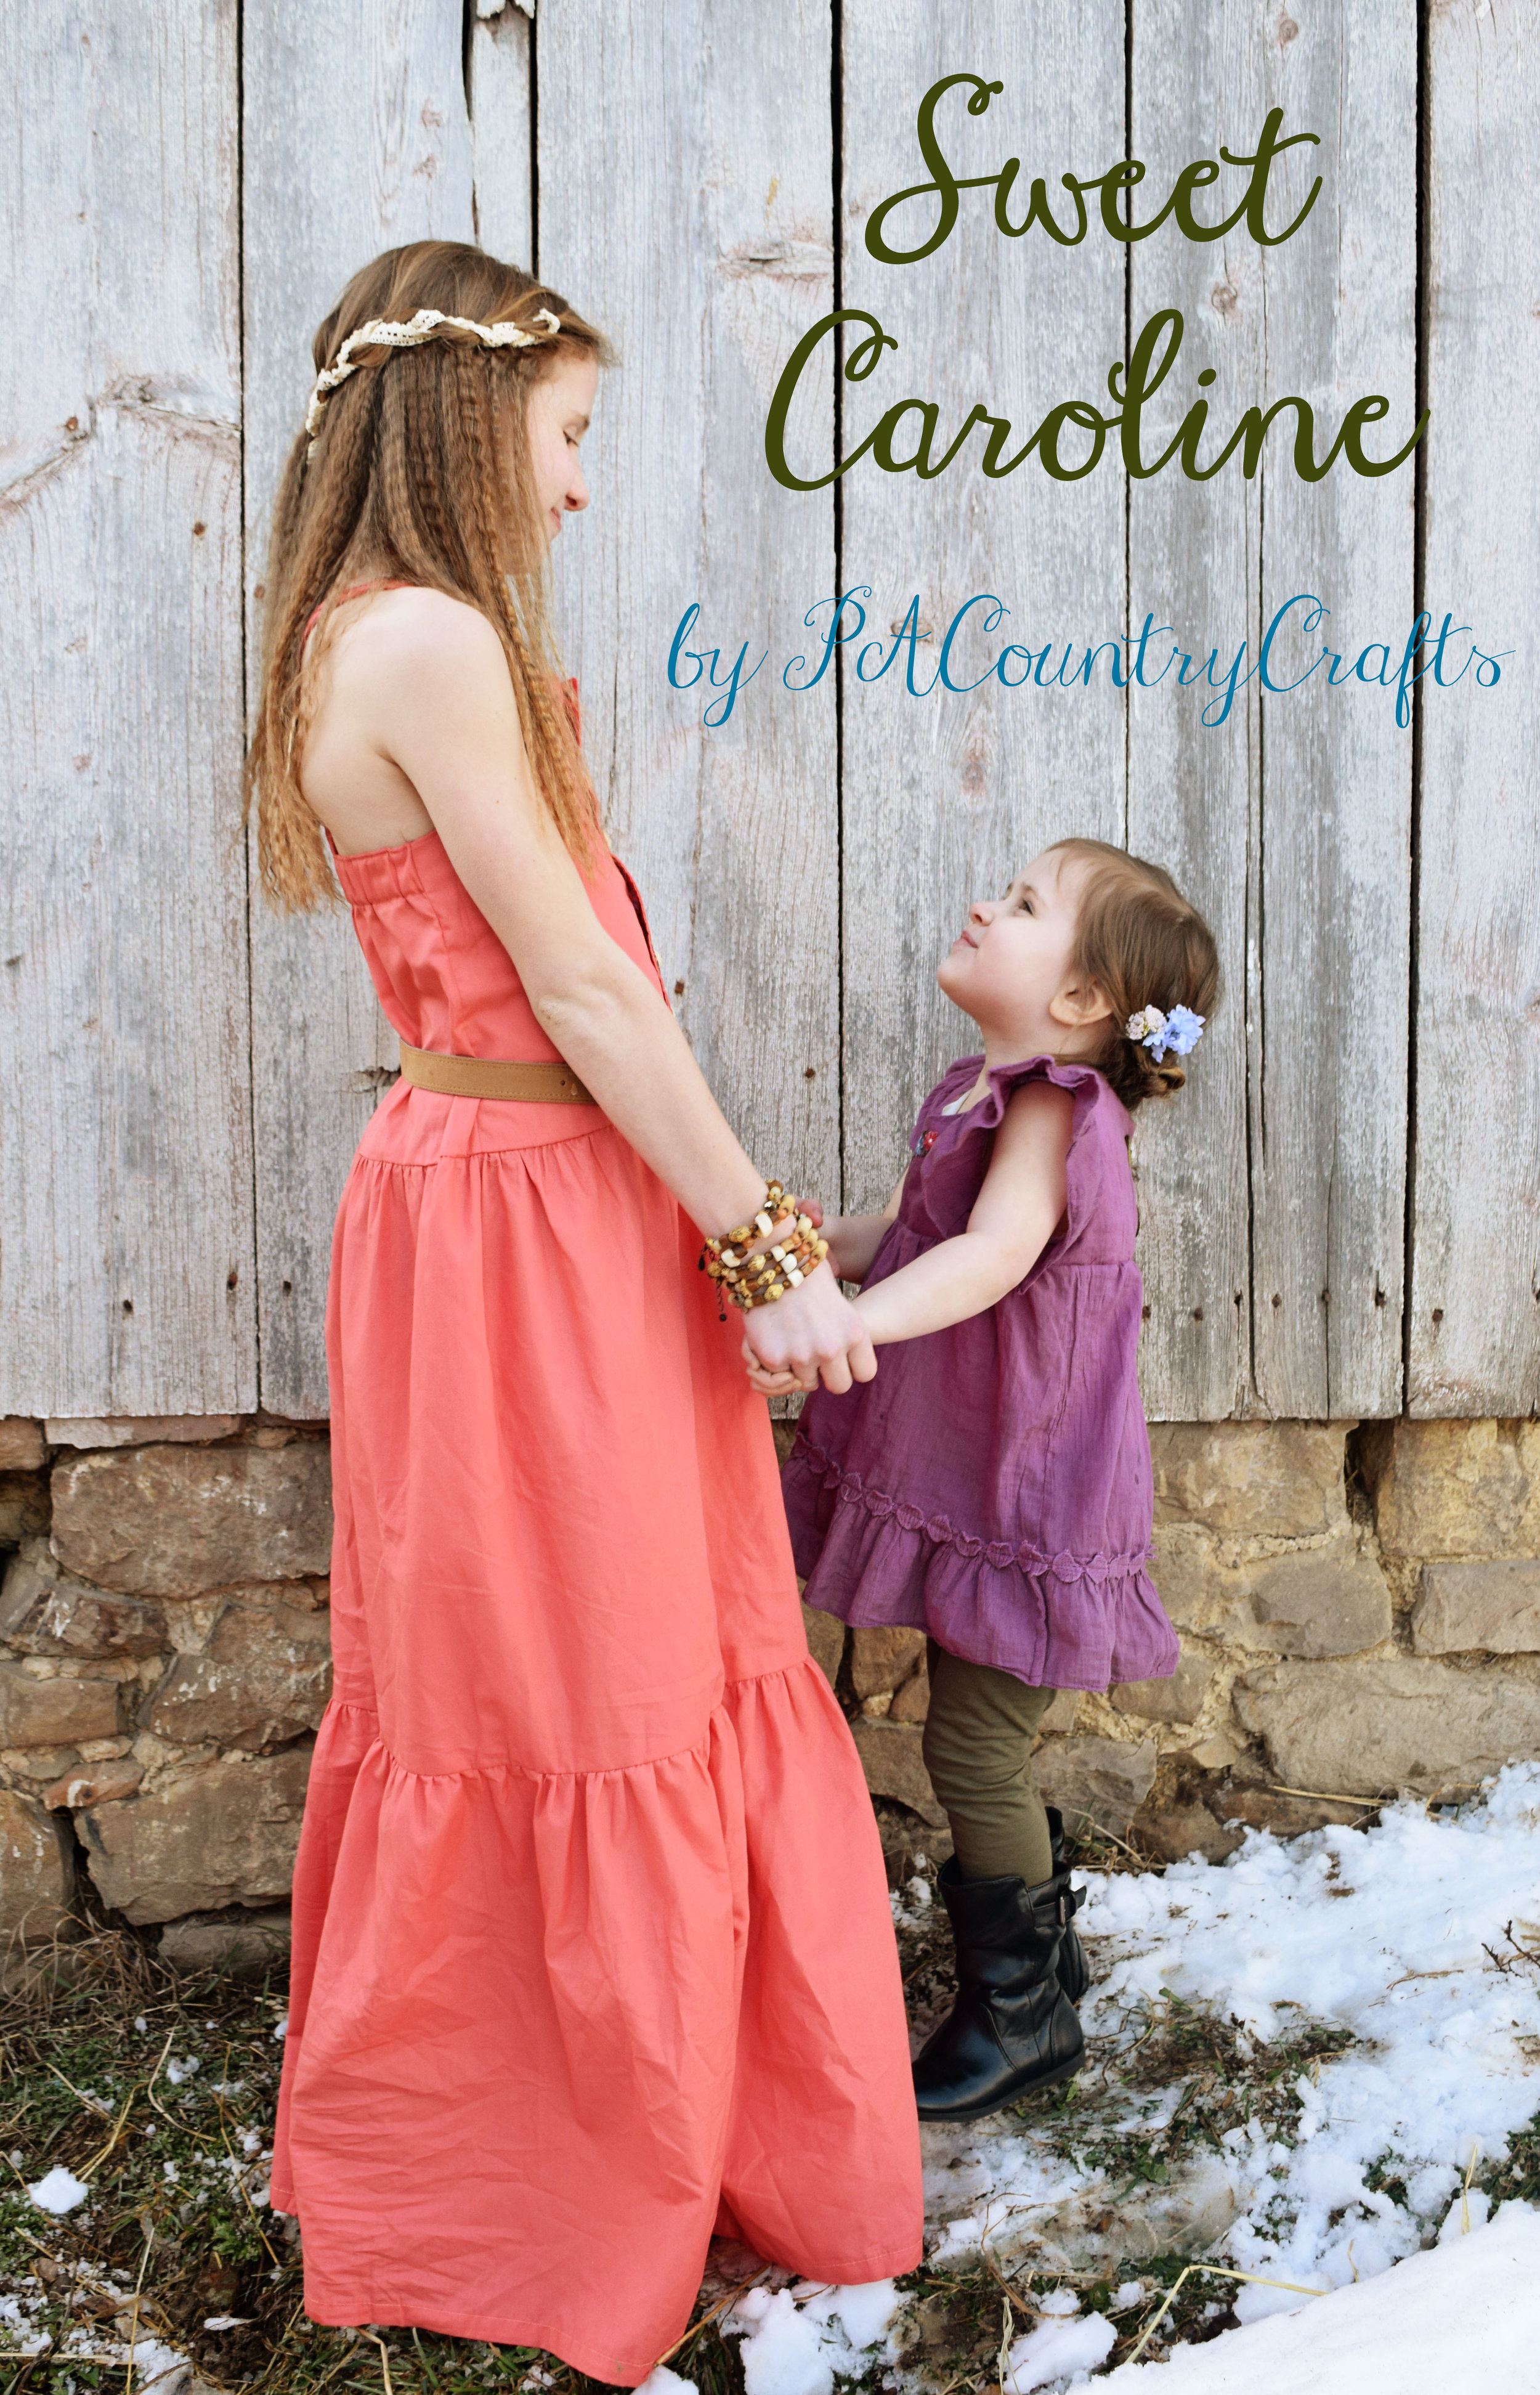
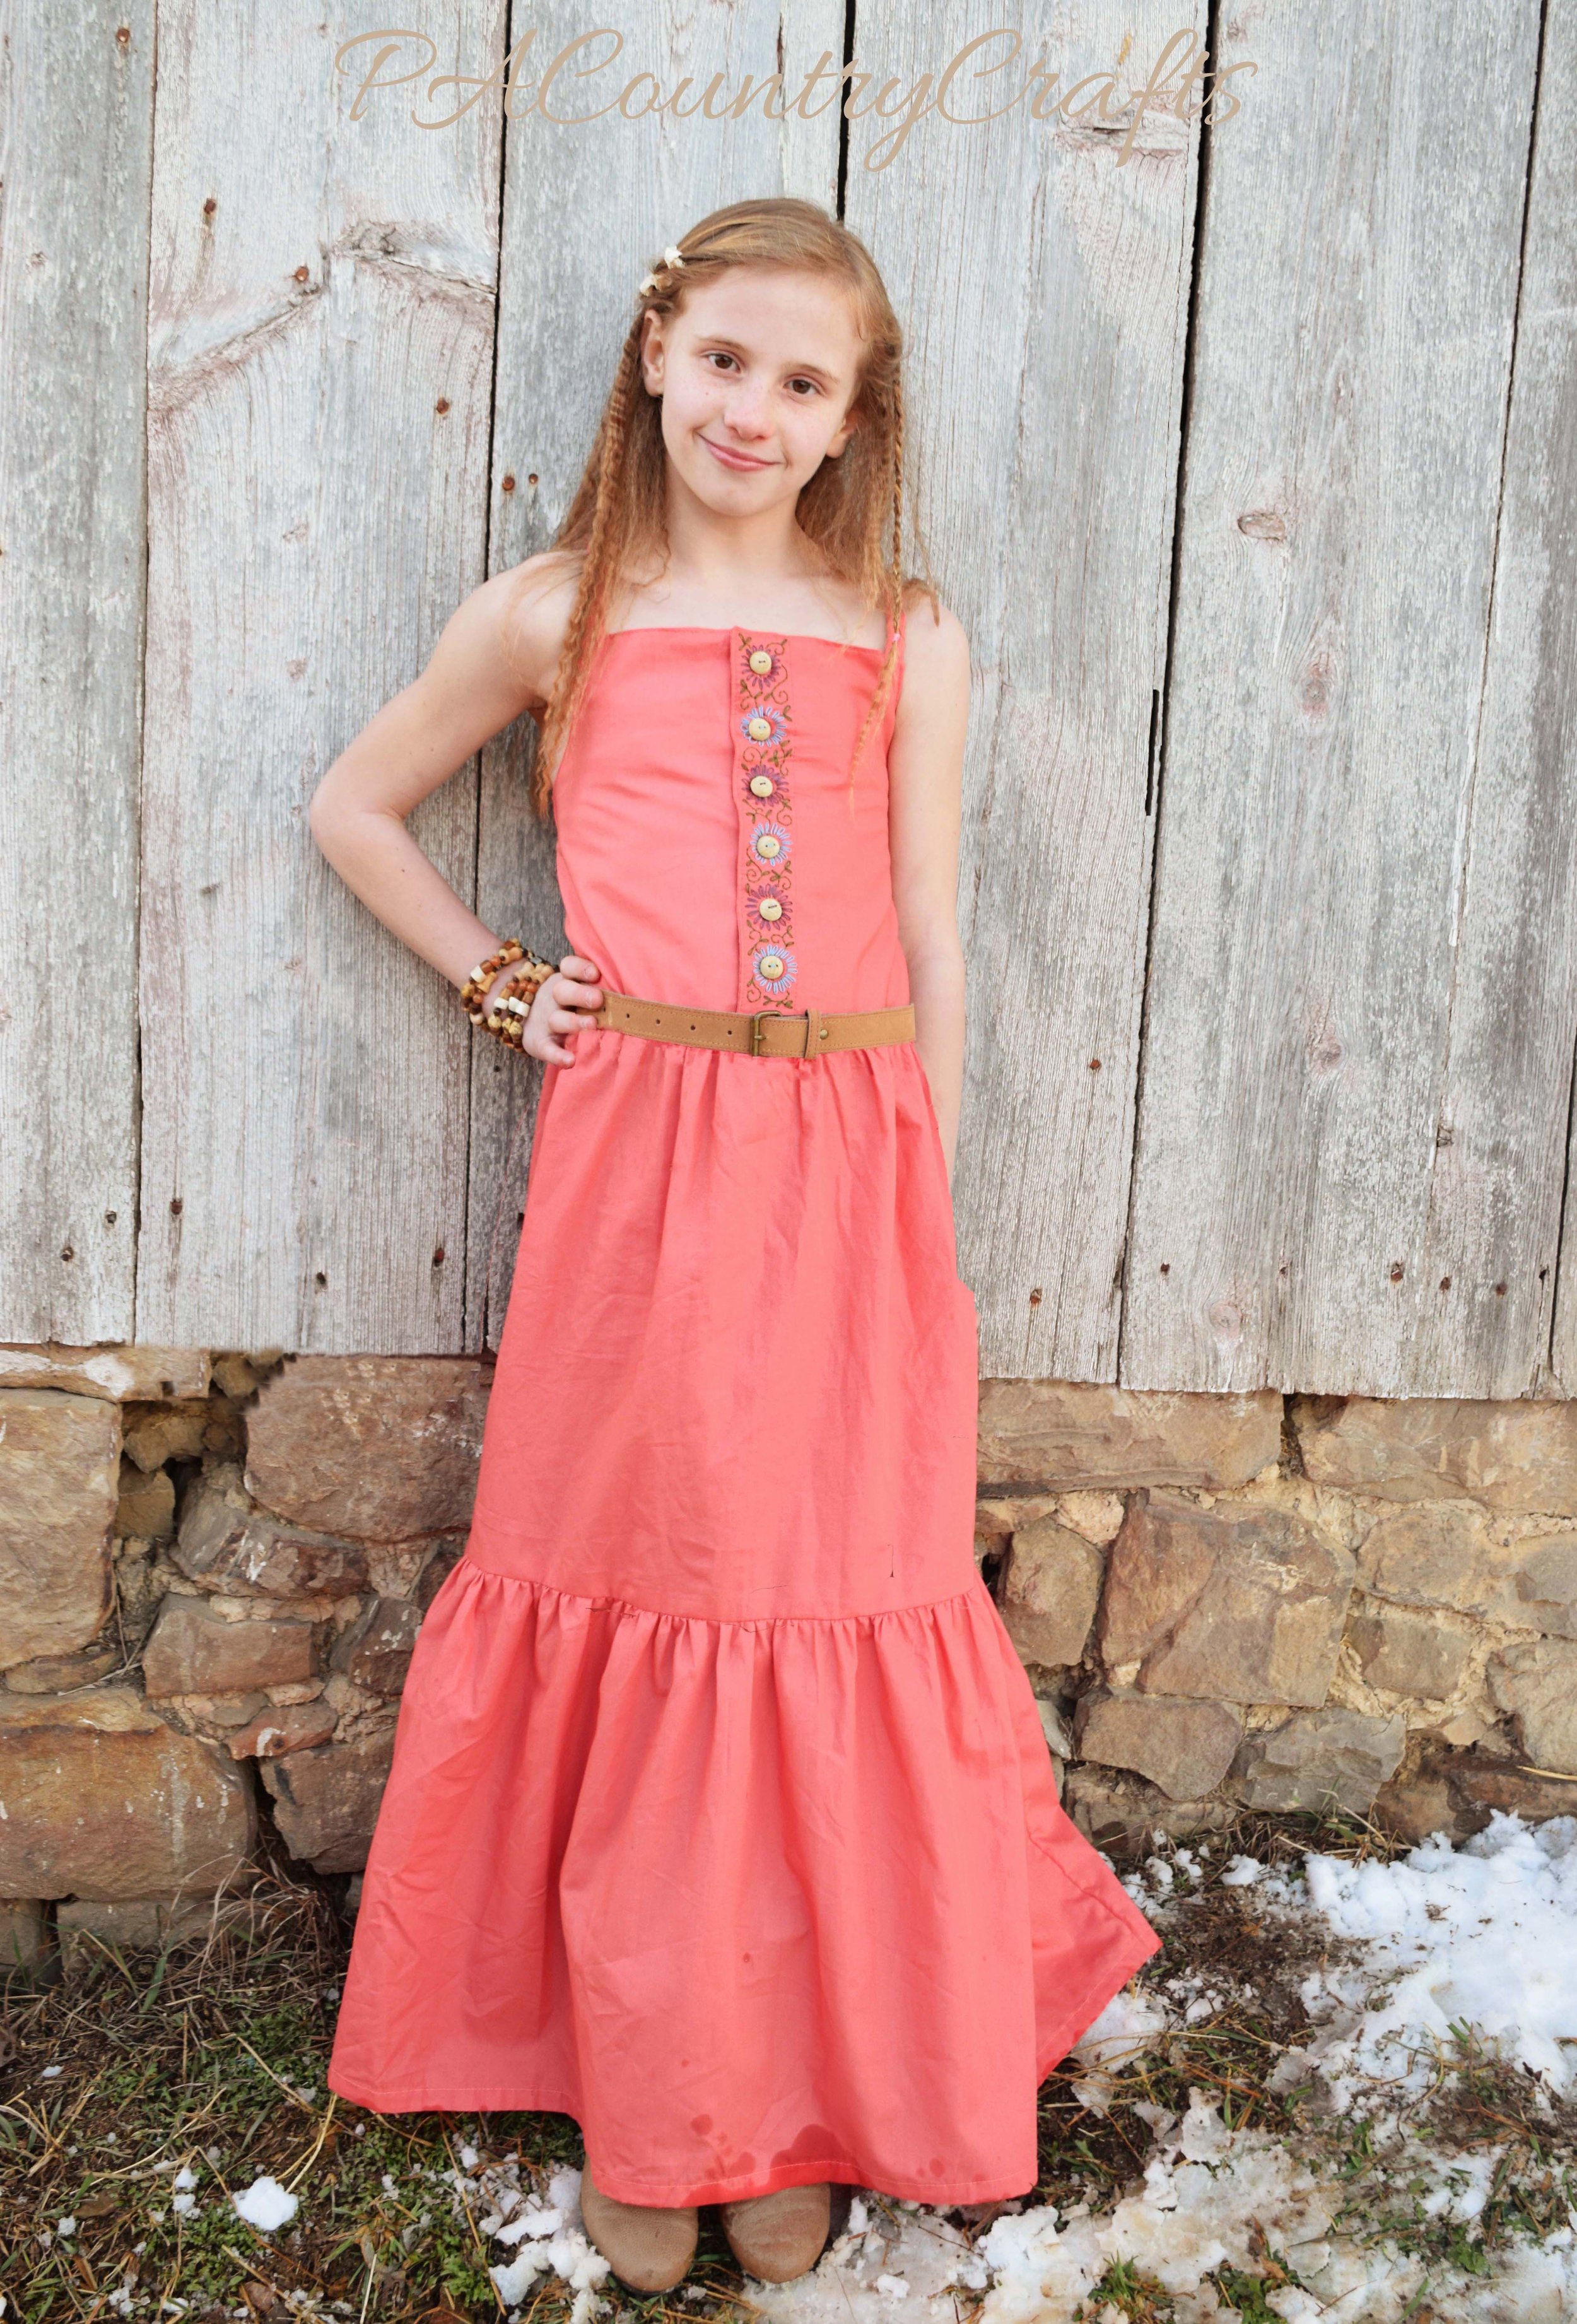
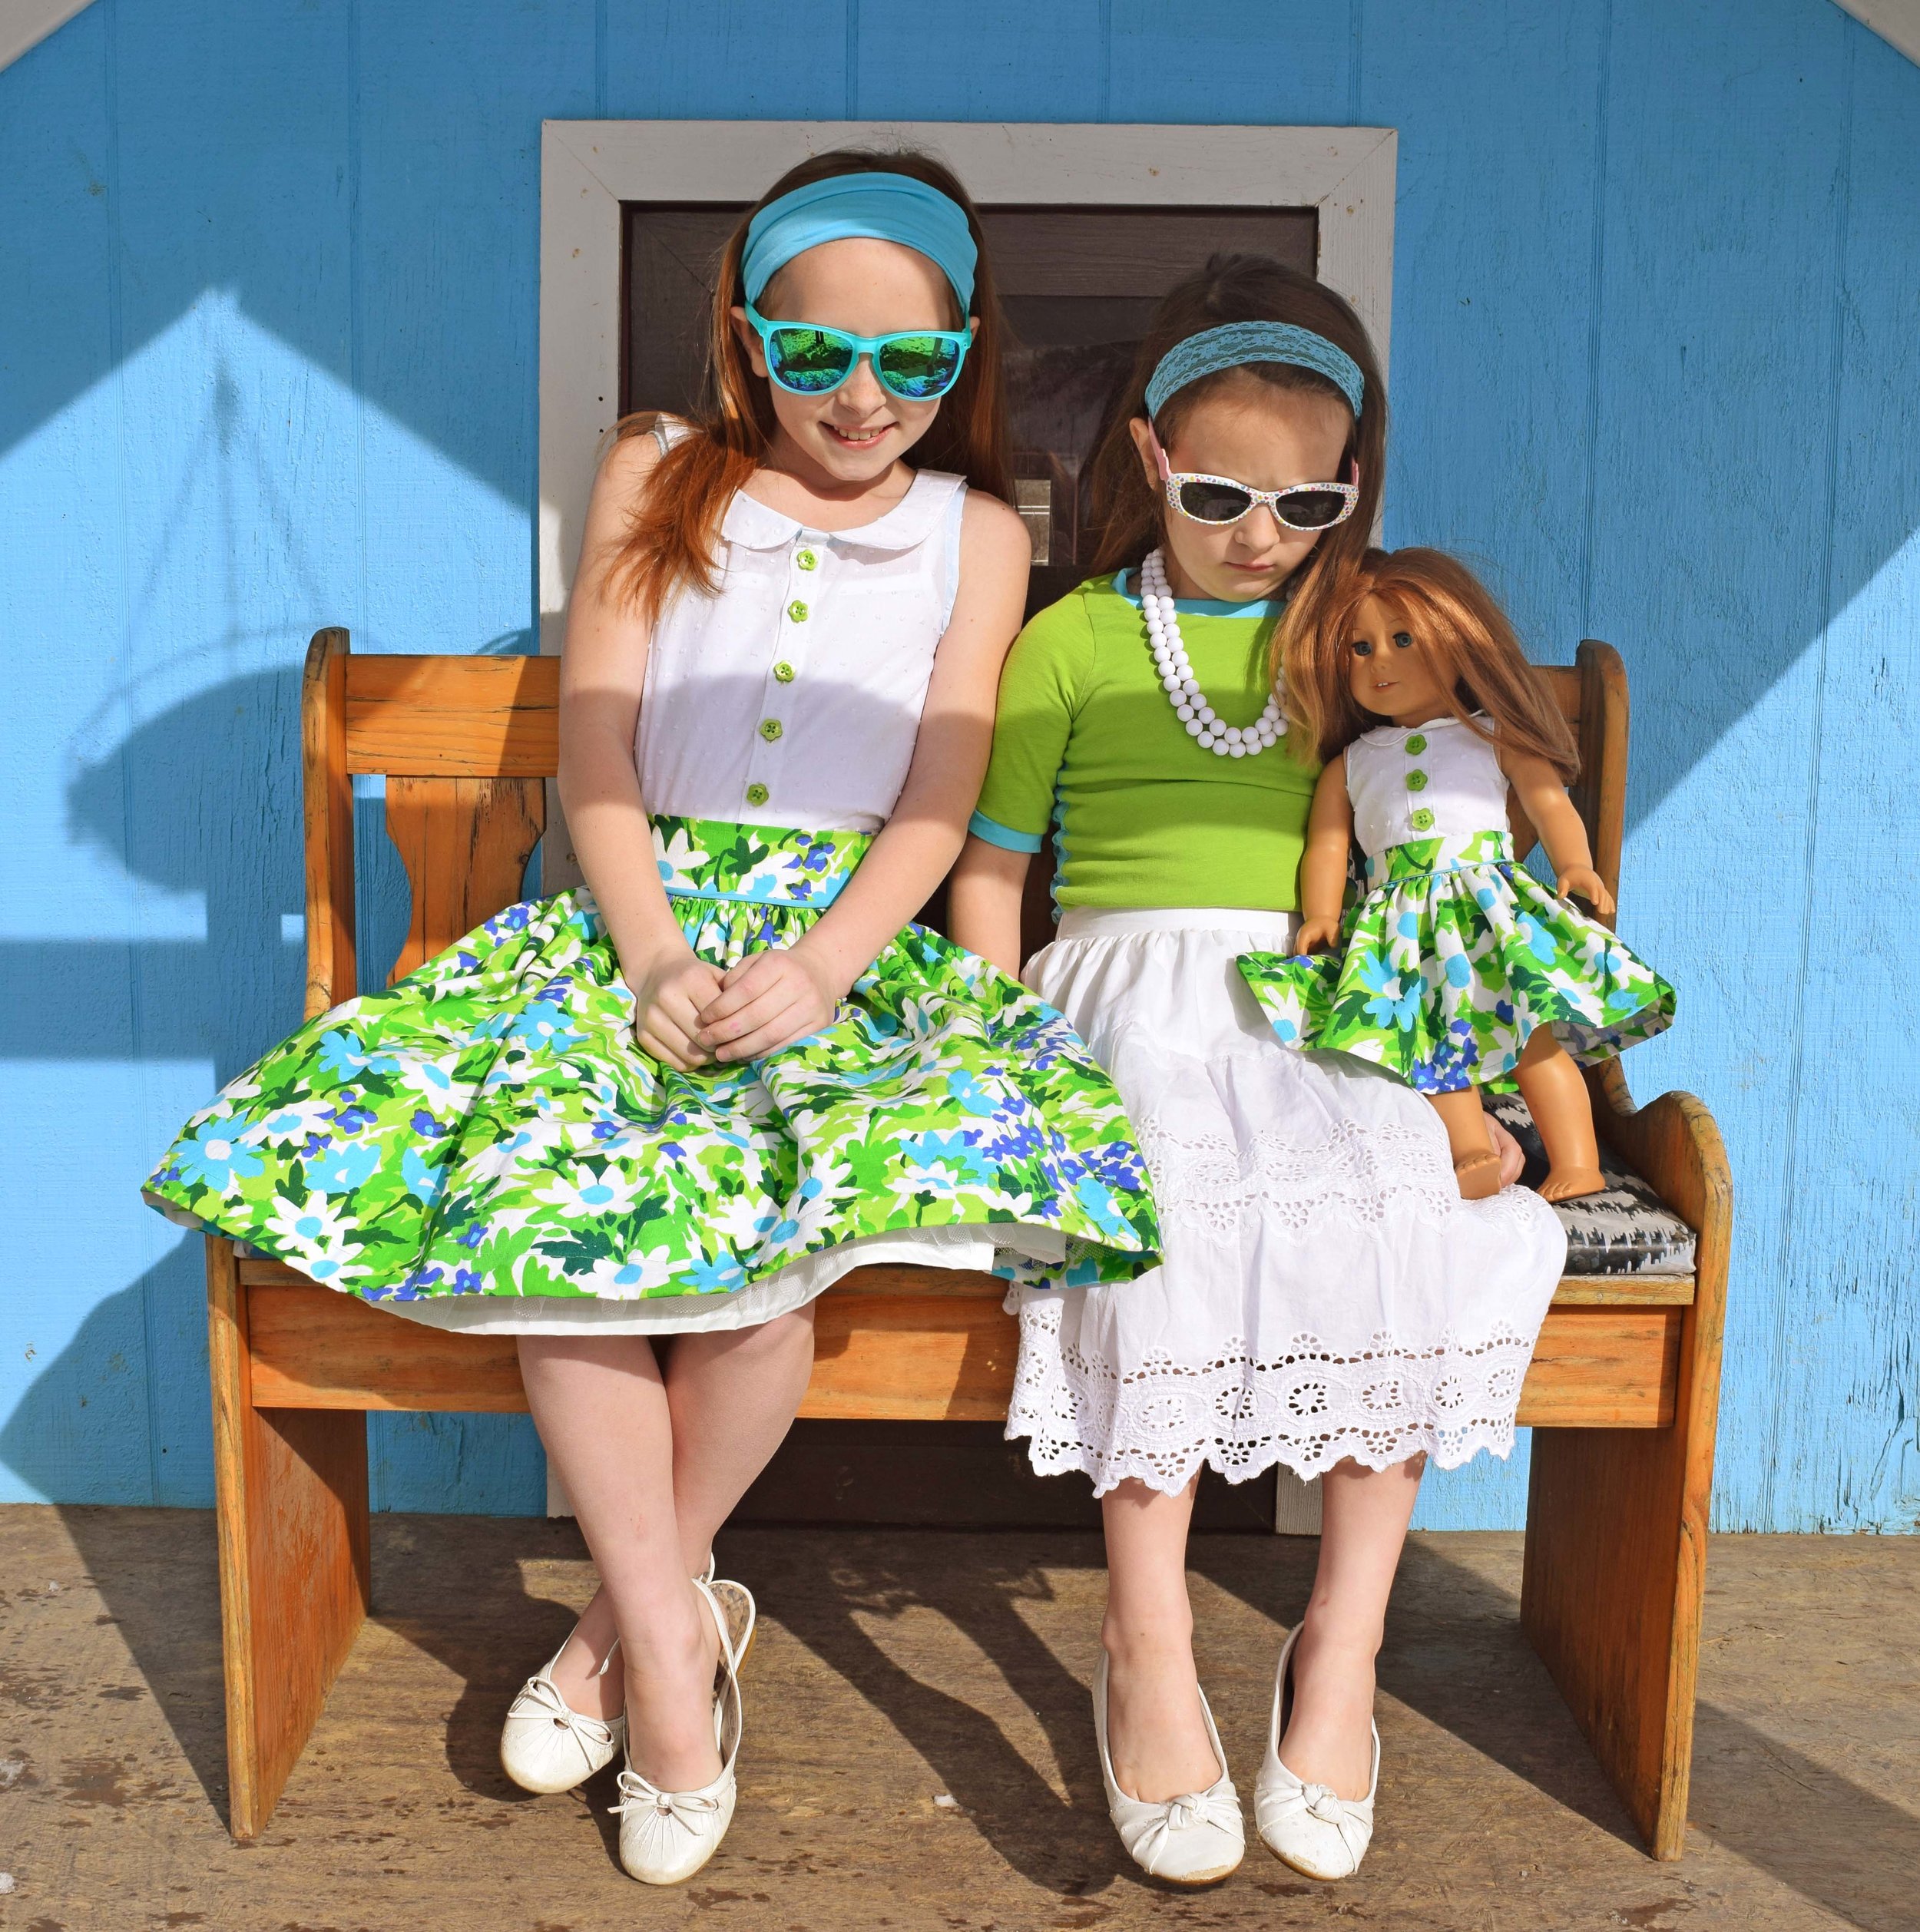
Now my oldest daughter is 13. She has outgrown the cute little girl styles and hates pink. My little girl who played in the mud wearing a Cinderella dress is now equal parts fabulous and sporty. She rocks a fashionable ensemble and a soccer uniform. She loves high heels and muck boots. She has reached an age where I don't know that she would want her mom to sew her an Easter dress next year, and she could actually sew her own if she wanted to. I really think this will be the last one I make for her, so I wanted to make it special. Instead of scrambling to make five Easter dresses in a week like I usually do, I decided to concentrate on this one.

ombre chiffon halter dress with a high-low hem

ombre chiffon dress

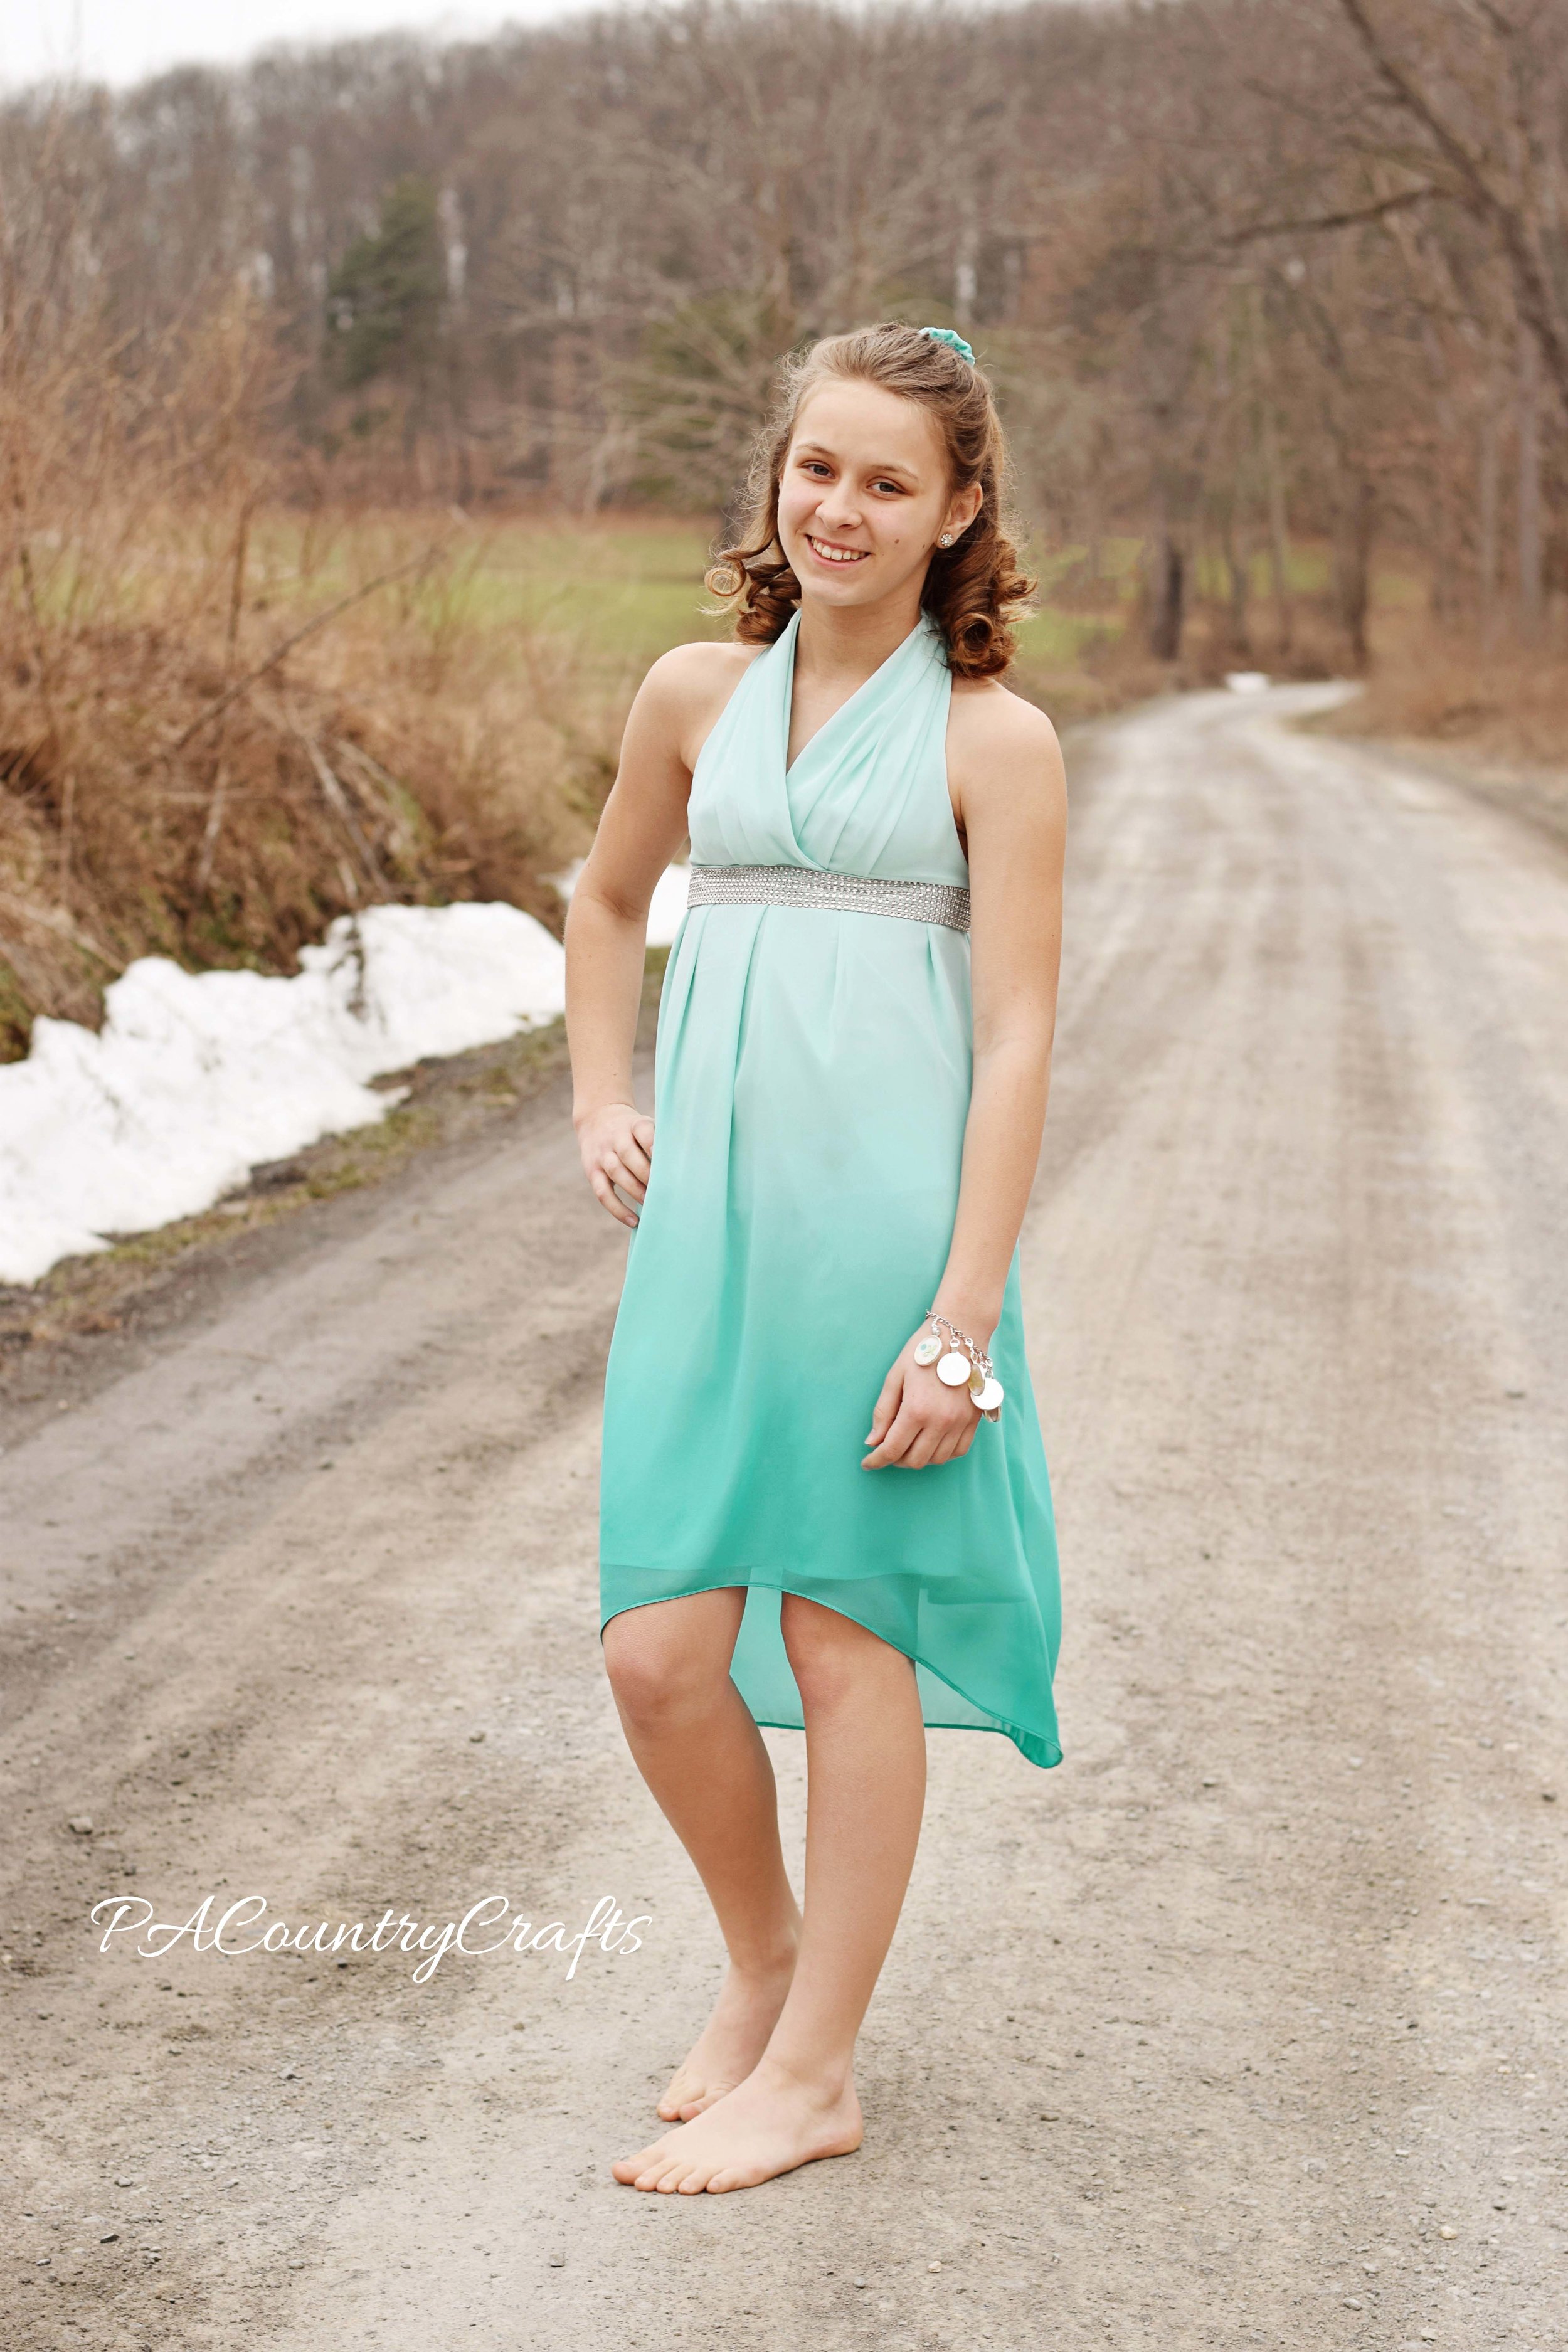
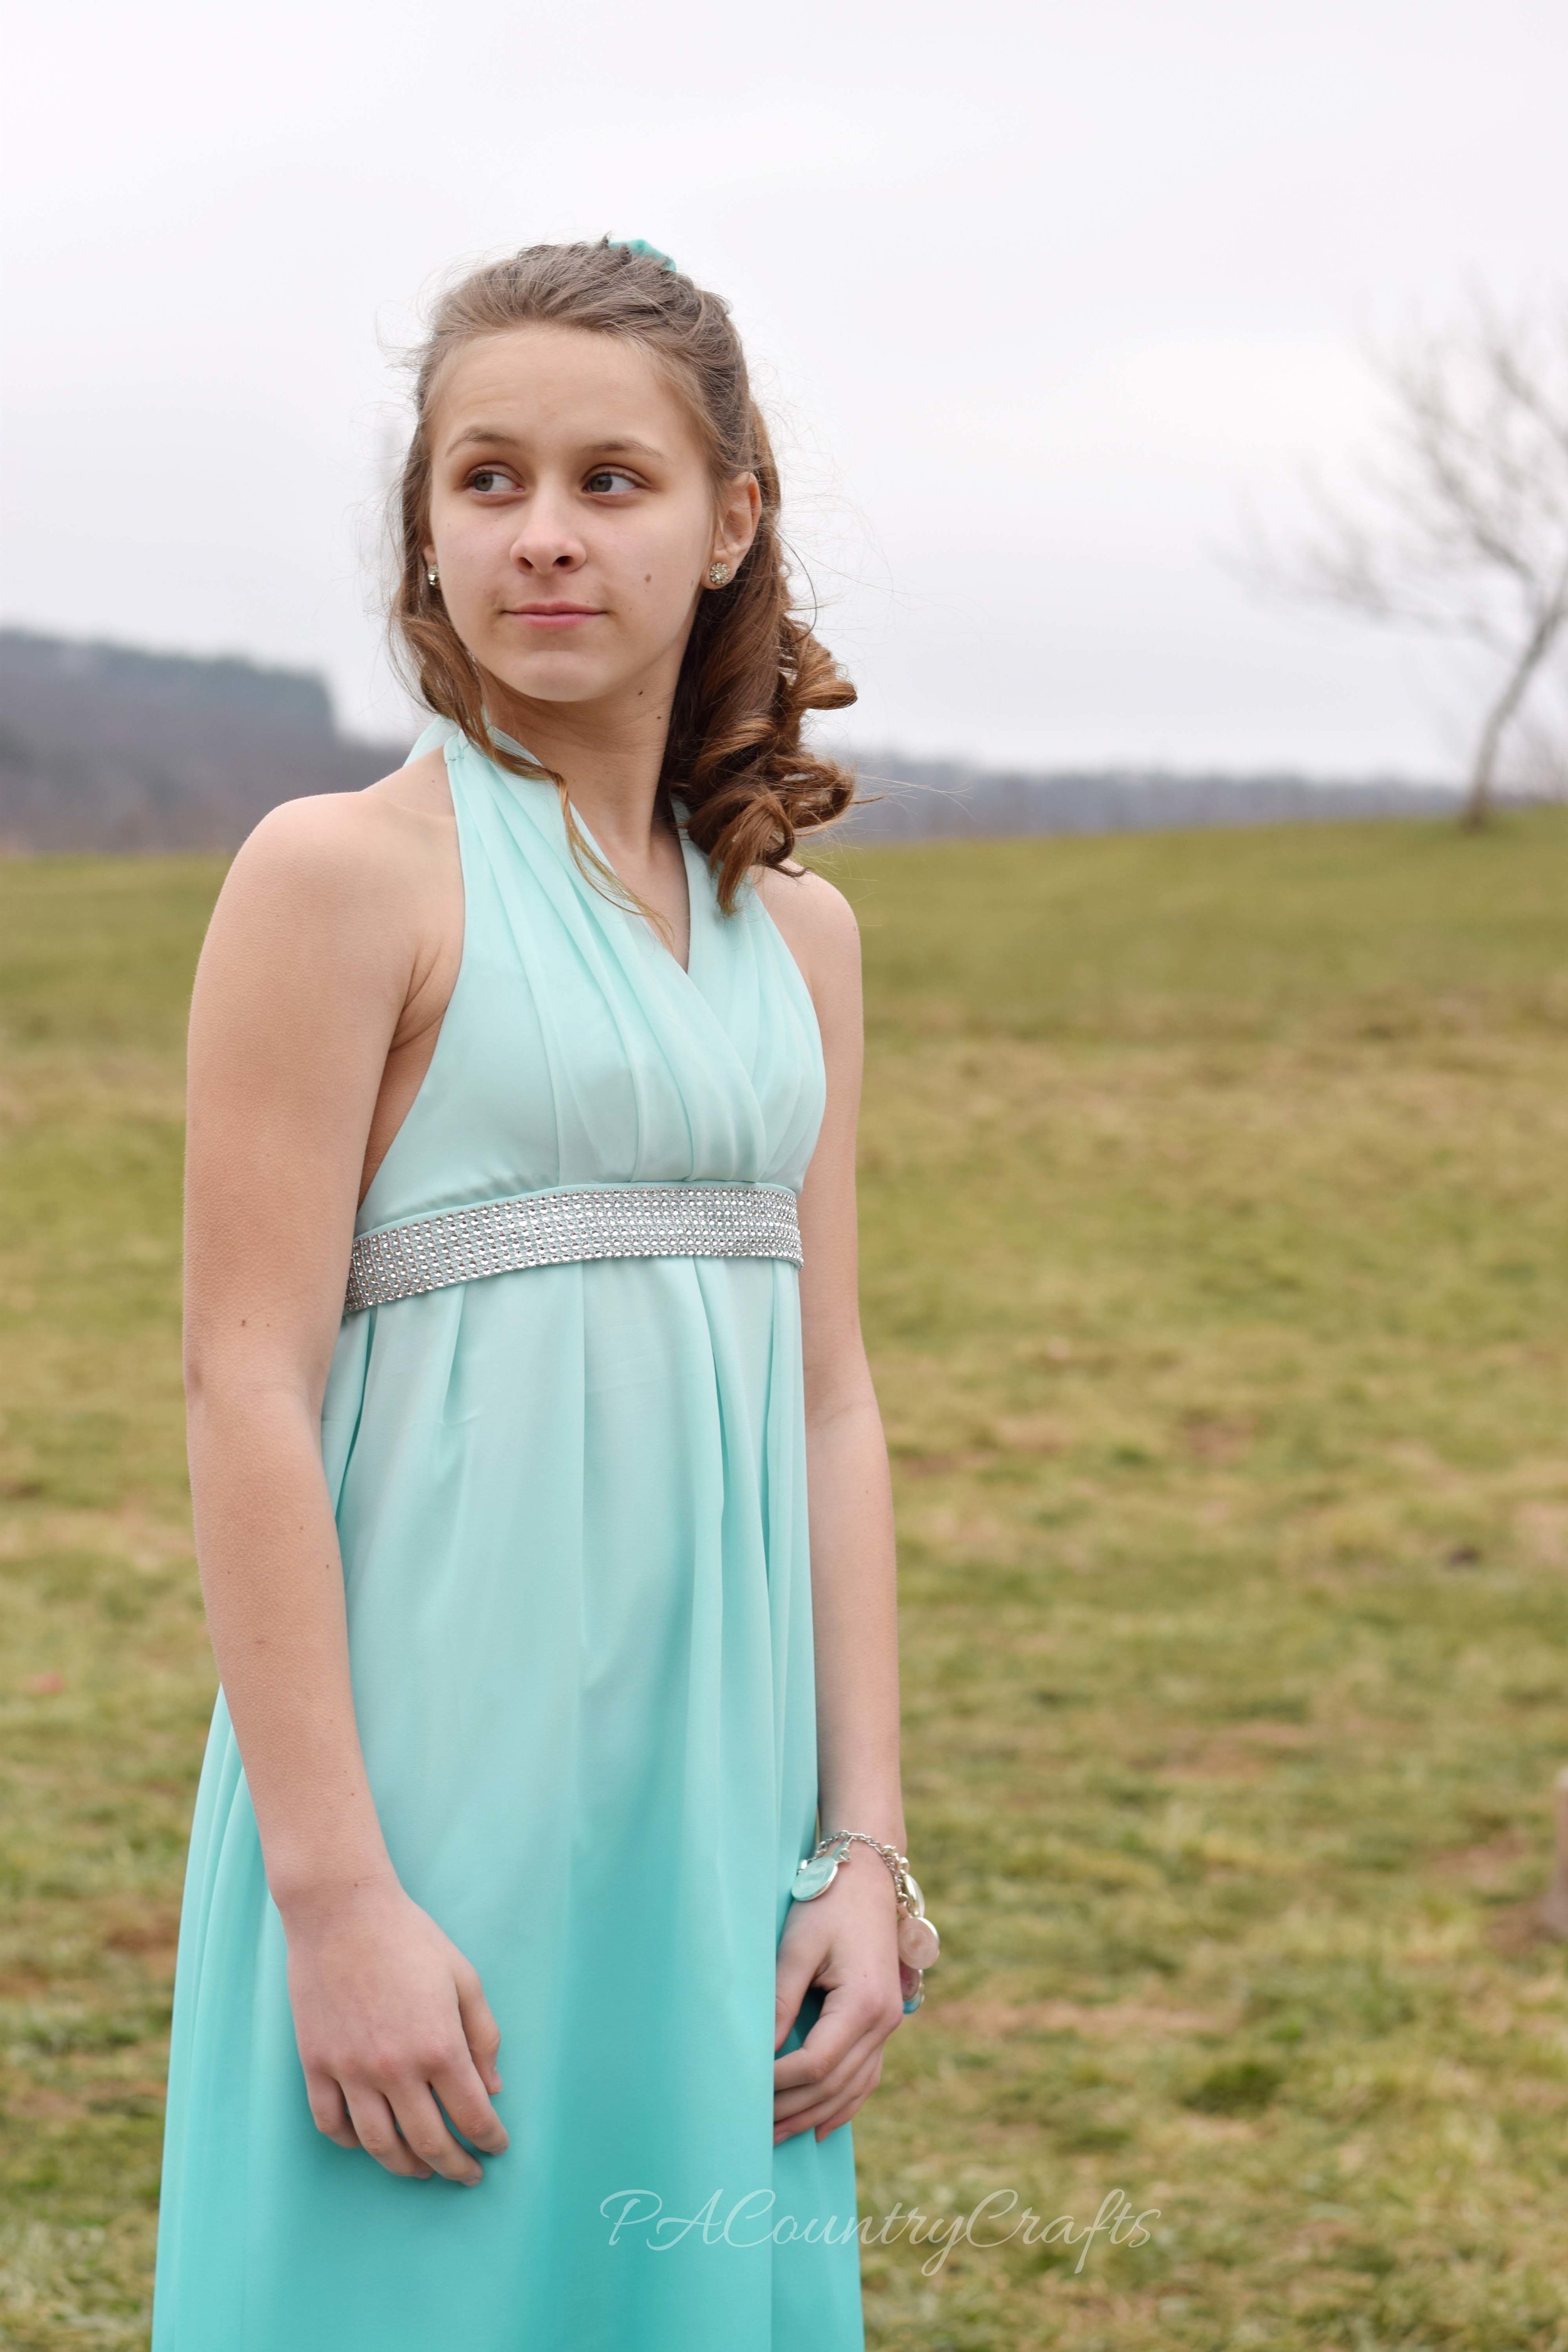
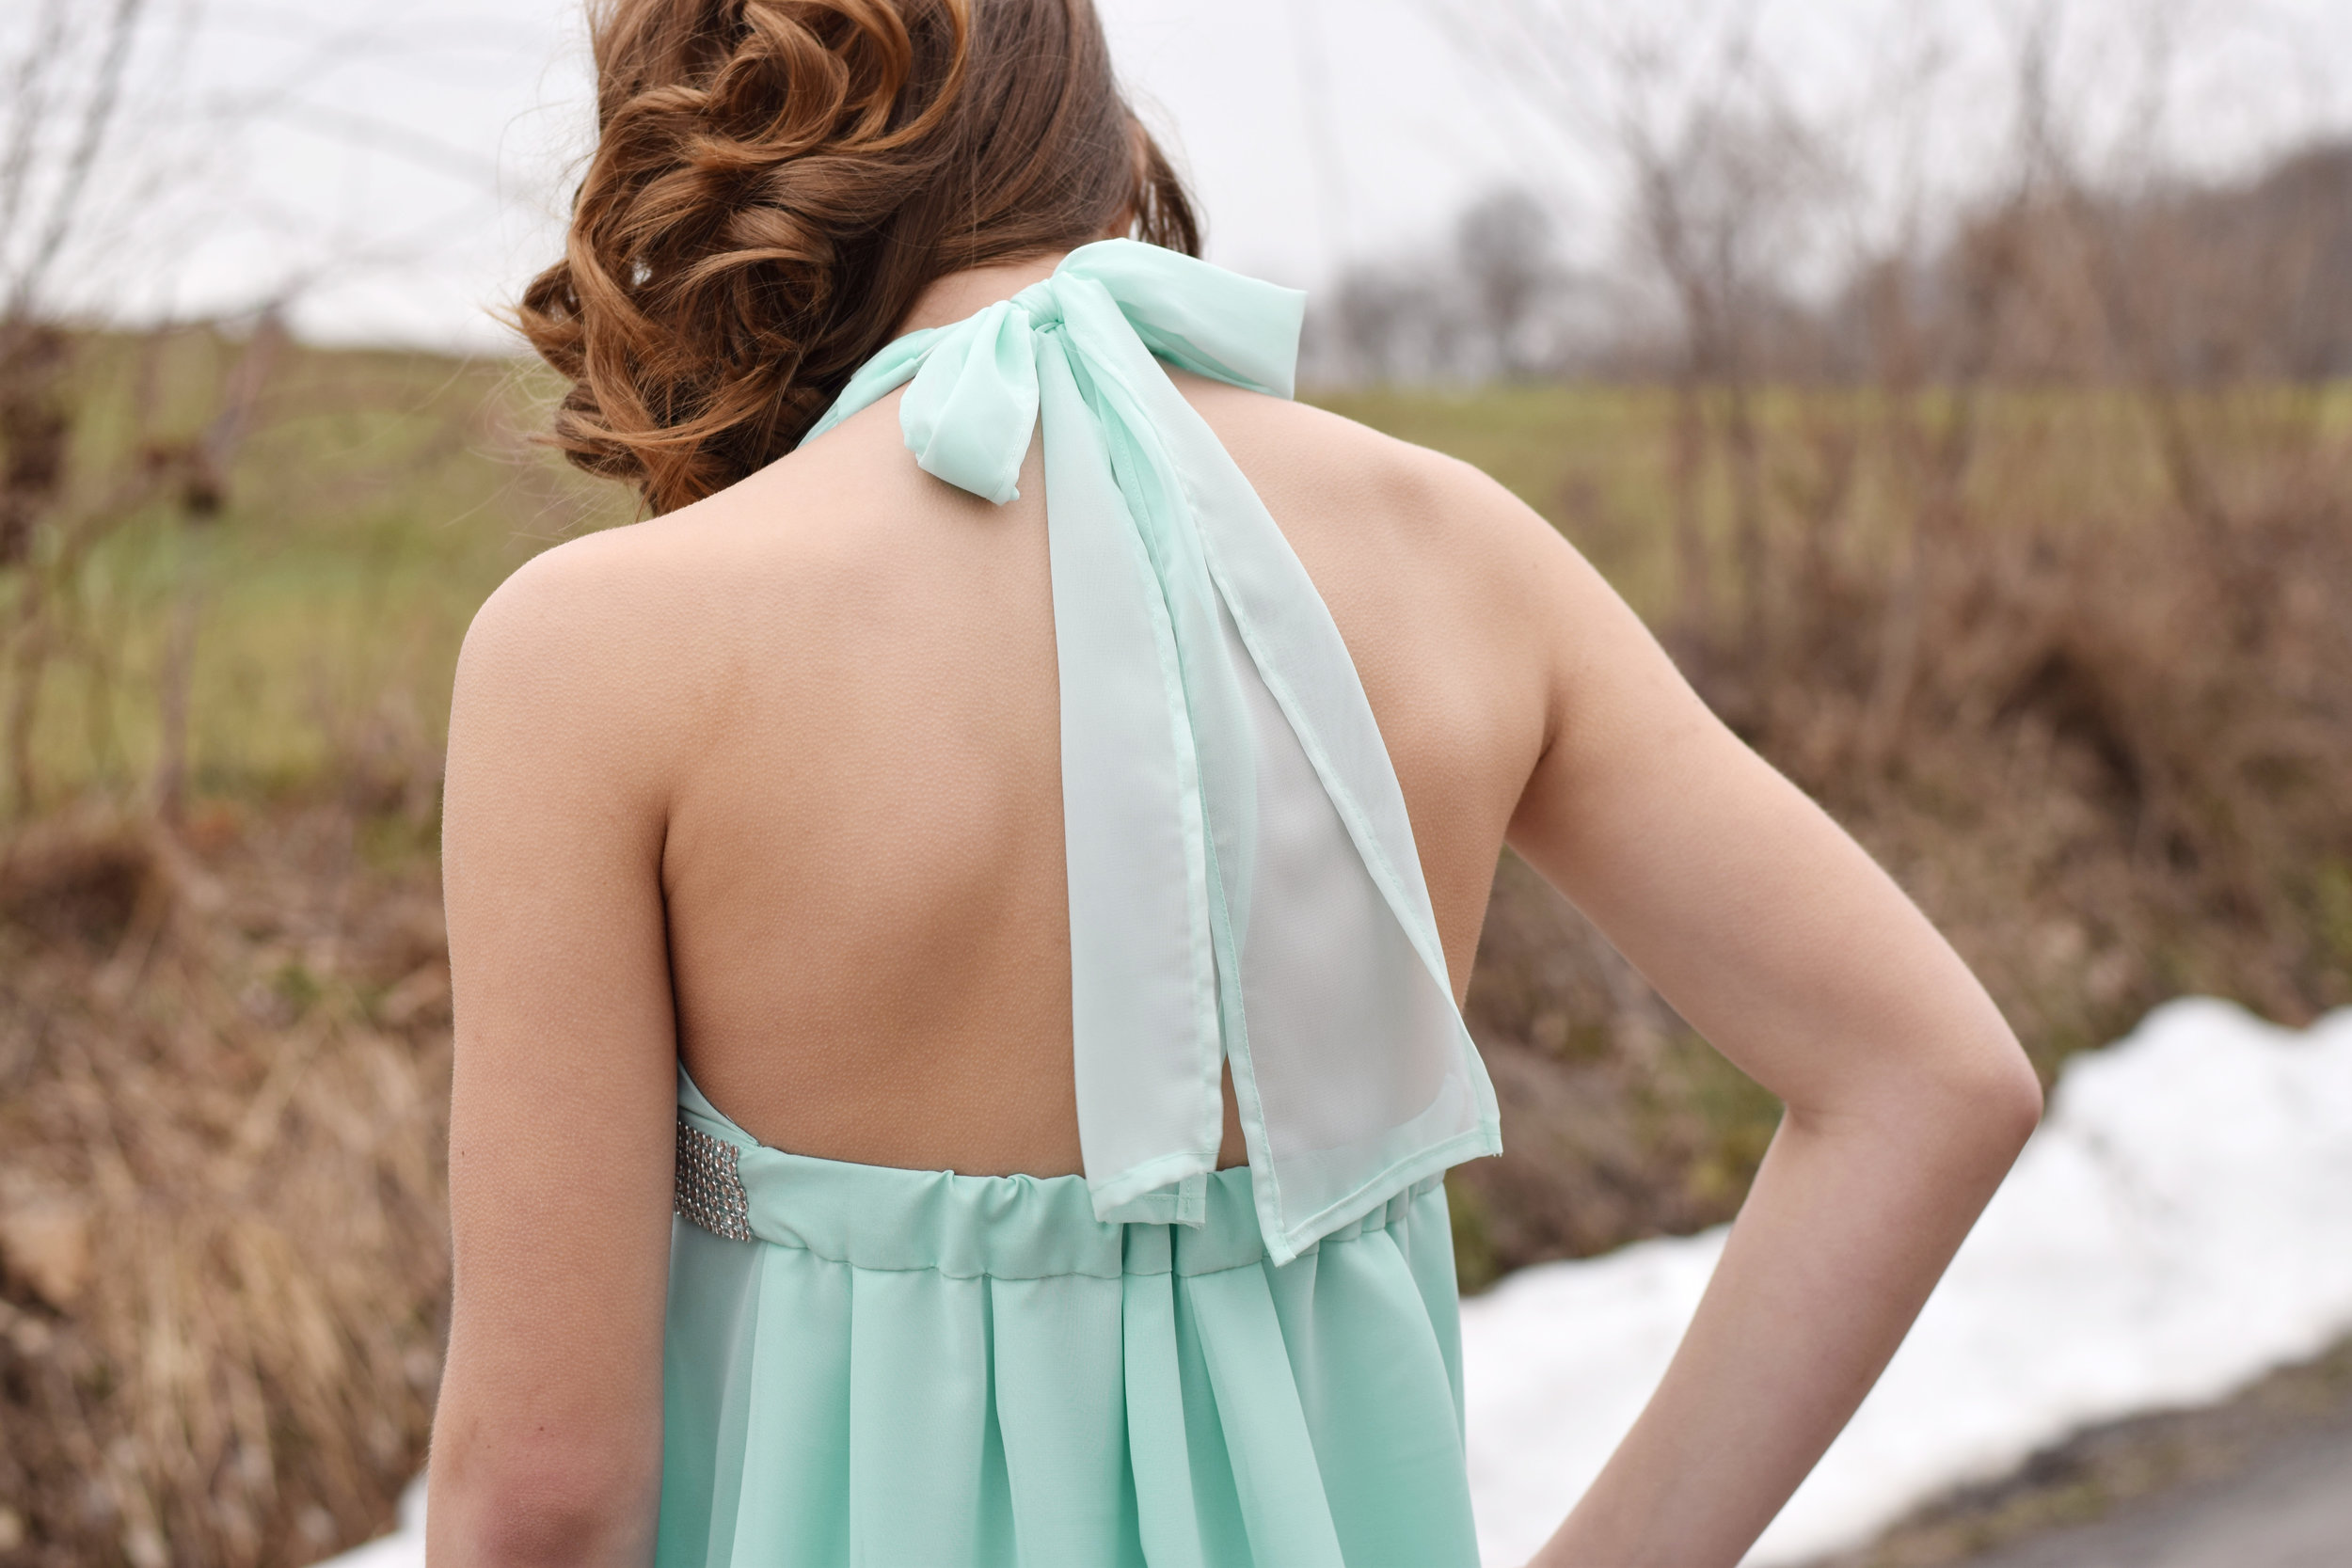
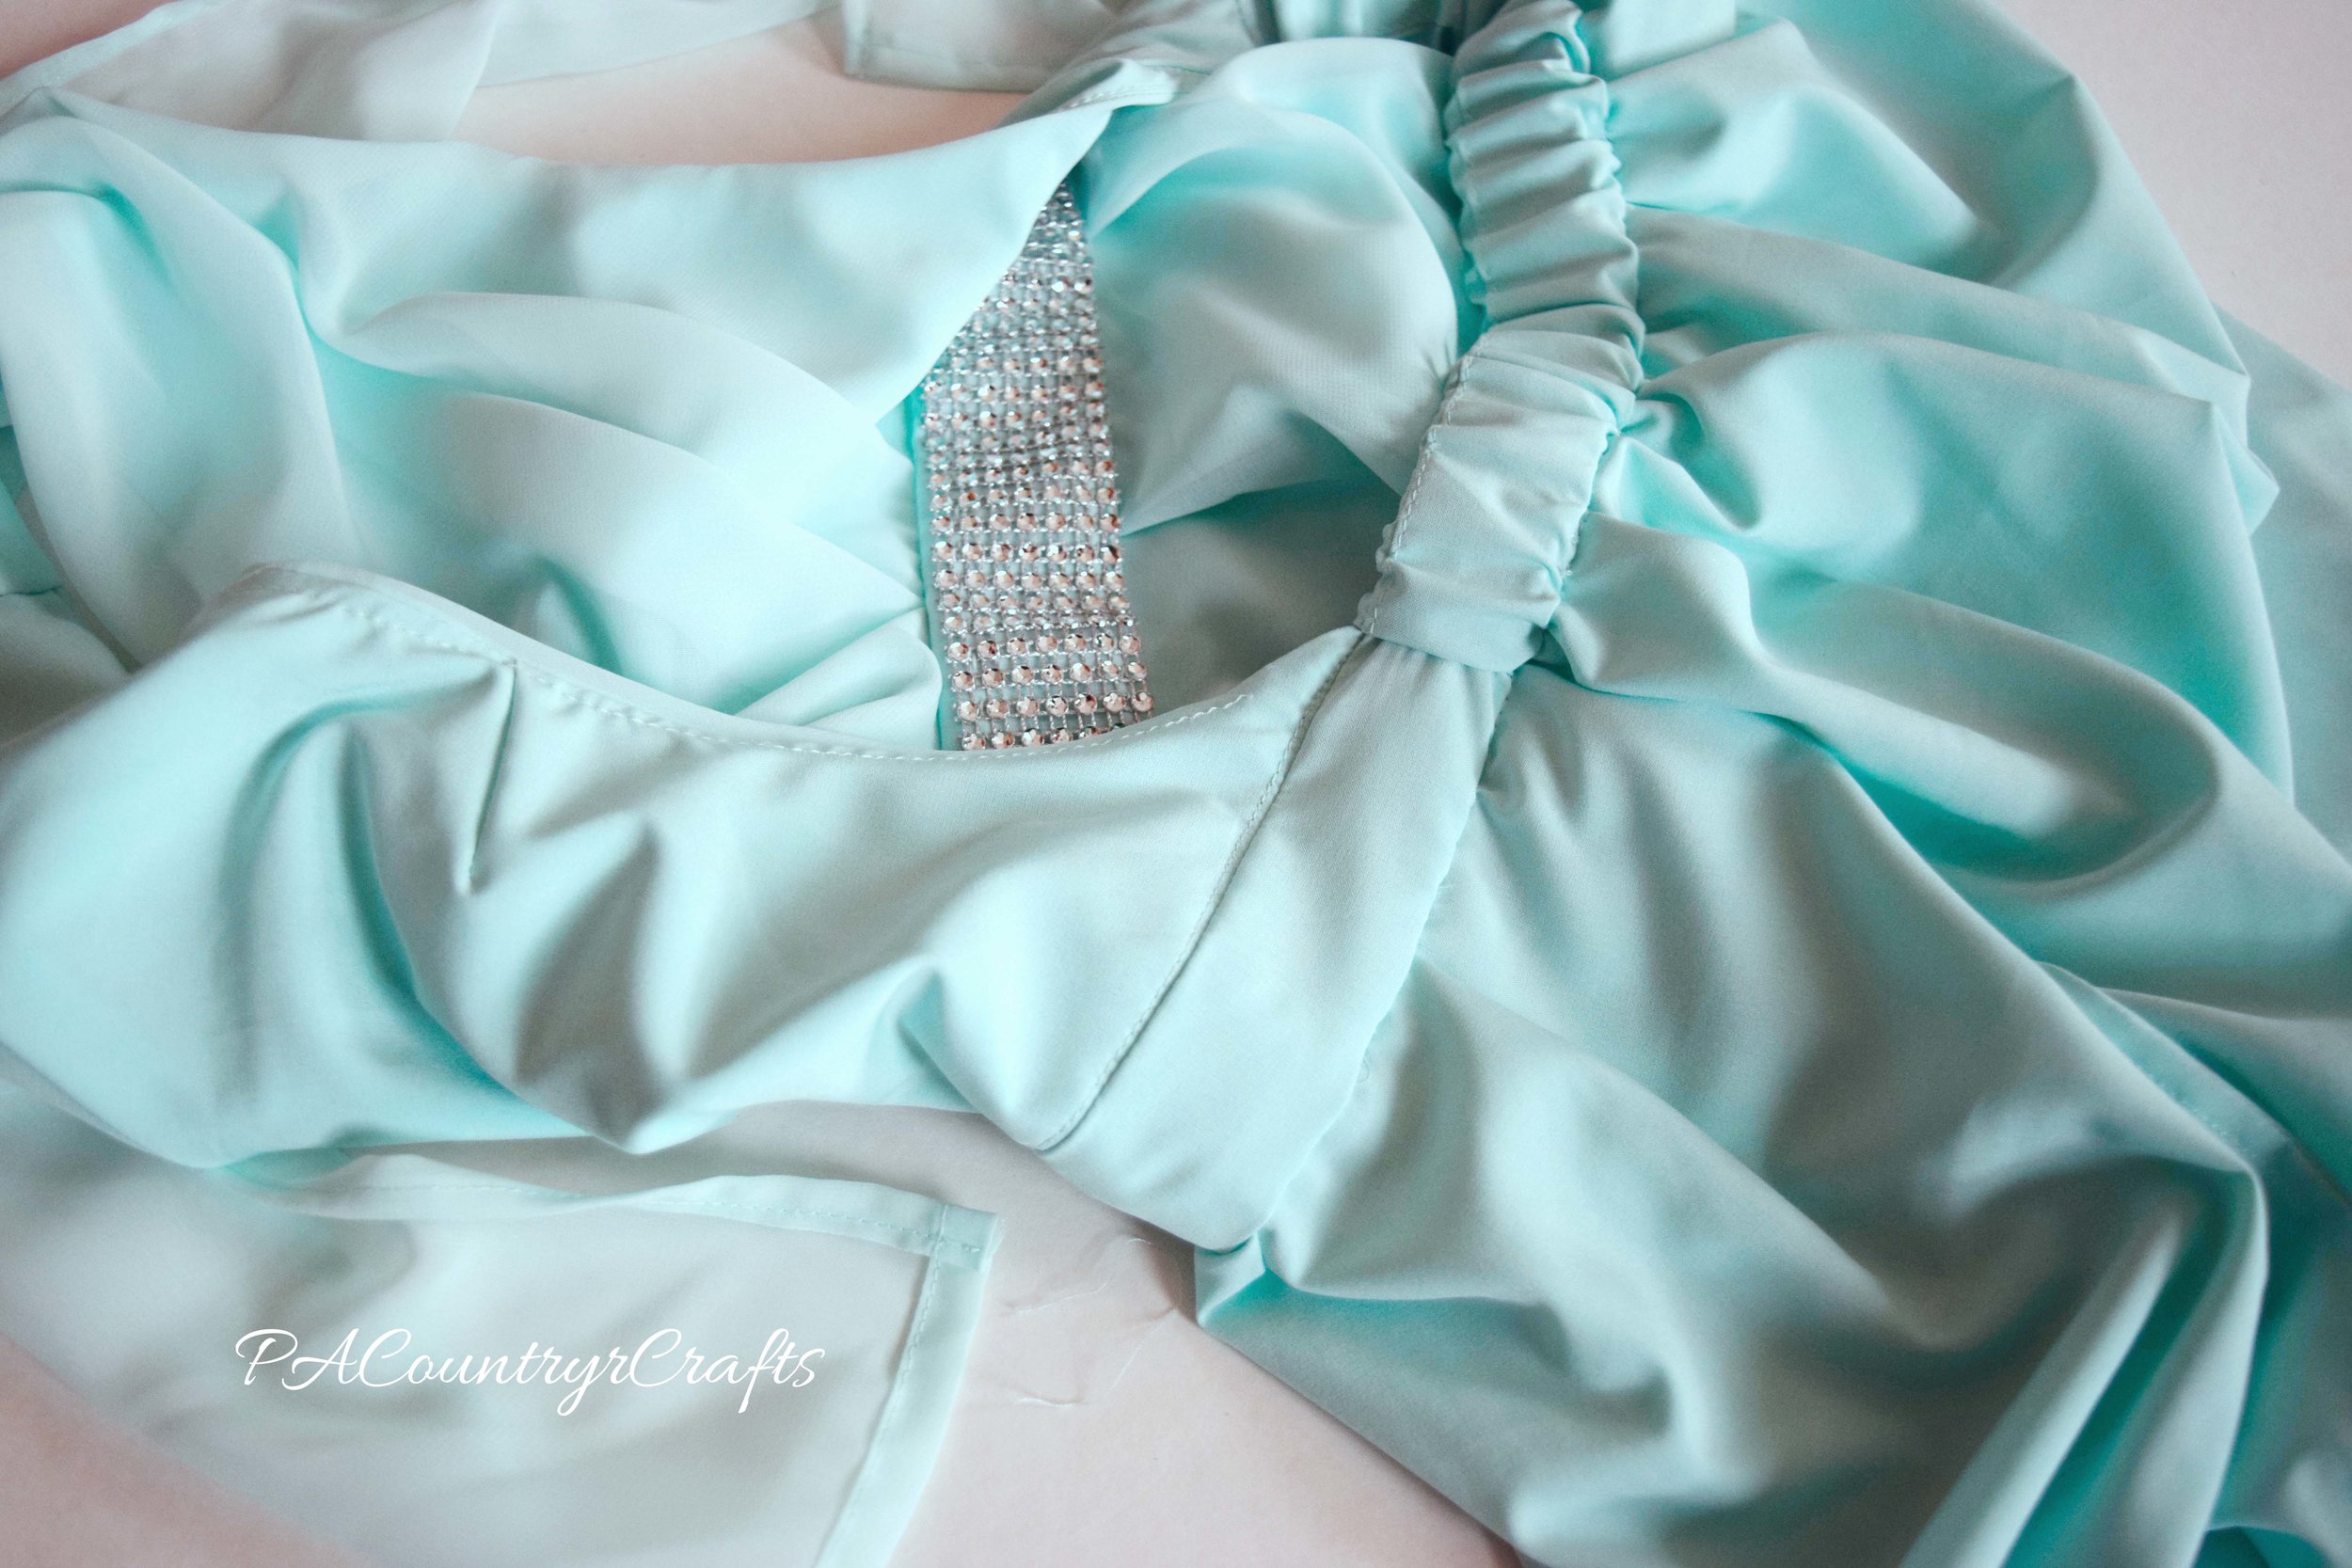
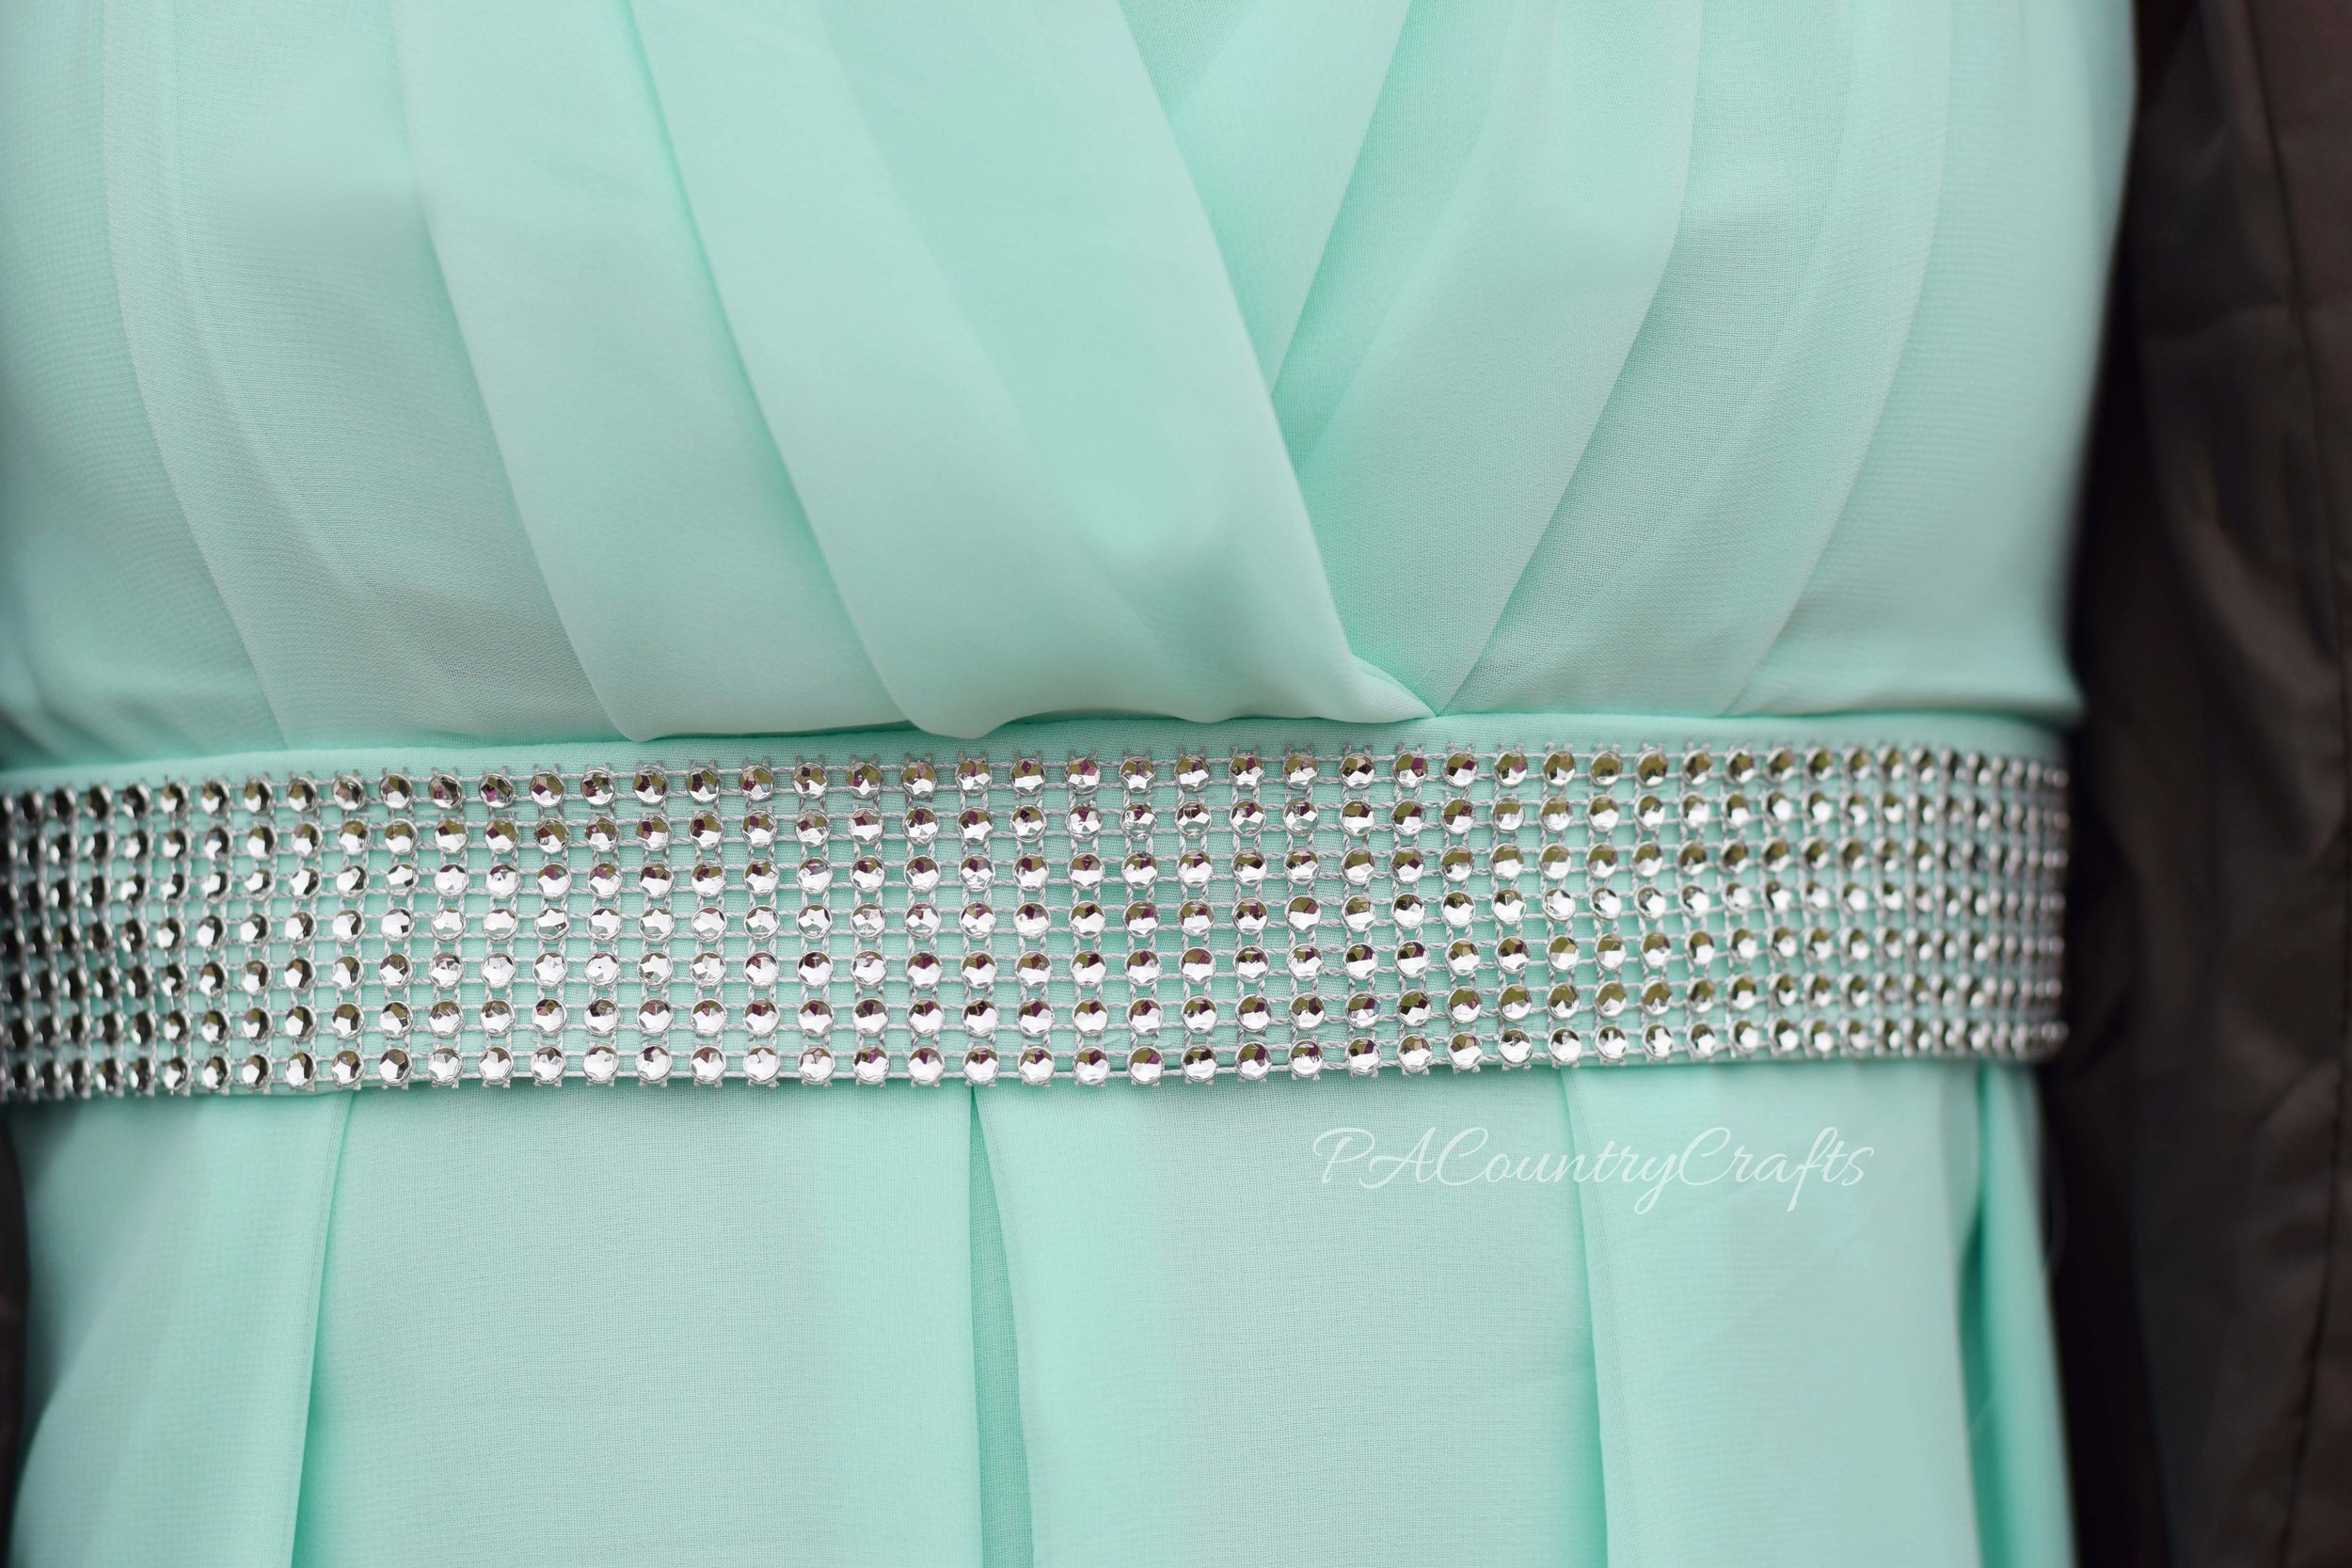
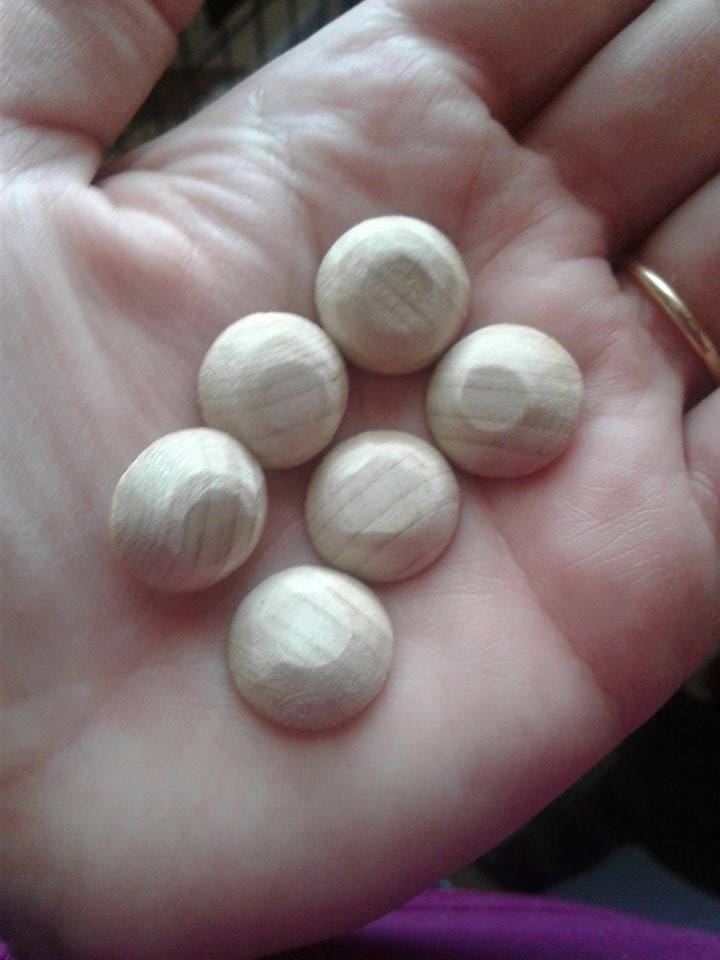
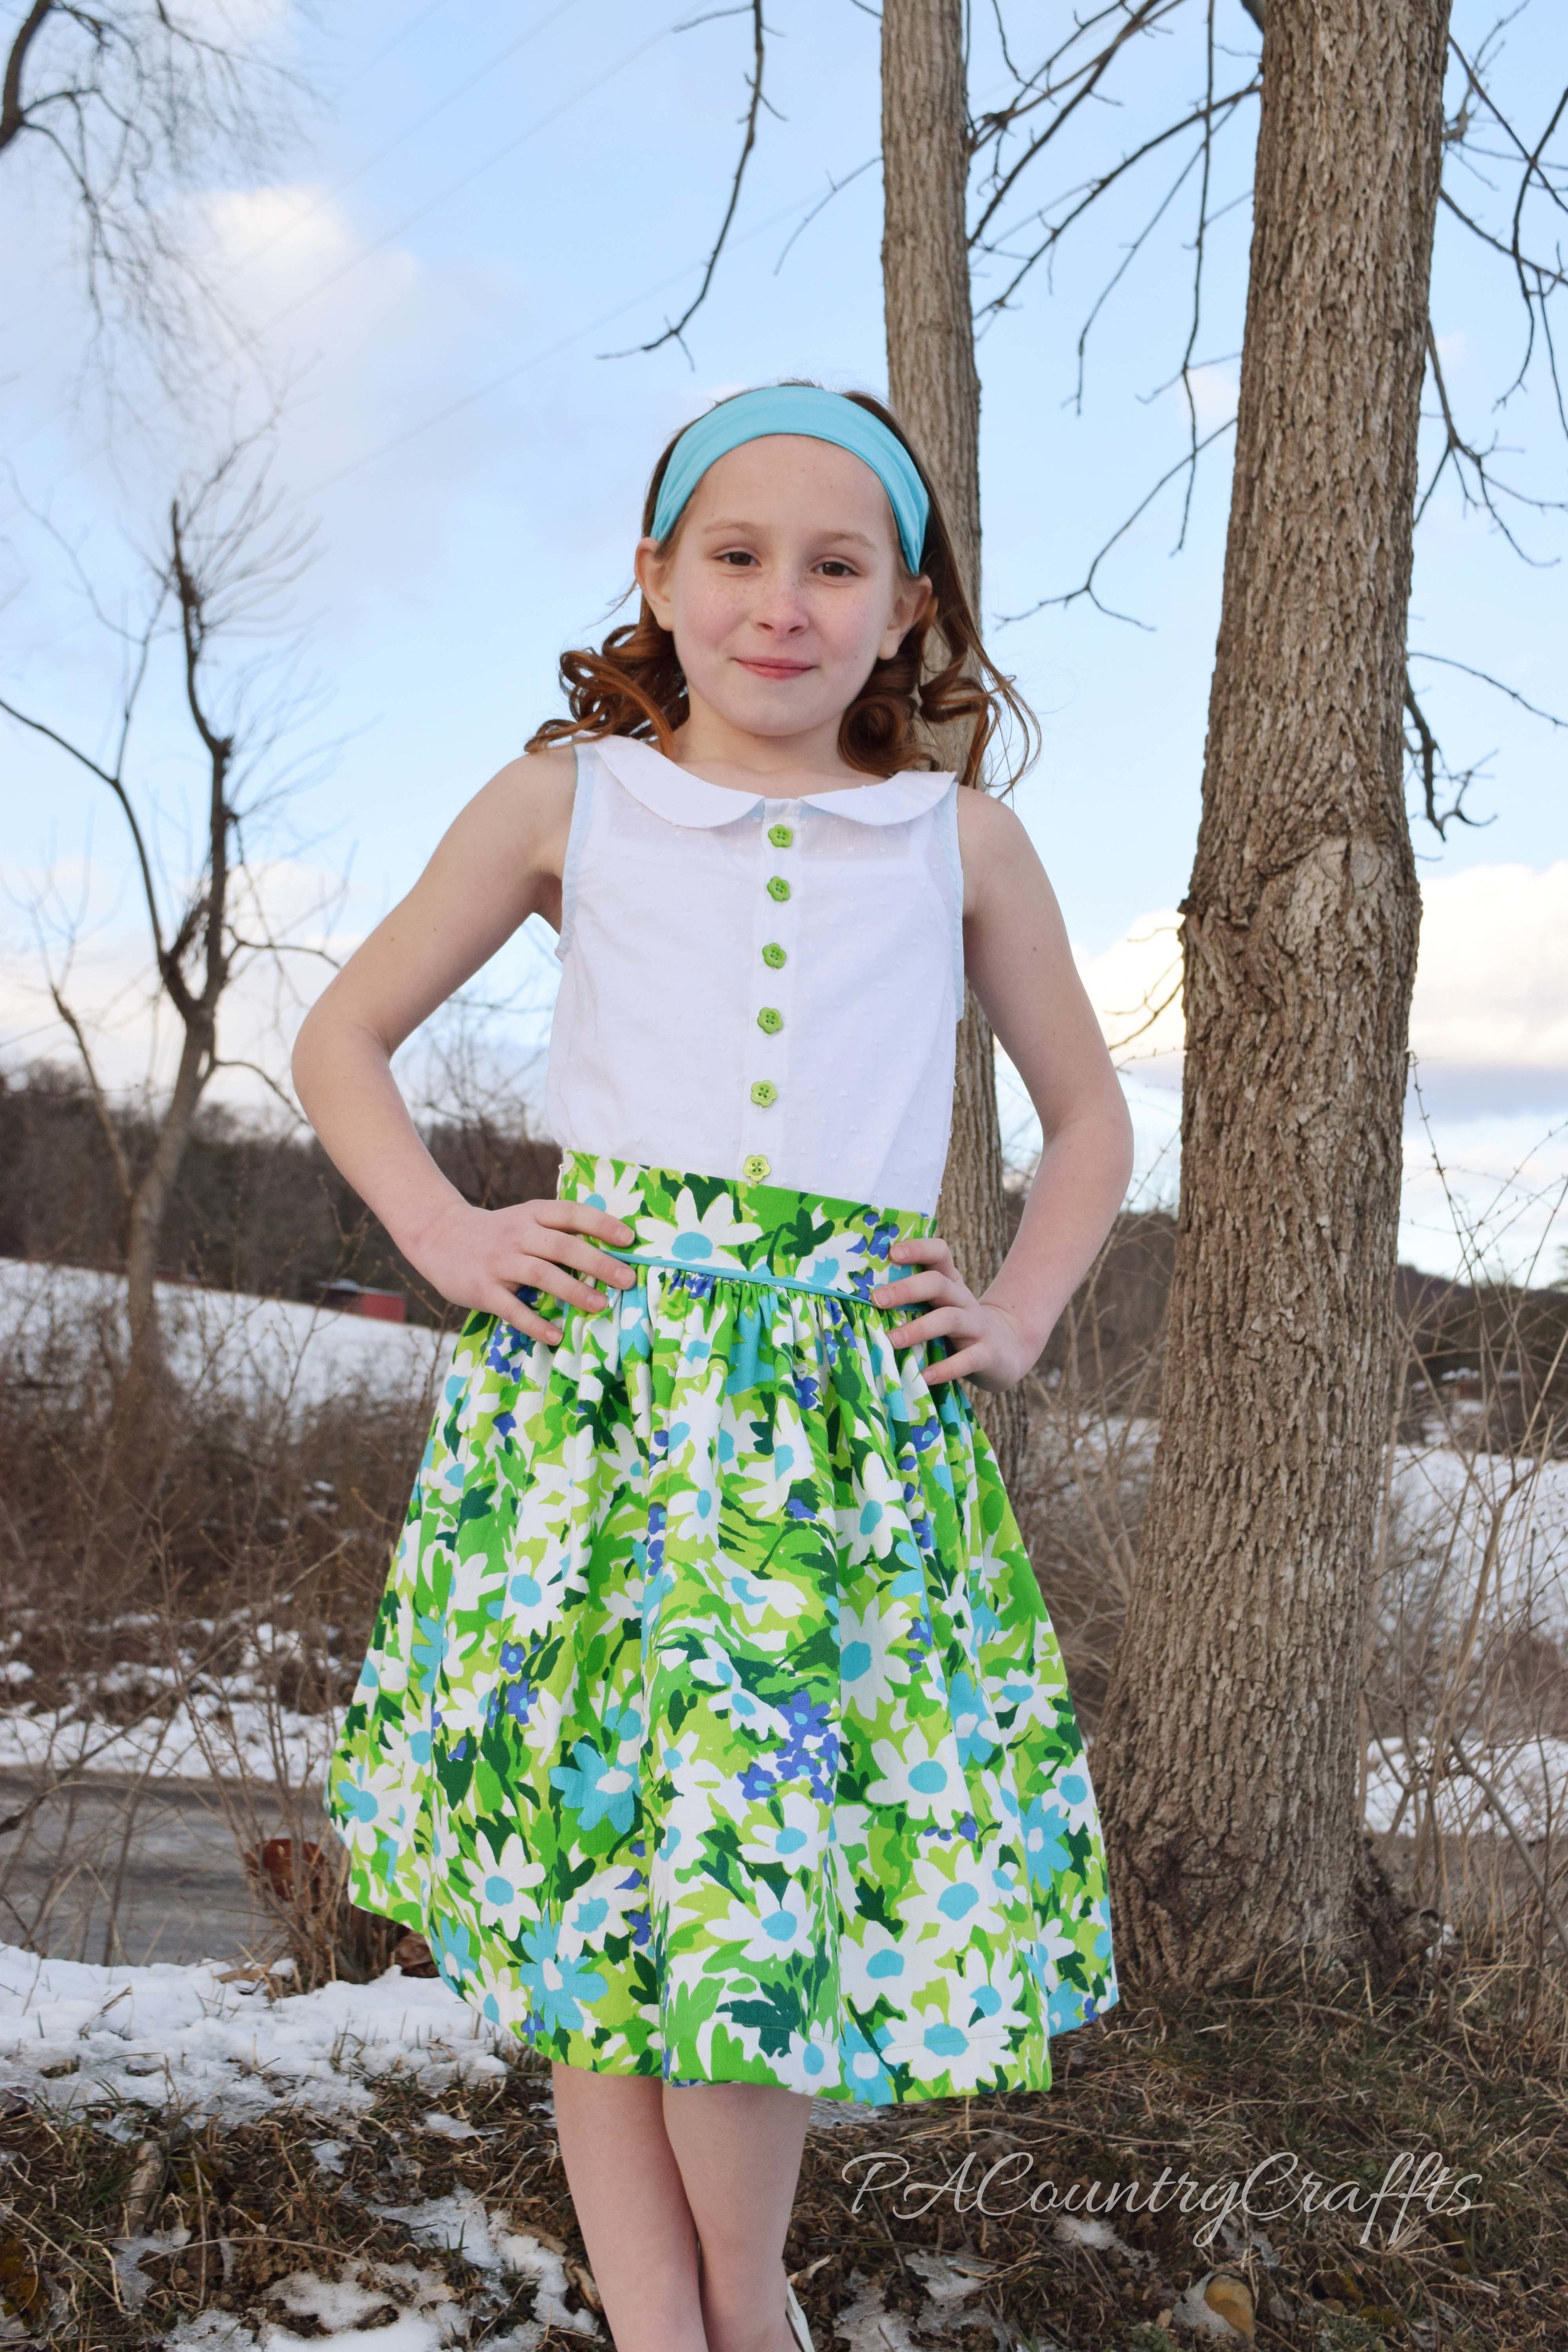
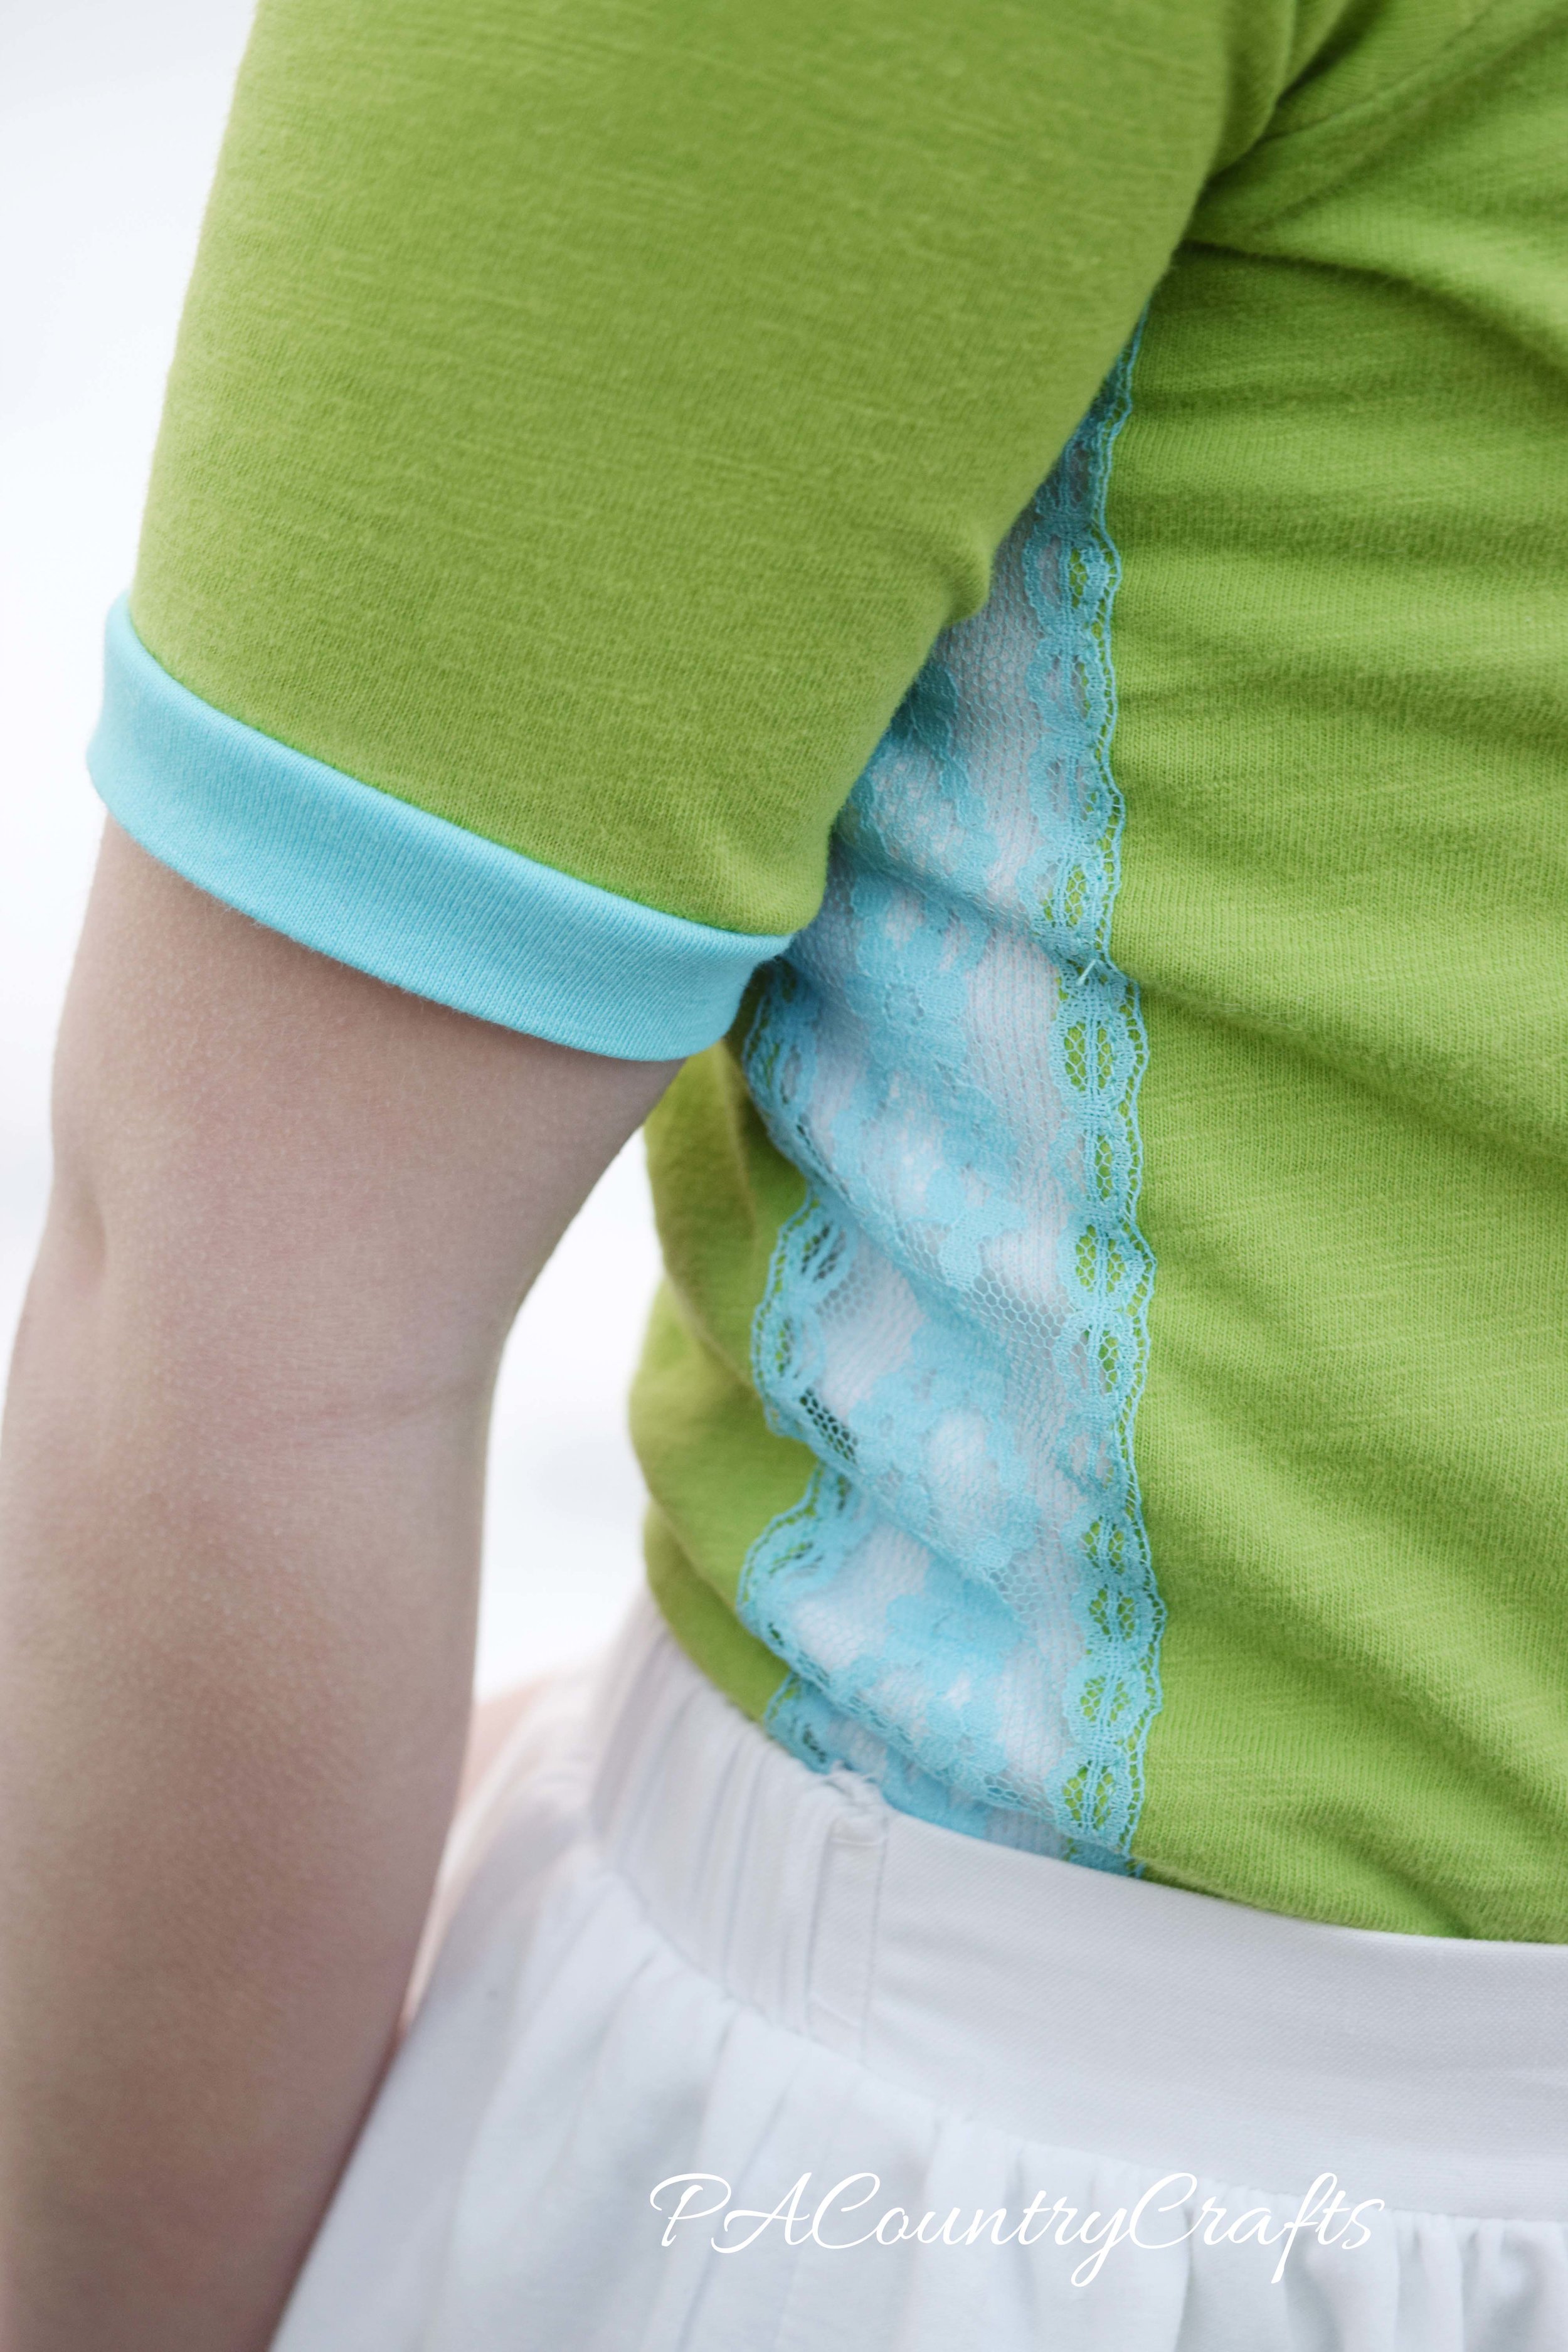
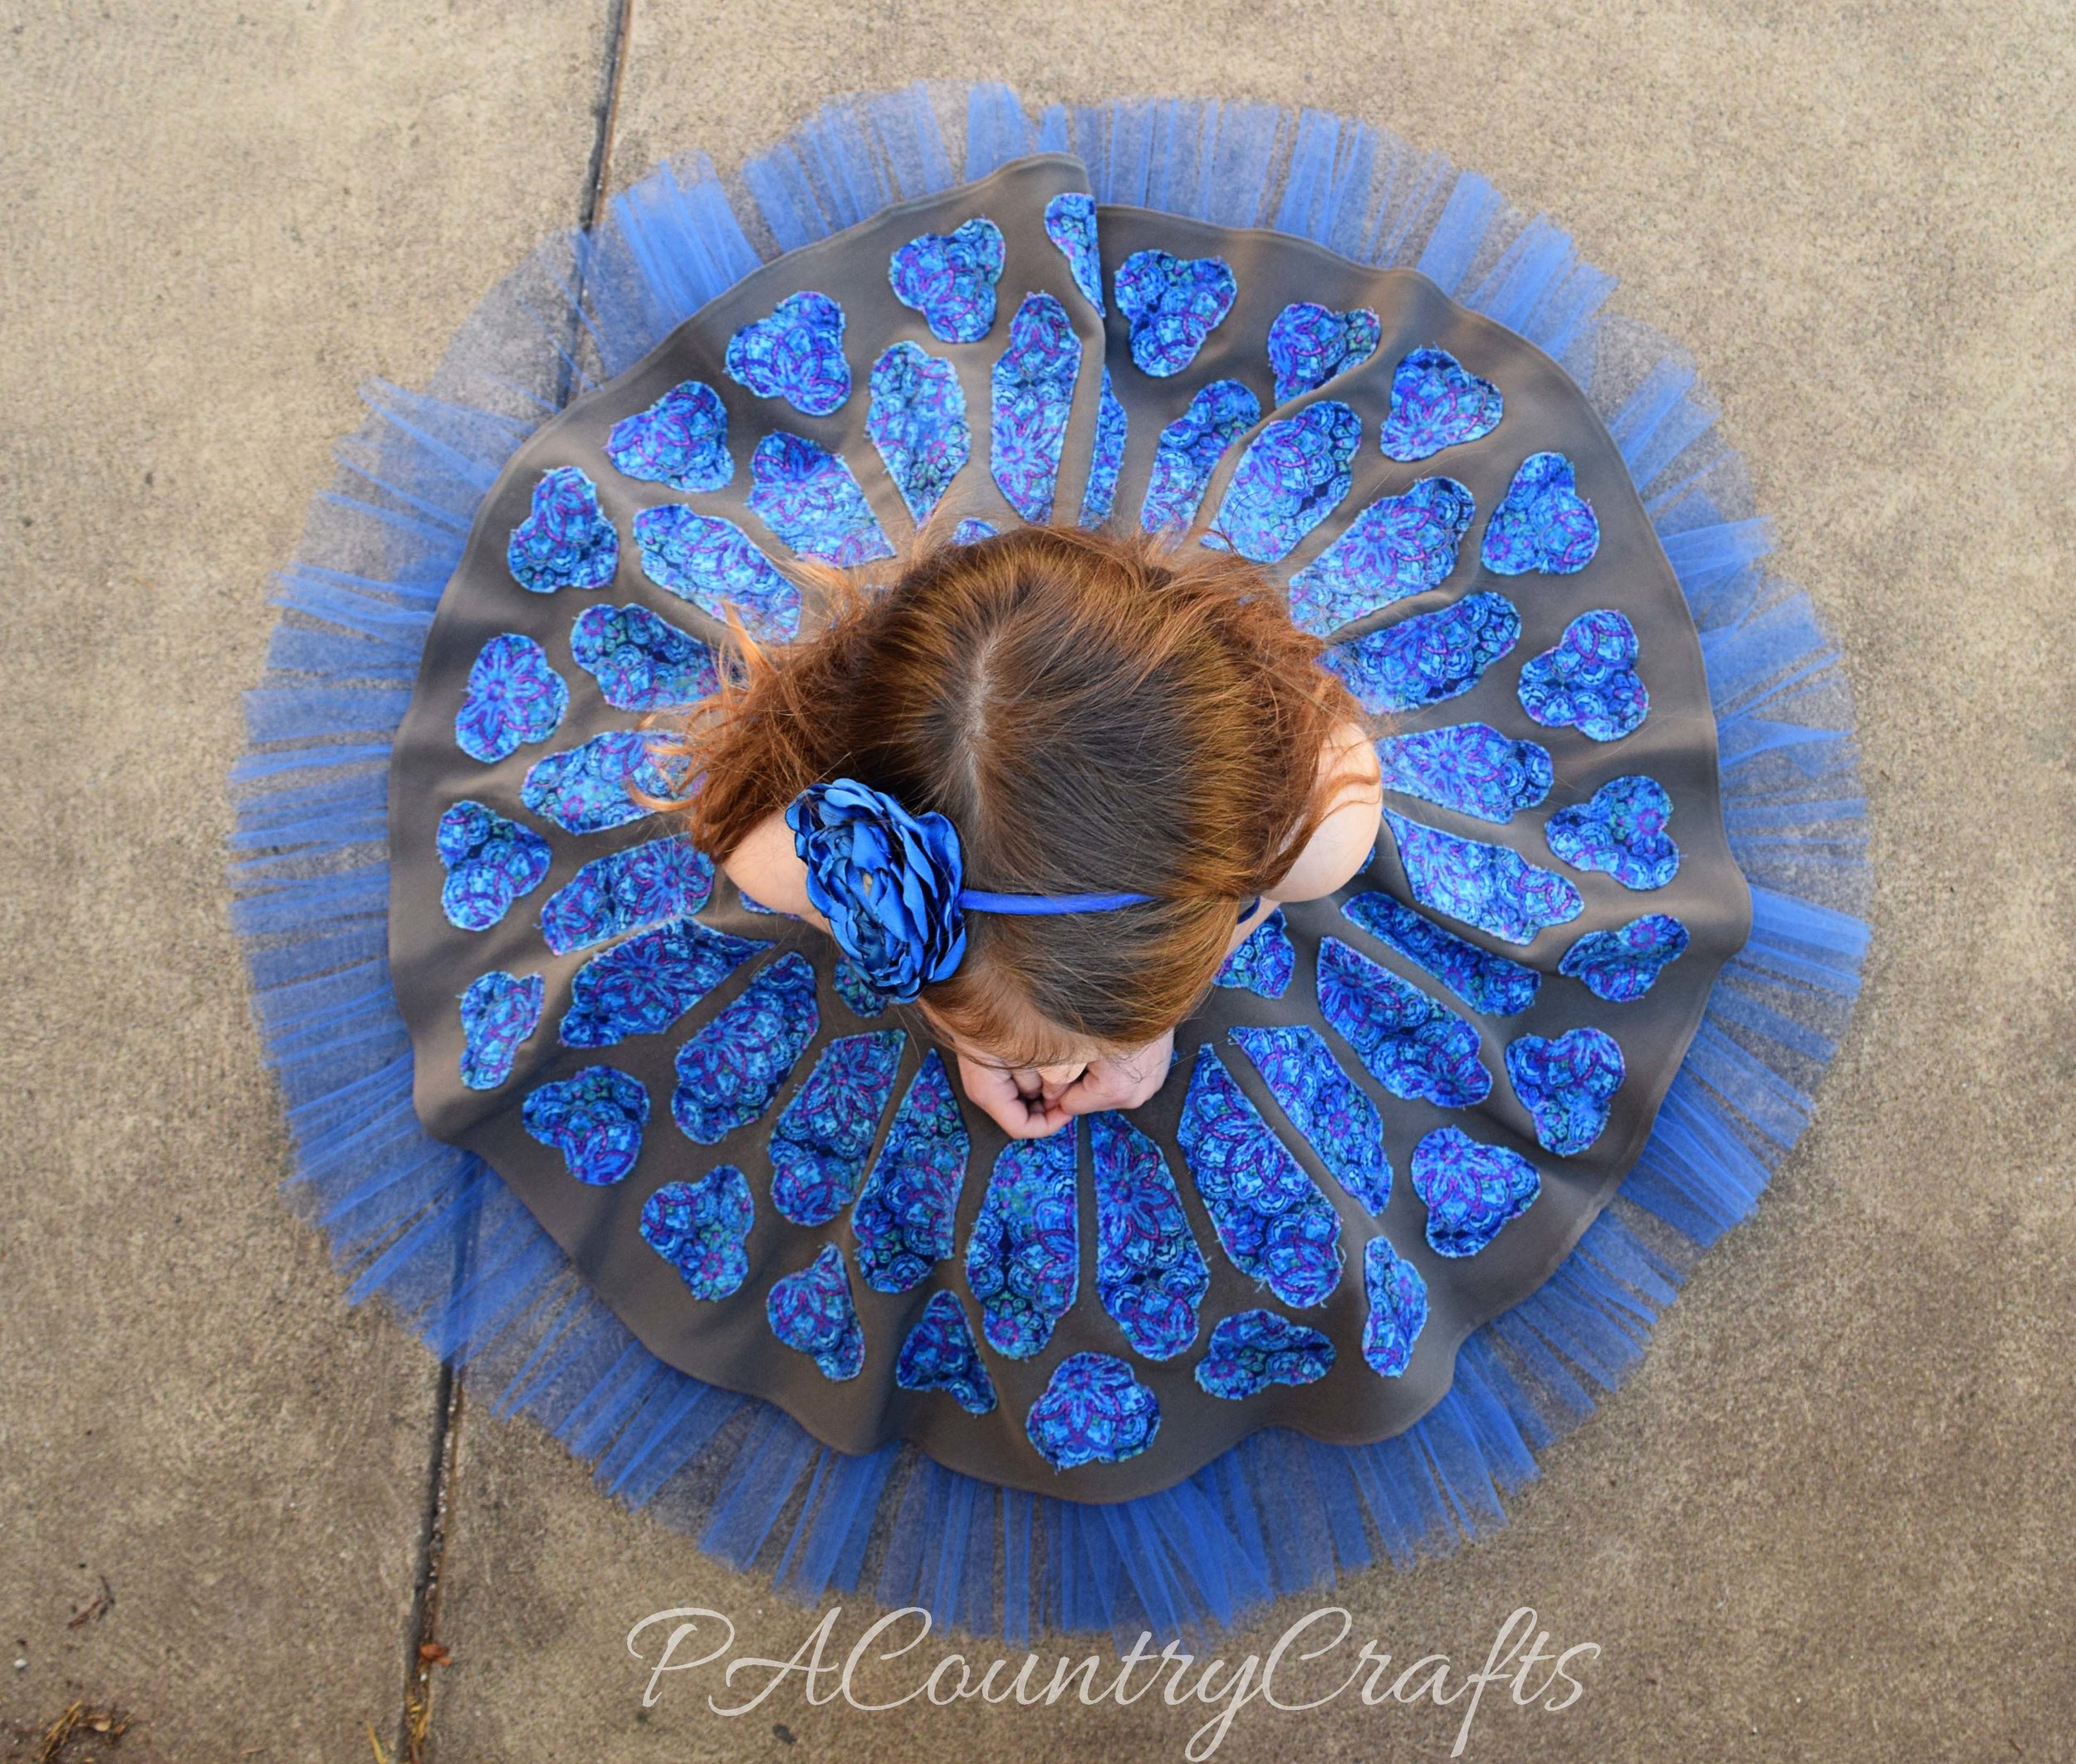
She chose this beautiful aqua/teal ombre chiffon from Joann's and the lining is a soft aqua rayon. She requested a high-low hem, but she didn't want a circle skirt. This dress felt like a final exam because it combined so many sewing skills. The top is a combination of several of my own tutorials- HERE, HERE, and HERE.  The pleated chiffon overlay was really tricky, but it softens the look of the bodice. The rhinestone ribbon was hand-stitched over the waistband to break things up a bit and match the bracelet (more on that later). Since the top was pleated, I decided to pleat the skirt, too. I used a french seam on one side and even french seamed the lining for bonus points. I actually didn't use my serger at all on this project. Everything was done the hard way, but if you see how smooth and neat the inside is, it is definitely worth it! The overlay has a narrow hem that took forever, but everything had to be done right to keep this chiffon light and flowy. I even redid my french seam to make it 1/8" finished and that piece I trimmed off became a pretty flower hair clip.

chiffon pleated halter dress

chiffon hi low dress

chiffon halter dress

inside-of-dresspleated-chiffon-dressombre halter dresschiffon ruffle flower hair clip

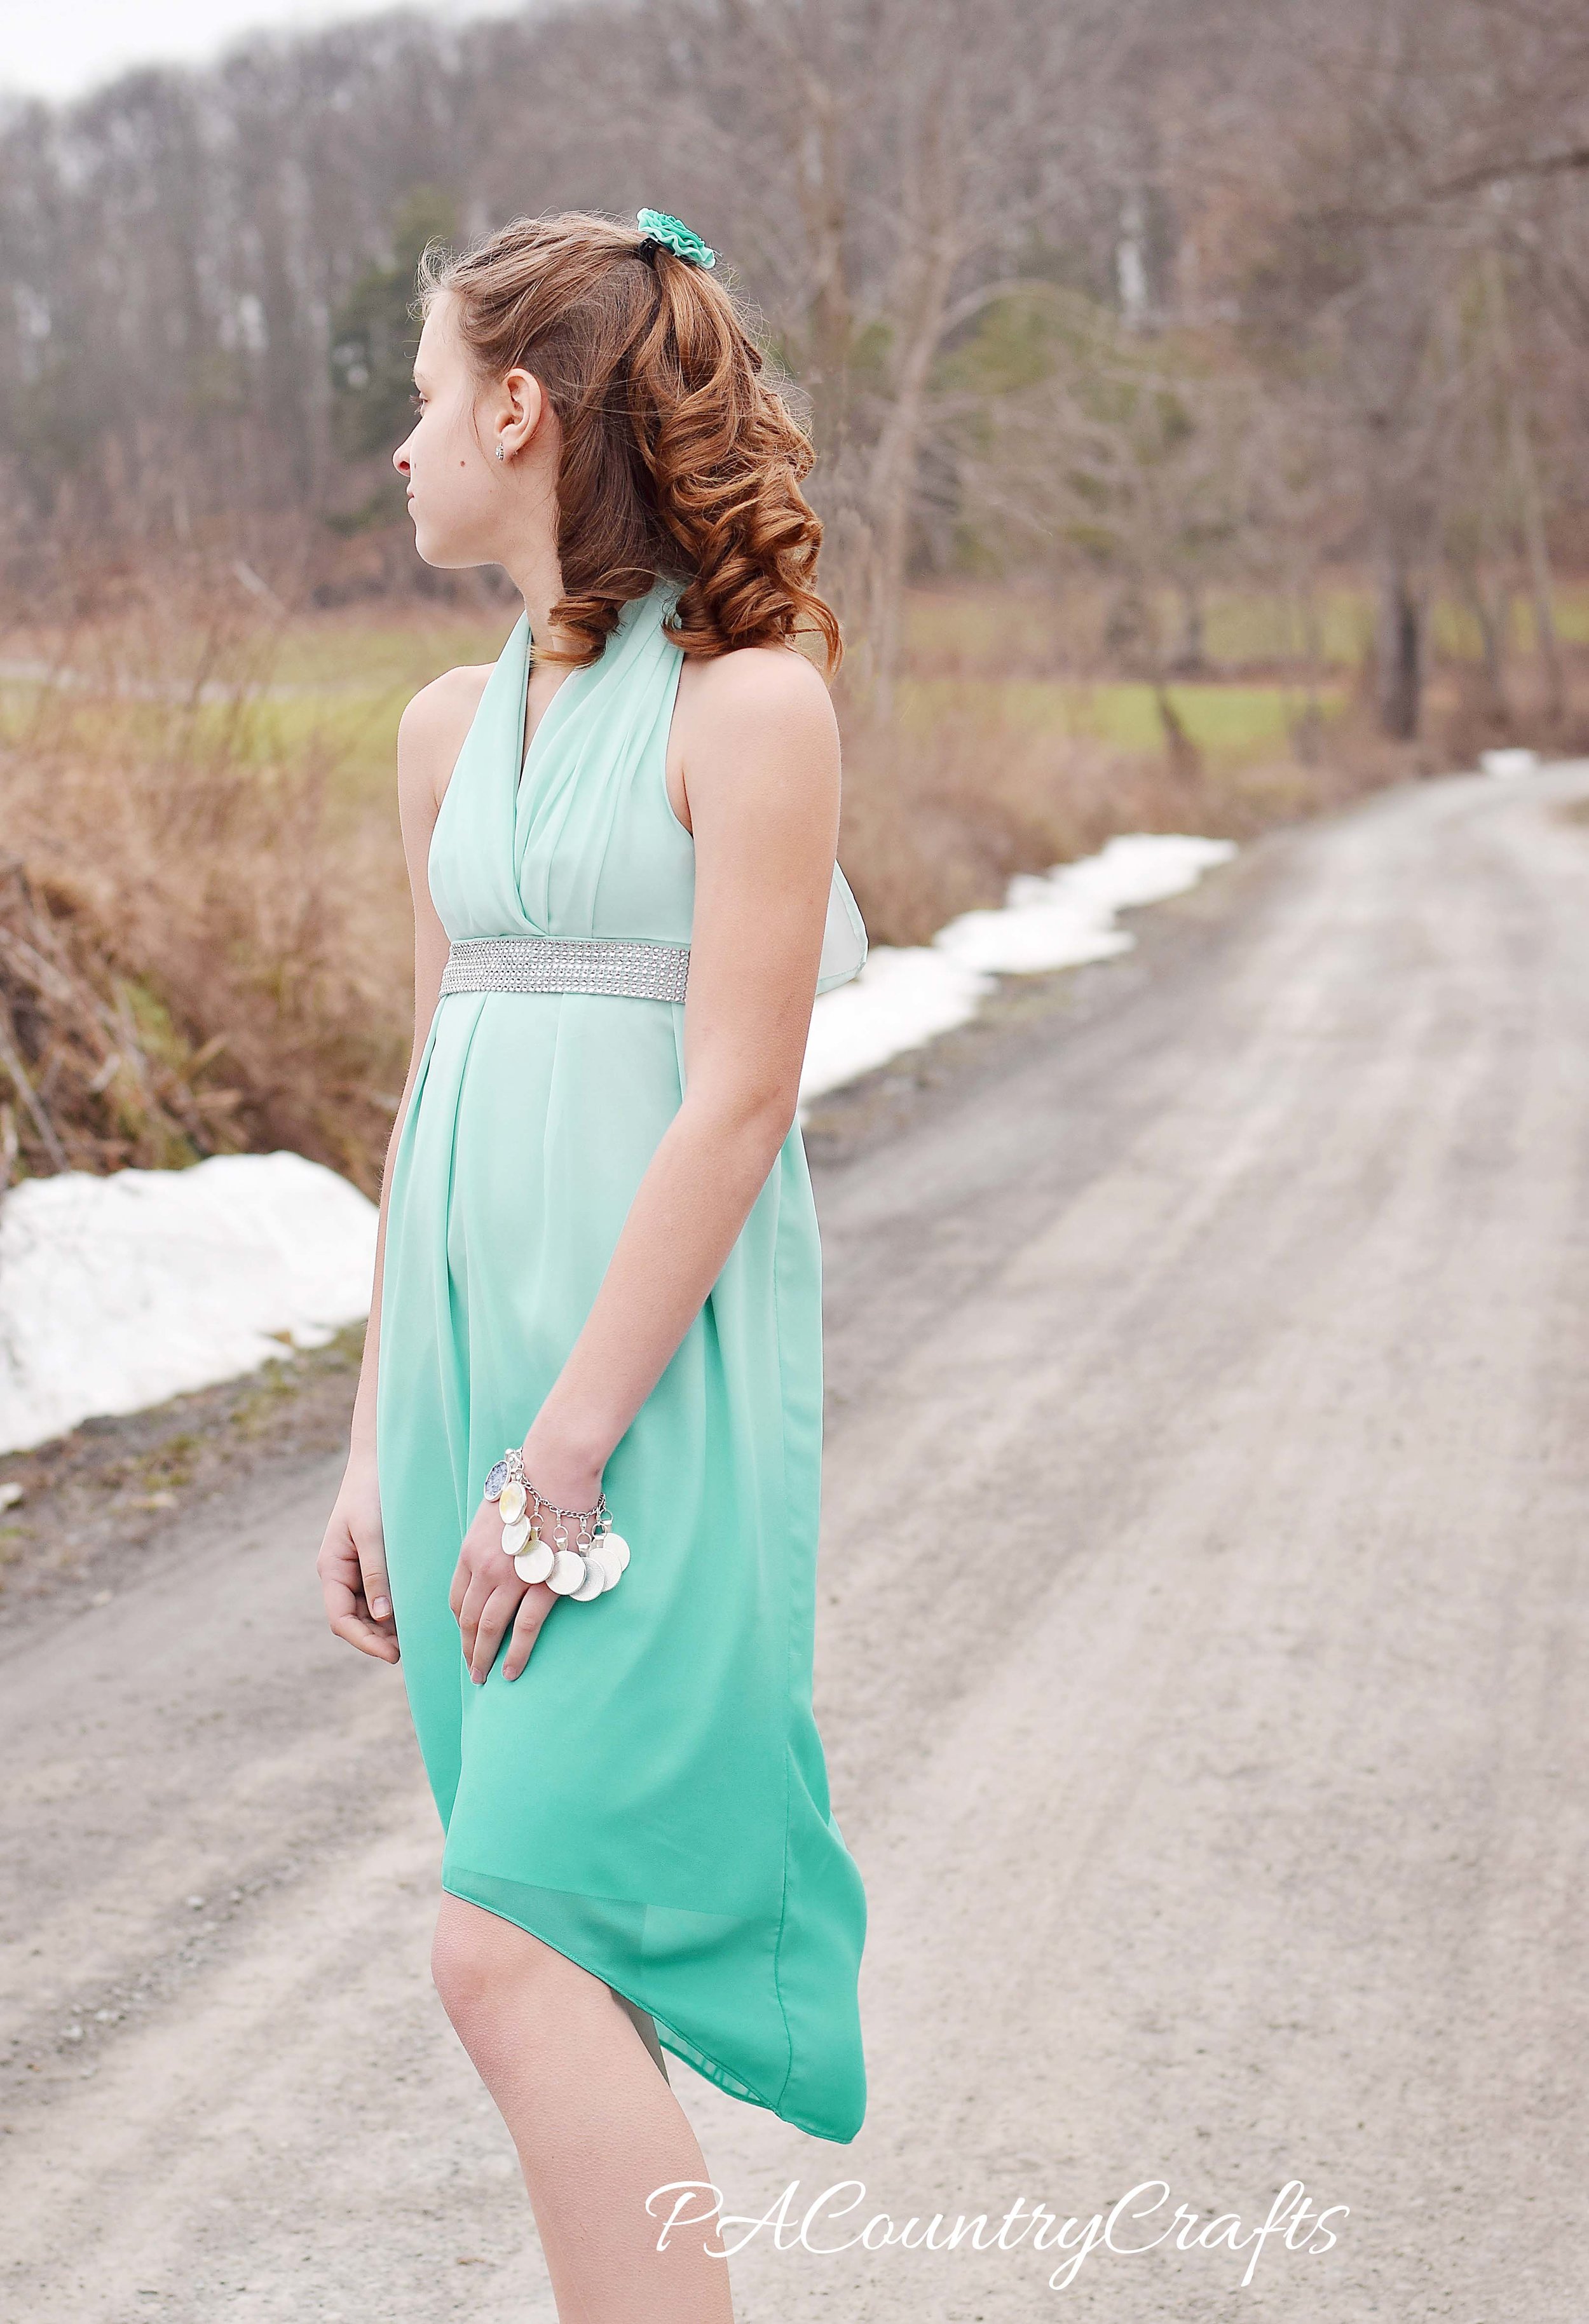
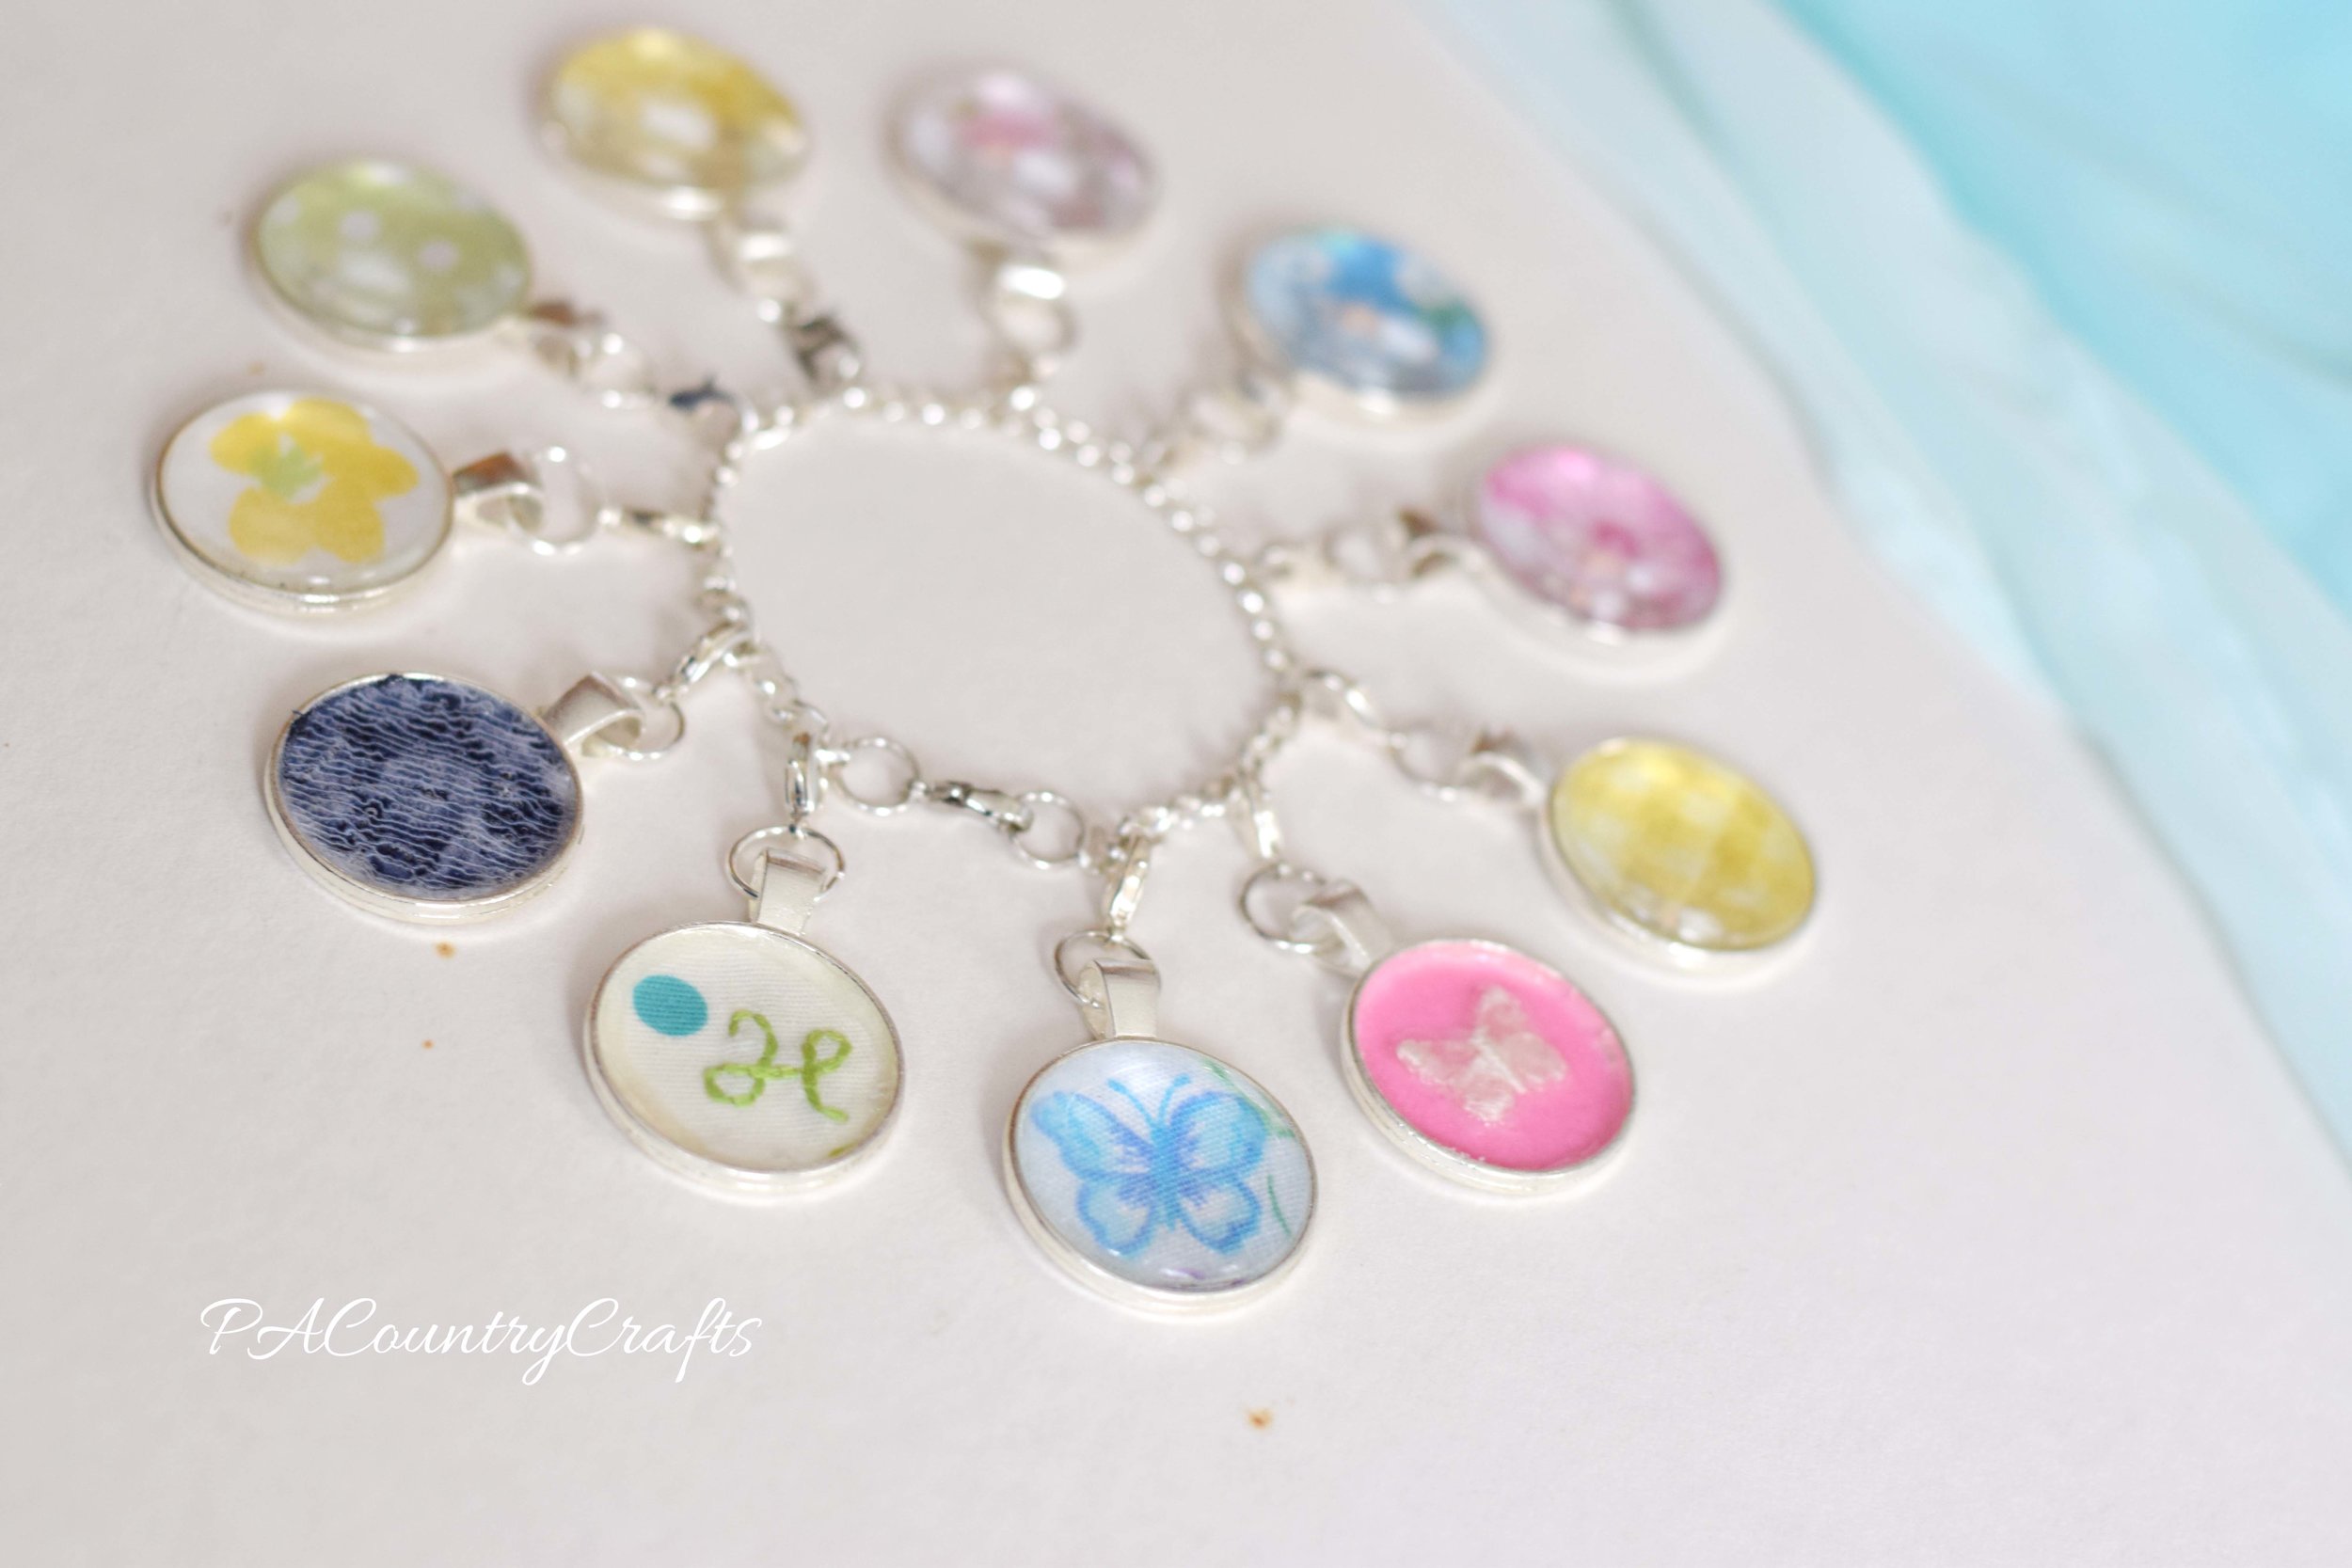
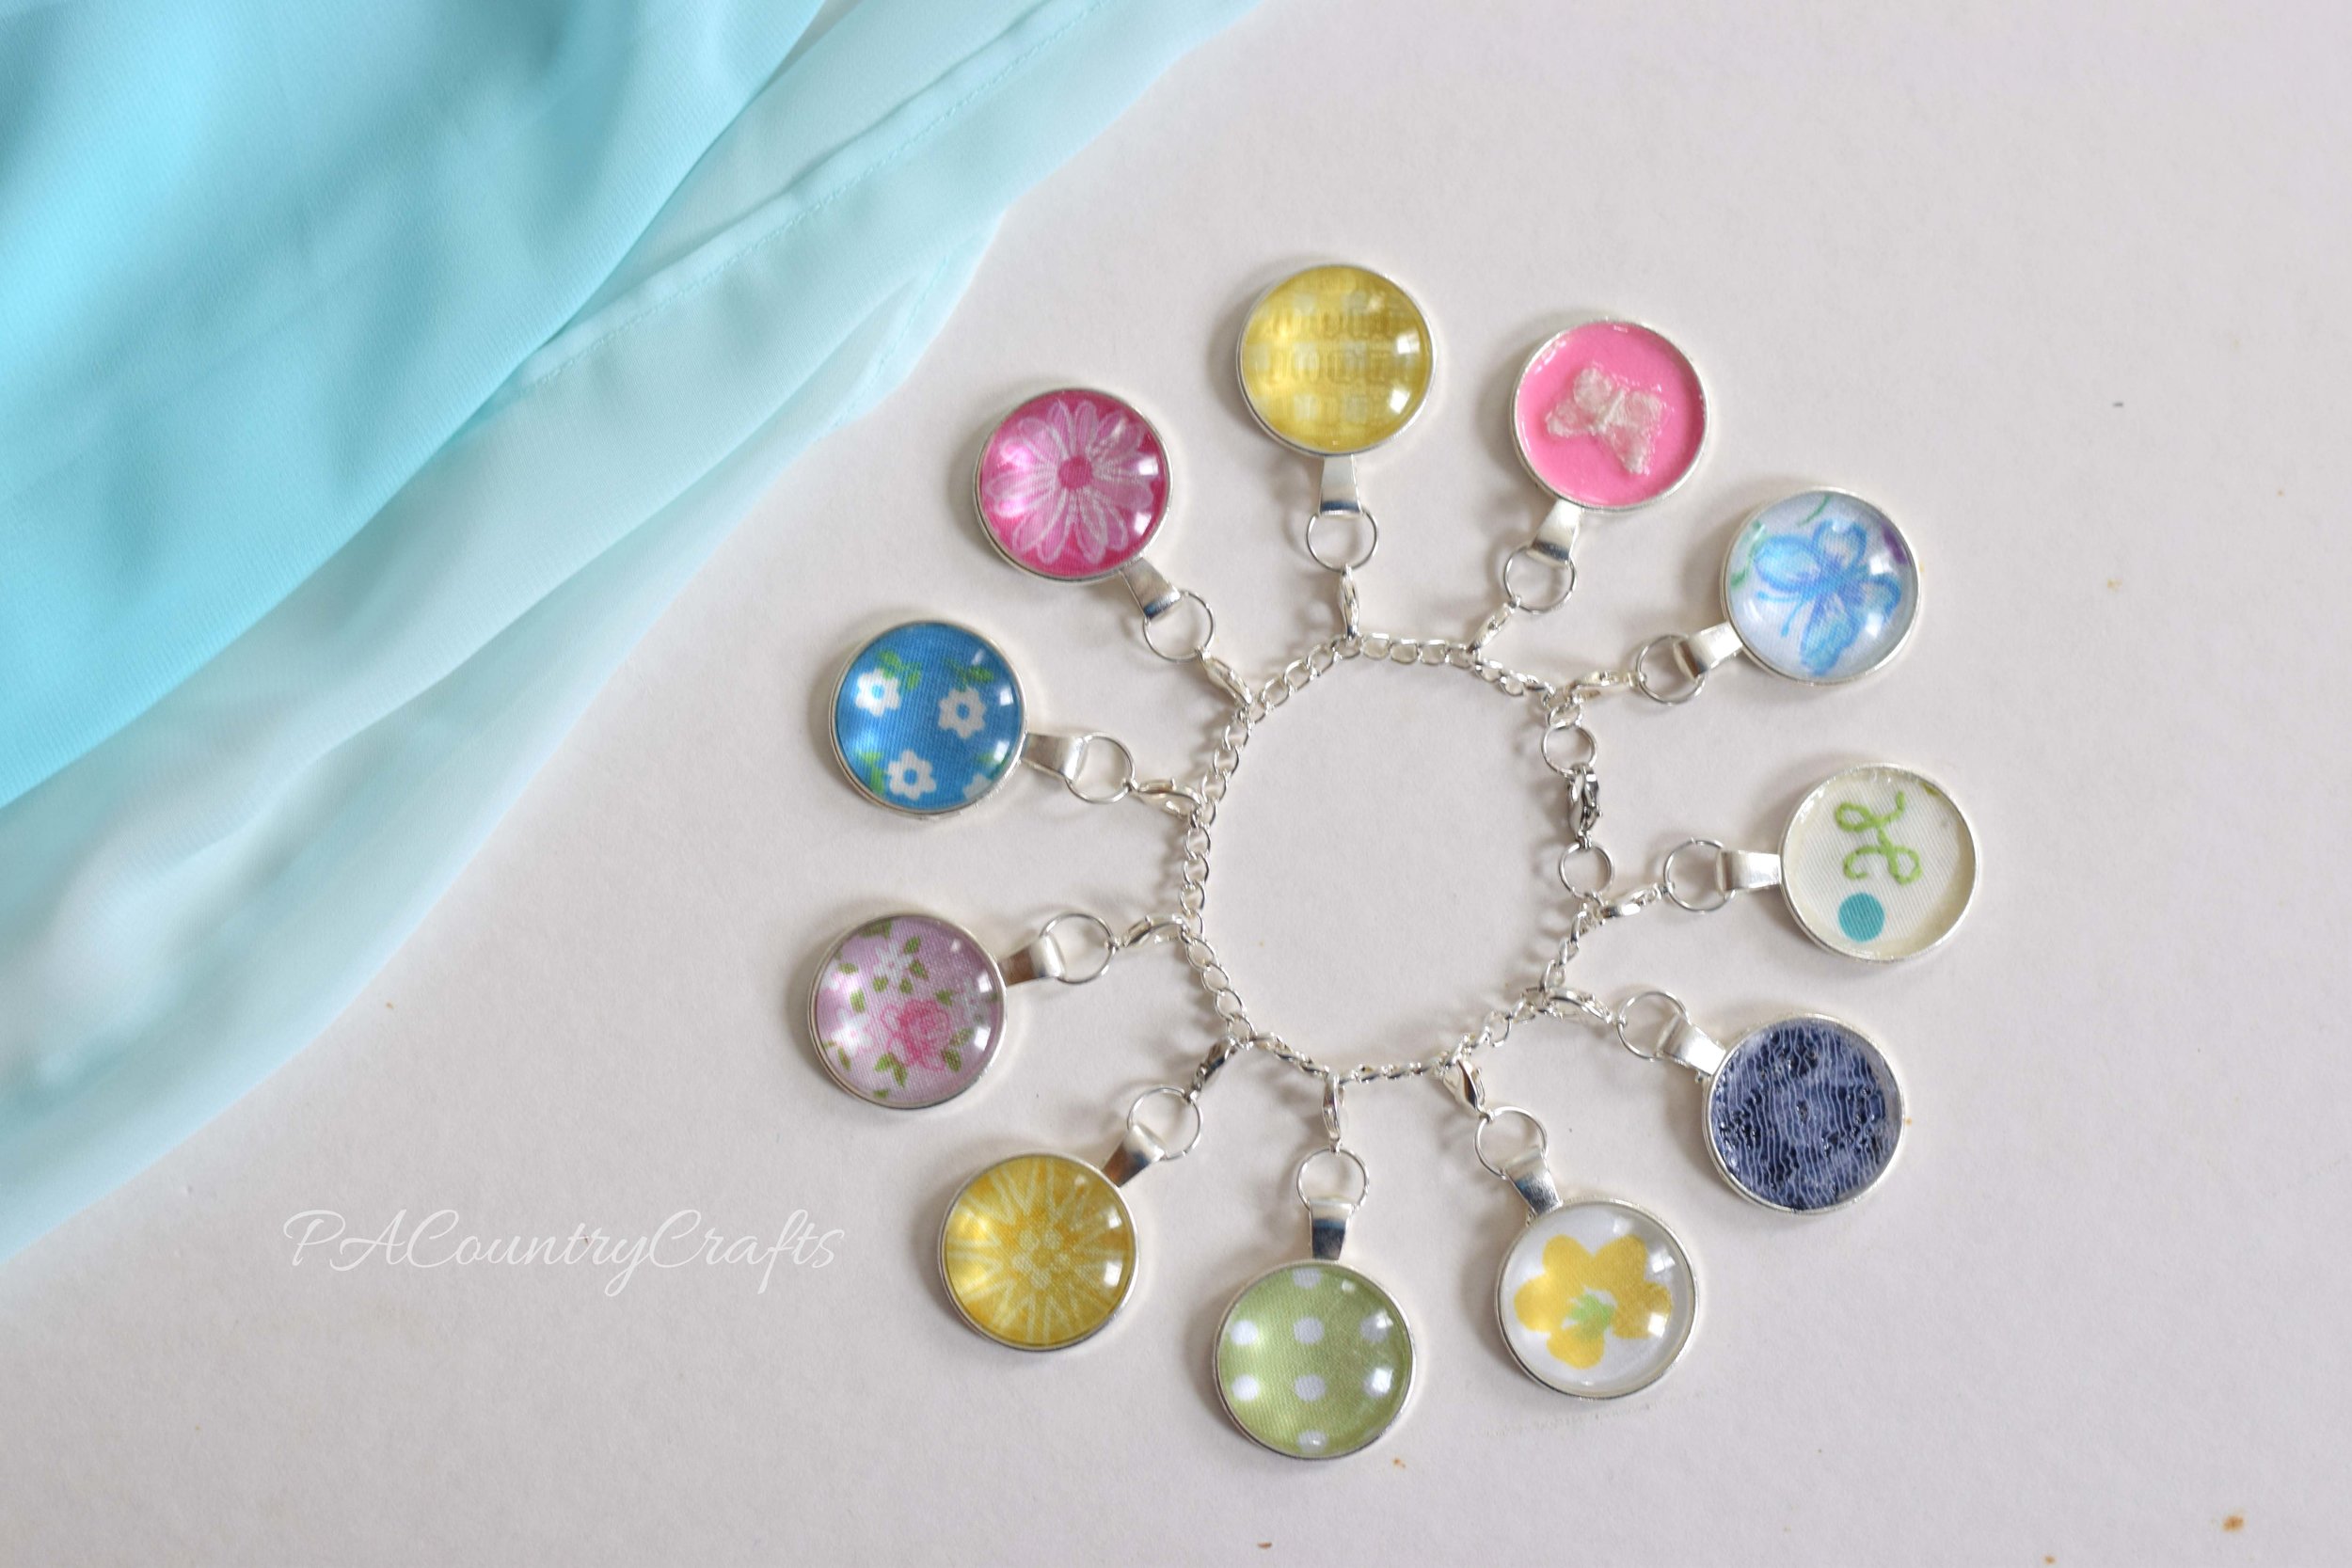
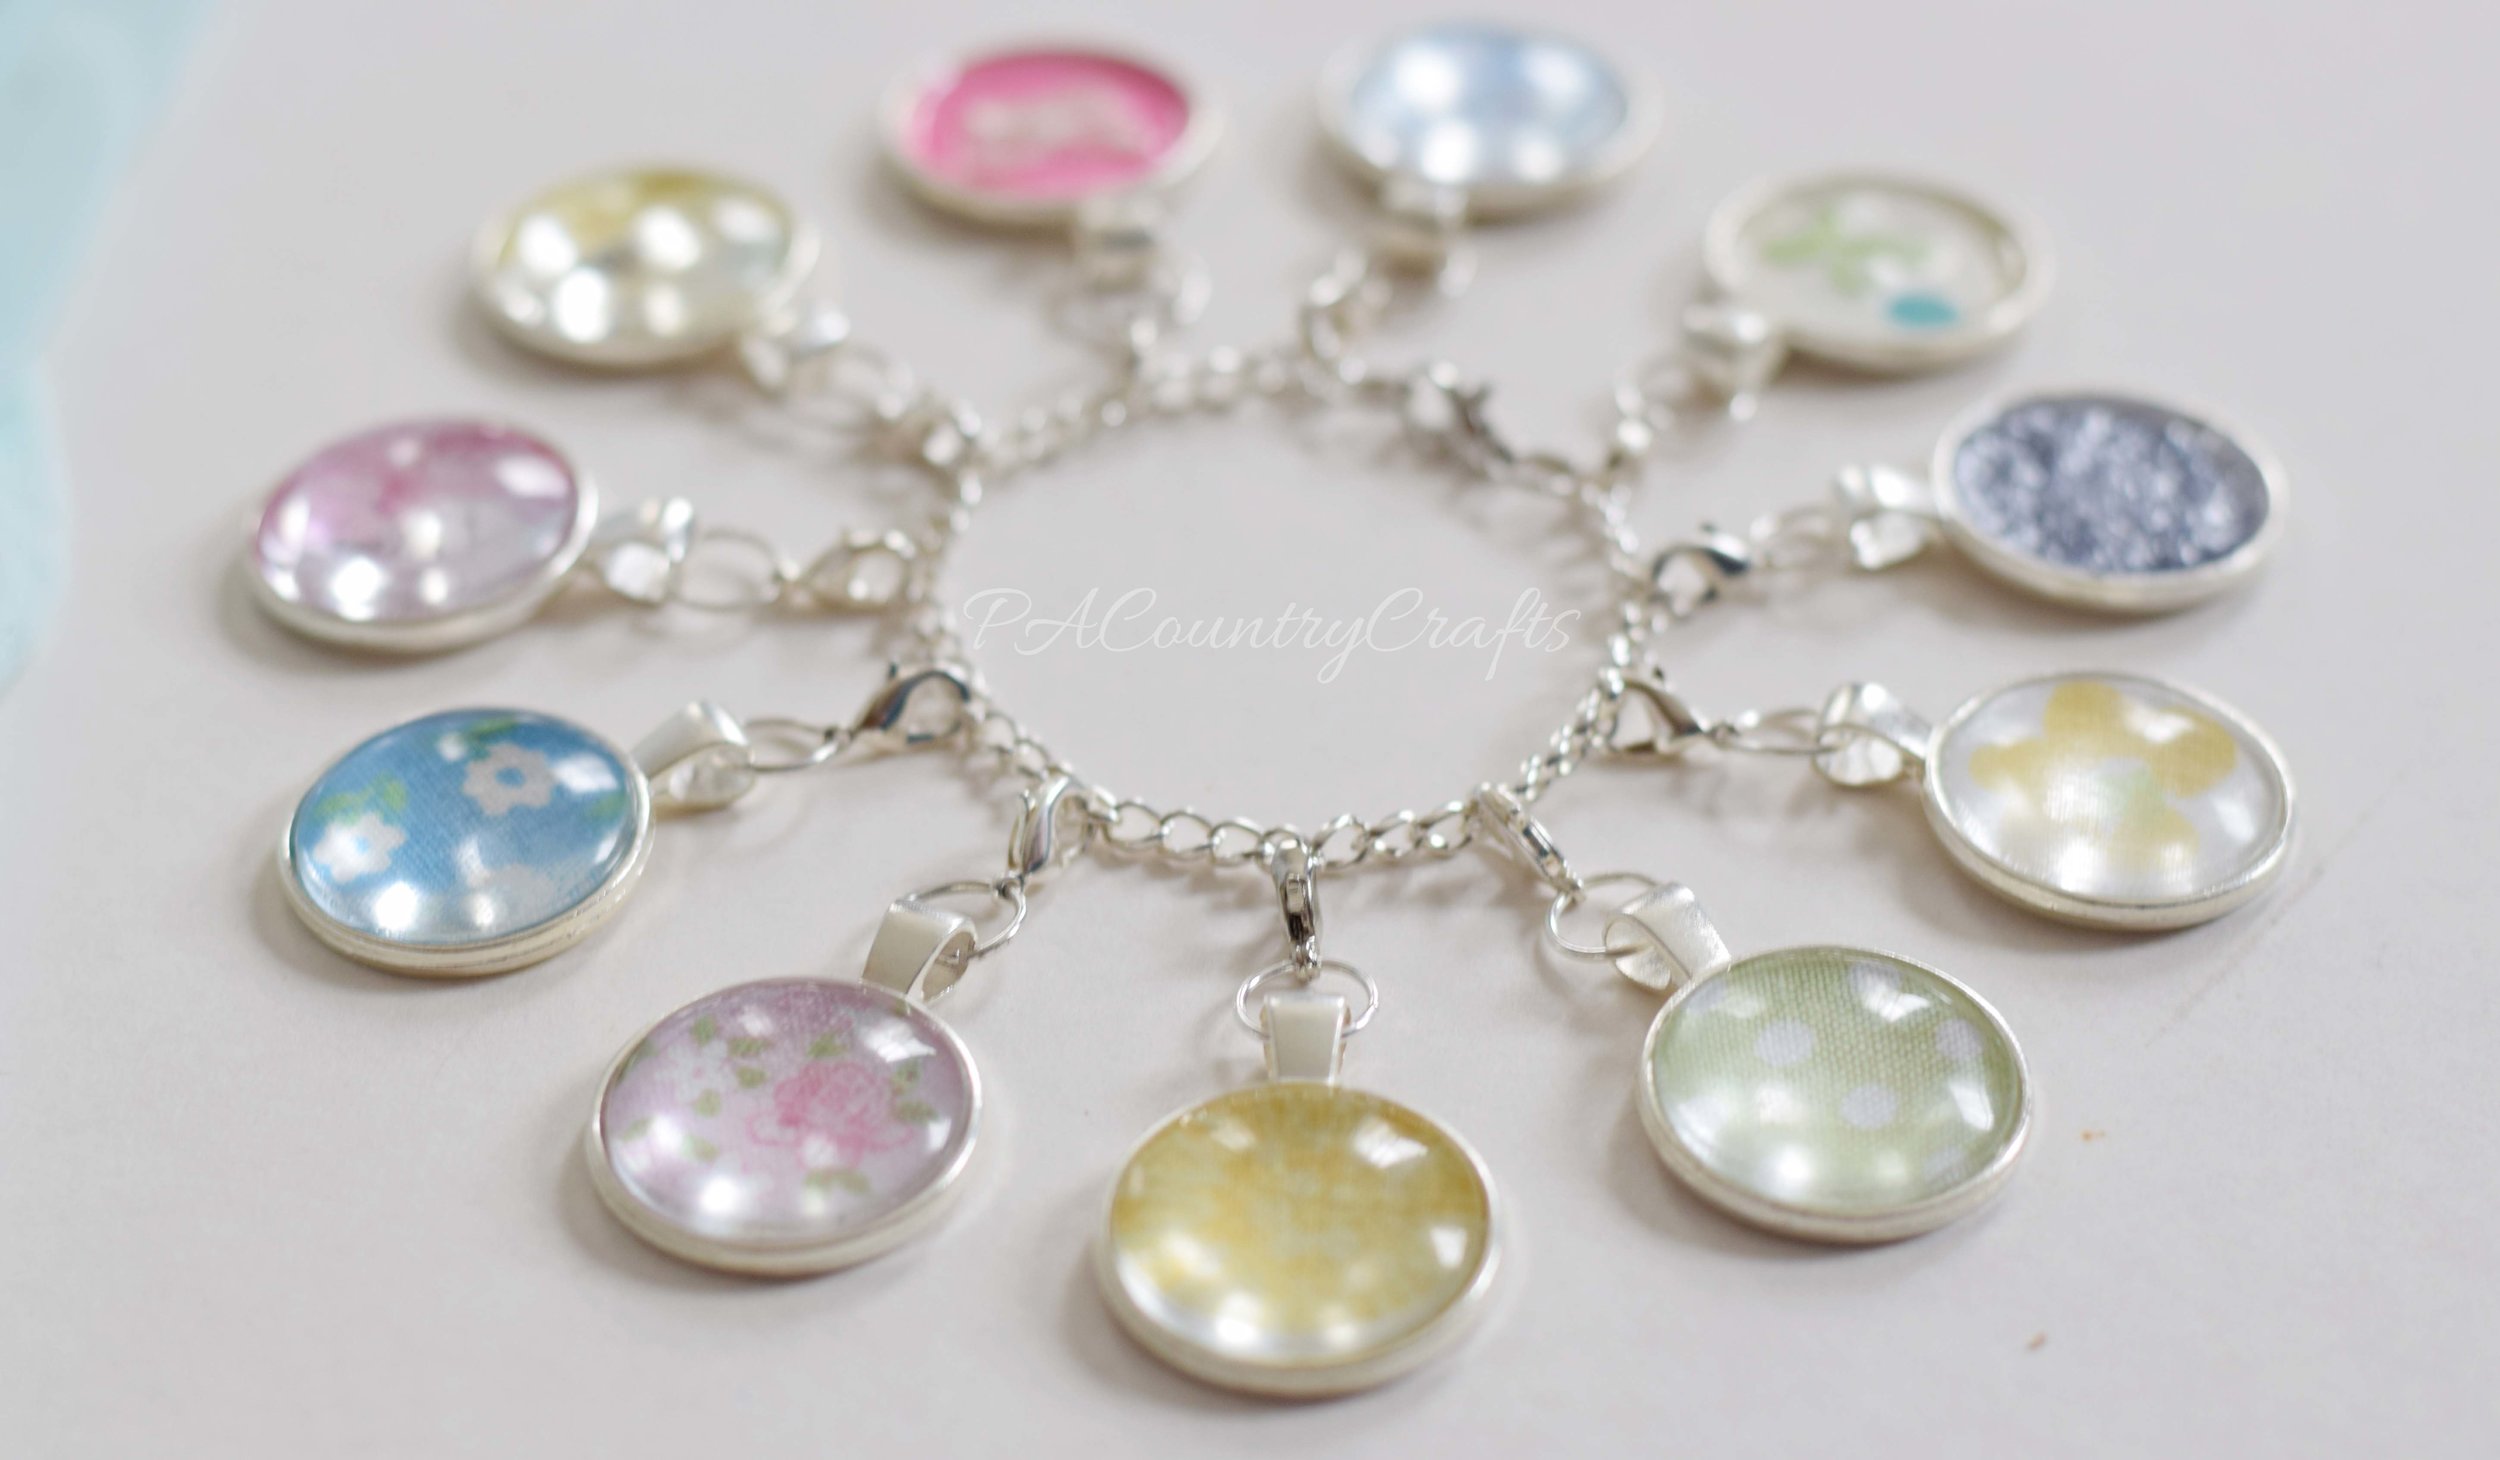
Finally, because I am sappy and sentimental, I got out the scraps from every Easter dress I have made for her and created a charm bracelet. There is a trick to it, so I will try to do a tutorial later. I used glass domes on most of them, but a few were too thick so I just coated them a glaze. I was really sneaky, so I was able to surprise her with the bracelet during the photo shoot! Also, I have just enabled fabric hoarders everywhere because this is another great idea for tiny scrap pieces. You are welcome!

glass charms made from fabric scraps

surprise-bracelet-edited_edited-1fabric scrap charm braceletcharm bracelet made from dress scrapskeepsake bracelet made from fabric scraps

I am a little sad to see my girl so grown up. It is bittersweet. We have both changed a lot.

first-and-last-easter-dresses

first and last easter dresses

https://www.youtube.com/watch?v=clcNB_EUao8

Put away the tissues and go vote HERE for the Project Run and Play Season 13 final round!!!

I am overwhelmed with the amount of support I have received from family and friends during this competition! Thank you so much!!! You are all amazing!!!

Sweet Caroline

sweet-caroline_edited-1-1.jpg

My great-grandmother, Caroline, was Bohemian; so "boho" means a little something different to me because I think of her.  I remember her fierce hugs and the stories of her spunk and determination. Widowed, with three young children, she moved from the city to rural PA and married a bachelor farmer.  I have always thought she was brave, and I wouldn't be here if she hadn't taken a chance. Characteristic of her generation, she was very resourceful.  My baby quilt is pieced from flour sacks and her quilt templates were cut from old cereal boxes. One Christmas, we all got stuffed pigs made from polyester scraps.  She also worked hard and never gave up. She had to quit school to help at home, but got her GED in her 80s because it was something that she had always wanted to do. I still remember her showing us the certificate hanging proudly in the frame on her living room wall. She made the best out of any situation with creativity and determination. That is a bit of what I tried to do this week. We had 2 feet of snow and 3 snow days, so I had to "make do" with what I had on hand, although it meant a lot more work. In the end, both outfits cost less than $5 to make and all that I had to purchase when I finally was able to leave the house was some thread, embroidery floss, and buttons.

Boho week for Project Run and Play!

I still tried to incorporate the modern "boho" style in my designs. First, I made a tunic from an old shirt that was given to me. I loved the color (with a slightly uneven dye effect) and it was a thin, flowy fabric perfect for what I had in mind. I removed the bottom ruffle (the open part was badly torn) and the bottoms of the sleeves. Then, I carefully cut the rest of my pieces from what was left of the shirt. I drafted a bodice with a curved front and trimmed the front of the bottom skirt portion a bit to create a high-low effect. The original ruffle was resized and sewed onto the bottom of the tunic. I embroidered the neckline with some simple flowers and vines. It took awhile, but it was definitely worth it to add some lovely detail. The top is lined with remnants of a really soft sheet I used to line THIS dress and I understitched along the inside neckline. I reshaped the sleeves to create a loose, flutter sleeve with a bit of gathering at the top. Then, I sewed it to the bottom and added buttons on the back. I also made a pair of leggings from some olive green knit fabric that I found in a tote after digging a path to my storage shed.

Before...

before-picture-of-shirt

After...

hand embroidery and understitching

buttons on the back of a flowy, boho tunic

butterfly sleeve boho tunic

double needle hem leggings

hi-low hem tunic upcycled from a womens shirt

purple hi-low tunic refashioned from a womens shirt

Hand embroidered girls boho tunic

My other daughter wanted a maxi dress and I found a dusty coral sheet I had purchased years ago on clearance at Target and stuffed under my fabric table. I only used about half of the sheet to make this dress. I drafted the pattern to have a drop waist and long, gathered tiers. I was careful in my cutting and able to use the original sheet hem, too! Yay! This time, I put the buttons in the front and hand embroidered the button placket in the same intricate flowers and vines. Oh, and those buttons? My husband made them from a dowel rod! He sanded them on the belt sander to make them round and carefully sliced them off of the dowel. I sanded them by hand to smooth and even them out. After a last-minute trip for 1/16th inch drill bits, he drilled holes in them for me. The straps are made from braided strips folded like bias tape and sewn together. They cross in the back and I added an elastic casing so that it would fit well and not gap in the back.

Some more before pictures...

dowel-buttons     flat-sheet

After...

Girls boho maxi dress made from a sheet

embroidered flowers

braided crossing straps

boho style maxi dress from a sheet

braided straps

Elastic casing to keep the back of the dress from gapping!

handmade wooden button

We tried to do a farm themed photo shoot, but it is hard because our options right now are: a) snow or b) mud. At the end, I decided to try to take some pictures with our new chicks, but it was clearly a bad idea. Let's just say that this was the second week in a row that an outfit had to be washed right after the pictures. Ew!!!

peeps_edited-1

peep-pooping

You can vote for your favorite "boho" look HERE over at Project Run and Play!

Thank you again to all of those who have voted and shared and supported me!!! Thank you to Aunt Karen for the purple shirt. A very special thank you to my sisters this week! Loni, you did an awesome job as my hairstylist and ironer. (Also, thank you for returning my vintage crimping iron.) Thank you to my husband for those awesome buttons and for carrying girls over the mud for pictures! Thank you most of all to my grandmother and other family members who pass down stories and leave a legacy to inspire future generations.

Boho style outfits made from a sheet and an old shirt!

Spring Snow

main-pic

main-pic

You can vote for your favorite "greenery" inspired design HERE at Project Run and Play.

The challenge for Project Run and Play this week is "greenery" which is Pantone's color of the year. It is symbolic of spring, rejuvenation, and reconnecting with nature.

We are in the middle of a potentially record-breaking blizzard in PA today.

I was having a hard time connecting with the theme and figuring out how to take some pictures of the outfits, especially with the smaller snowstorm we got on Friday while I was freezing and sewing my little heart out in the sunroom. Then, I realized that the weather perfectly mirrored what I was trying to create. Like the bright blue skies and bits of green grass and daffodils peeking up out of the cold snow to bring new life, I aimed to create something beautiful out of things that were unwanted.

daffodils in the snow

daffodils in the snow

project run and play week 2 outfits

project run and play week 2 outfits

When I looked at Pantone's website to learn more about the color "greenery" I immediately pictured a piece of vintage fabric that I had stored in a box in my shed. It came from someone's attic and had been sewed and used for something else a long time ago. I pictured a full, vintage style skirt with a crisp, white, sleeveless swiss dot blouse.

Vintage style girls outfit

Vintage style girls outfit

vintage style girls outfit

vintage style girls outfit

The skirt is so full!!! The fabric is heavier than quilting cotton, so it holds it shape very well. I added lining and a built in petticoat layer, so this skirt has 552 inches of gathering!!! I used some vintage bias tape as flat piping under the waistband, too.

flat piping made from bias tape

flat piping made from bias tape

The shirt was a bigger challenge for me. I drafted my own pattern and used some more of that vintage single-fold bias tape around the arms and neckline. The fabric is somewhat sheer, so it adds a hint of color to the edges. I hand stitched the button holes since my sewing machine started snapping needles again. The buttons are from Joann and I was excited because they matched perfectly!

swiss dot sleeveless blouse

swiss dot sleeveless blouse

To take it a step further, I created a matching doll outfit from the scraps. I made my own patterns for these, too. It is lined, so I just used aqua topstitching around the edges.

matching vintage doll outfit

matching vintage doll outfit

For the second outfit, I used two old t-shirts to create a new shirt in the same color scheme. I have never made a knit neckband before, so I was really happy with how that turned out. It has sheer, vintage lace under the arms.

lace inset sides

lace inset sides

(Yes, I know she has goosebumps. Poor girl! We took most of the pictures in our greenhouse so that it would be a little warmer.)

The beautiful lace eyelet skirt used to be part of a dress I found at the thrift store. I added some quilting cotton scraps to make a waistband that is elastic in the back. I know white is dangerous, but I figure there is always bleach. Something gross and awful happened to it after this photo shoot, so I will probably be testing that out soon. #keepitreal

I whipped up a few headbands to match from more lace and t shirt scraps.

greenery project run and play week 2 outfits

greenery project run and play week 2 outfits

Oh, and the bright blue playhouse is an upcycle project, too. It used to be a chicken pen with weathered wood and a leaky roof! Sometimes, all it takes it a little bit of hard work to bring new life to something that was unwanted. So, even though things may be looking like a winter mess where I live today,  I know that it is going to be OK: spring and all of the beauty that comes with it will be here soon.

Cute vintage style girls clothes made from repurposed materials- there is even a matching doll set!

Cute vintage style girls clothes made from repurposed materials- there is even a matching doll set!

You can vote for your favorite "greenery" inspired design HERE at Project Run and Play.

Thank you to everyone who voted for me last week! I am so excited to stay in the competition!!! Thank you again to the friends and family, even those with terrible fashion sense, who help me figure things out and give me honest opinions. Thank you to my Aunt Karen who forgot to vote, but gave me one of shirts I used. Thank you to Vicki for saving that wonderful, old fabric for me. Thank you to my friends and family who help me with my vision. Thank you to my husband for finishing the greenhouse before the snow came and being my photography assistant. As you can see by the picture below, one of my models was not as cooperative this week.

Adorable vintage style girls outfits made from upcycled materials

Adorable vintage style girls outfits made from upcycled materials

Notre Dame Dreams

notre-dame-dreams_edited-1.jpg

I am so excited to be a part of Project Run and Play! You can vote HERE. When we found out the themes for this season, I knew the first challenge would be the hardest for me. We don't travel, so I don't even think about places I would like to visit one day. My Plan A was something safe and simple, but I knew that I wasn't really pushing my sewing skills or my creativity. Eventually, I changed my mind and started over. I stepped totally out of my comfort zone and tried something original, knowing that no matter the outcome of the competition, I put forth my best effort.

The challenge said, "Show us where you would like to travel to, with this destination-inspired outfit for your child." Since I was finally being honest with myself, the first thing that had popped into my mind when I thought about travel, if I allow myself to dream, is that I would love to visit Europe to see the beautiful architecture. My brother has been travelling recently and I am a little jealous of his tourist photos. I studied cathedrals for an art history paper in college and I especially love the Notre Dame cathedral in Paris.

A Notre Dame cathedral inspired dress with an applique circle skirt.

The daughter I chose to model loves to dress up, so there is nothing too fancy for her. She wears a fabulous outfit and coordinating headband nearly every day. Trust me. There are a lot of arguments over fashion in our house.

I started by making a circle skirt inspired by the rose window of the Notre Dame cathedral. After cutting my skirt piece, I designed a template and then stitched 60 pieces onto the fabric. I wanted a raw edge applique and I didn't want to make the skirt too stiff by using an iron-on adhesive. I tried quilt basting spray and glue stick, but resorted to just holding the pieces down with straight pins because the worked the best. It took FOR.EV.ER. I also made a lining with a gathered tulle layer at the hem. It reminds me of the light radiating from the windows.

stained glass skirtNotre Dame rose windowstained glass applique dress

stained glass applique
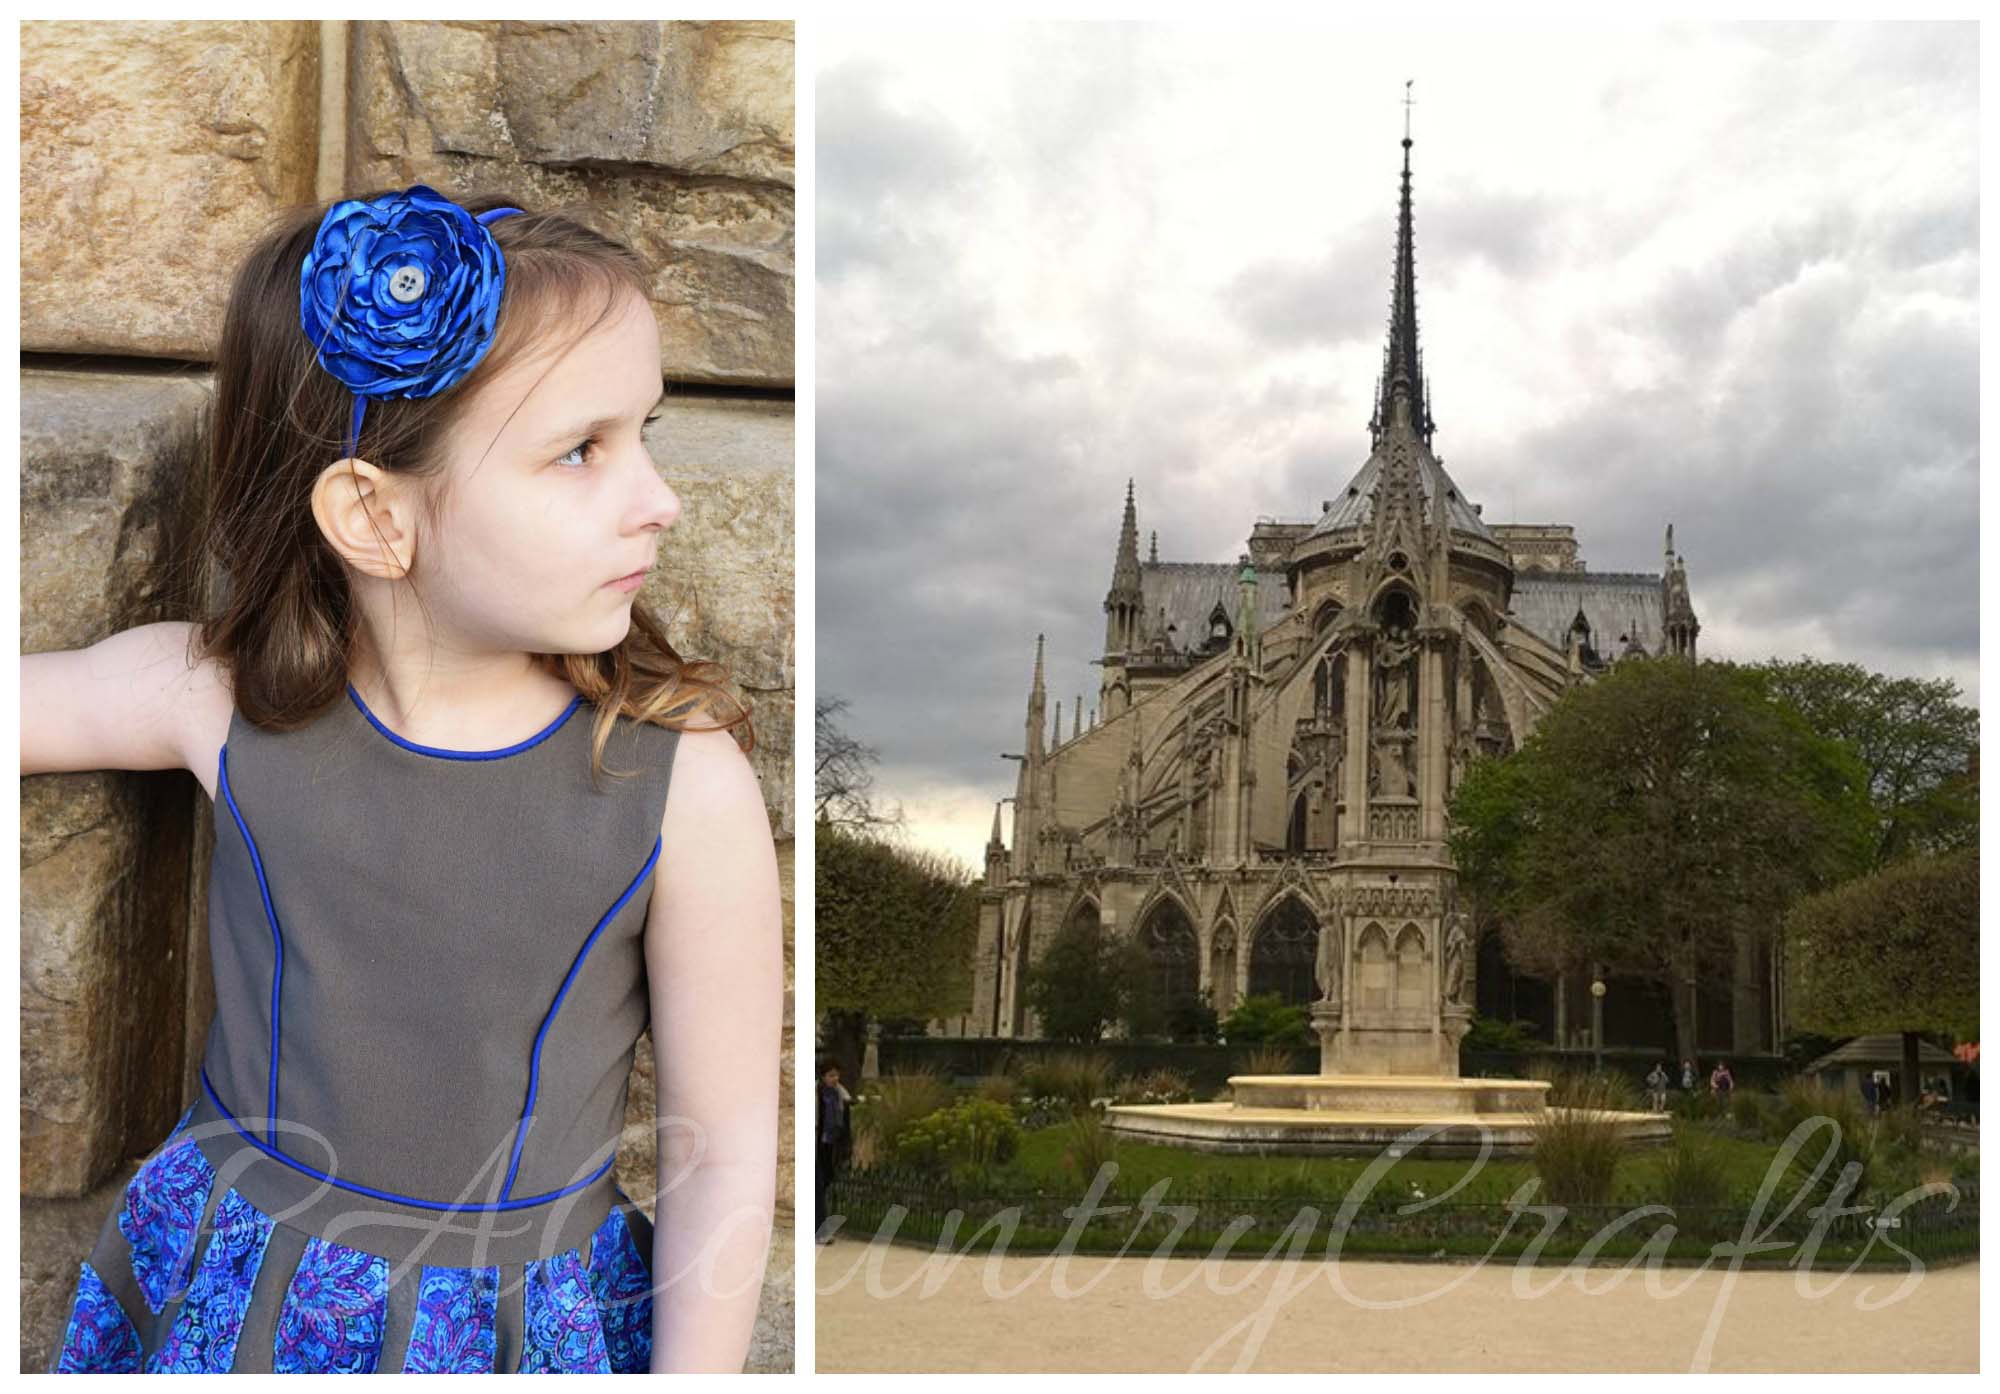
For the bodice of the dress, I wanted to mimic some of the architectural details. I added piping to the front inspired by the arc of the flying buttresses that support the cathedral walls.

princess seams with piping on little girls dressflying-buttresses 
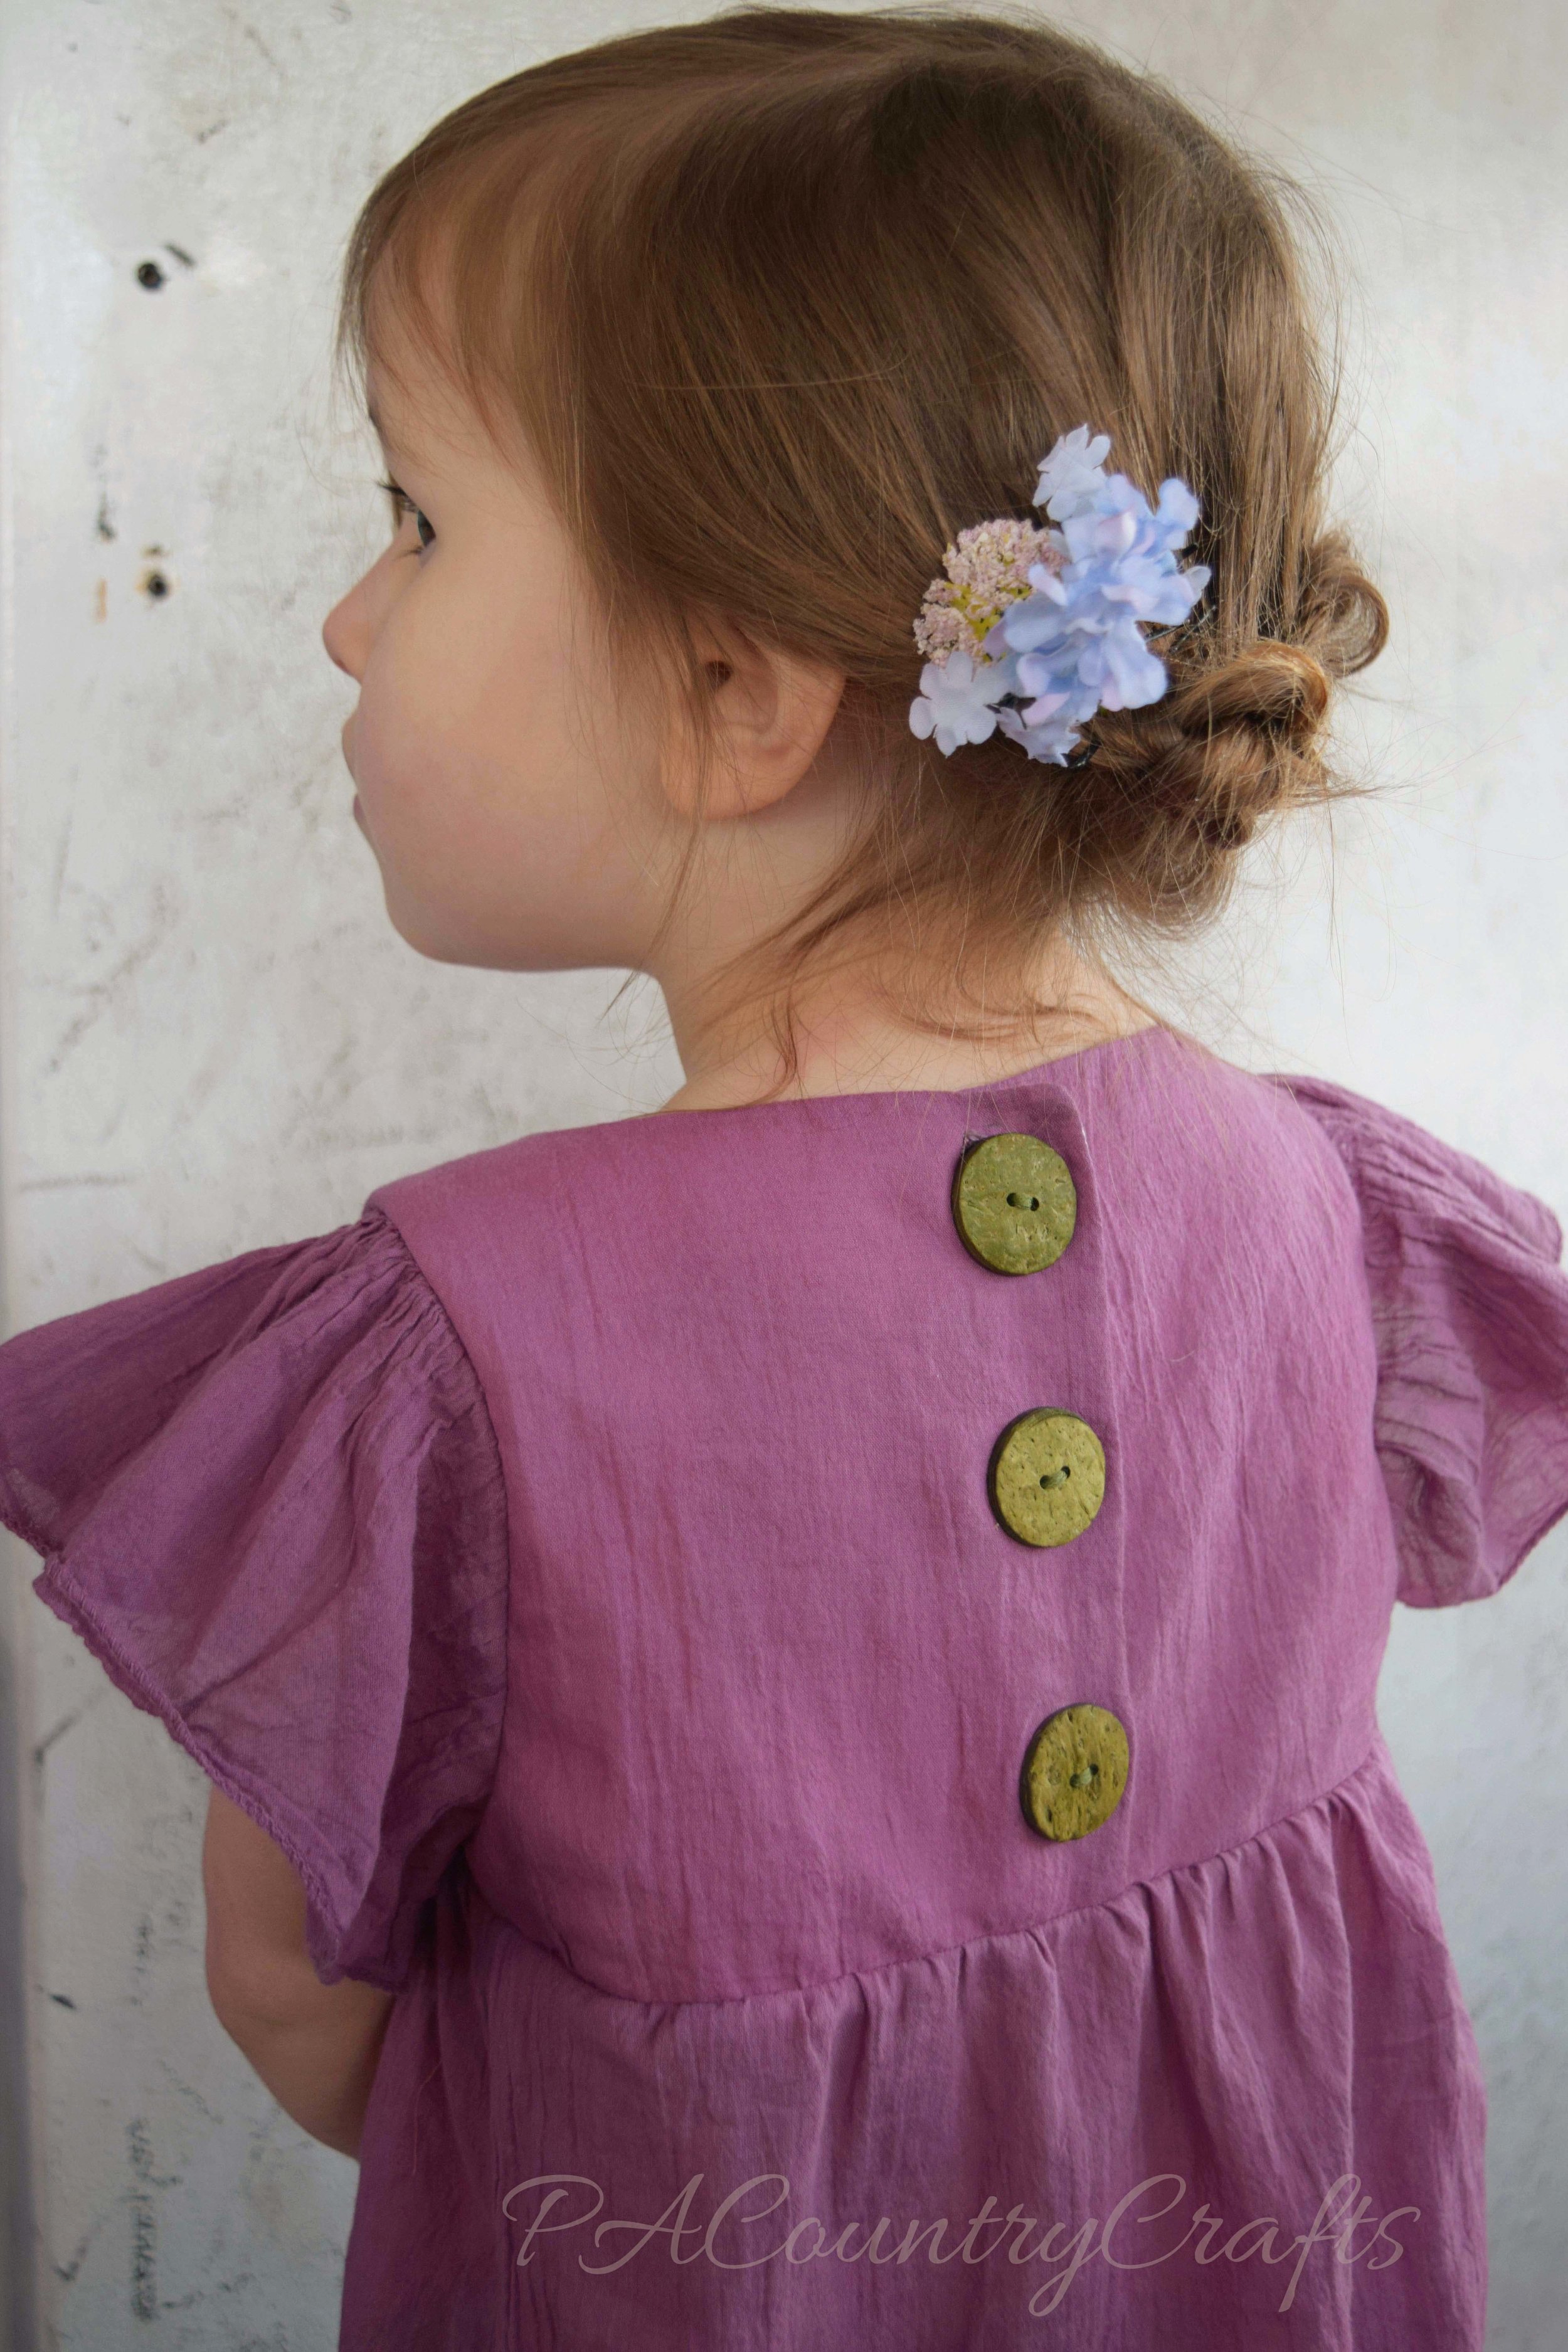
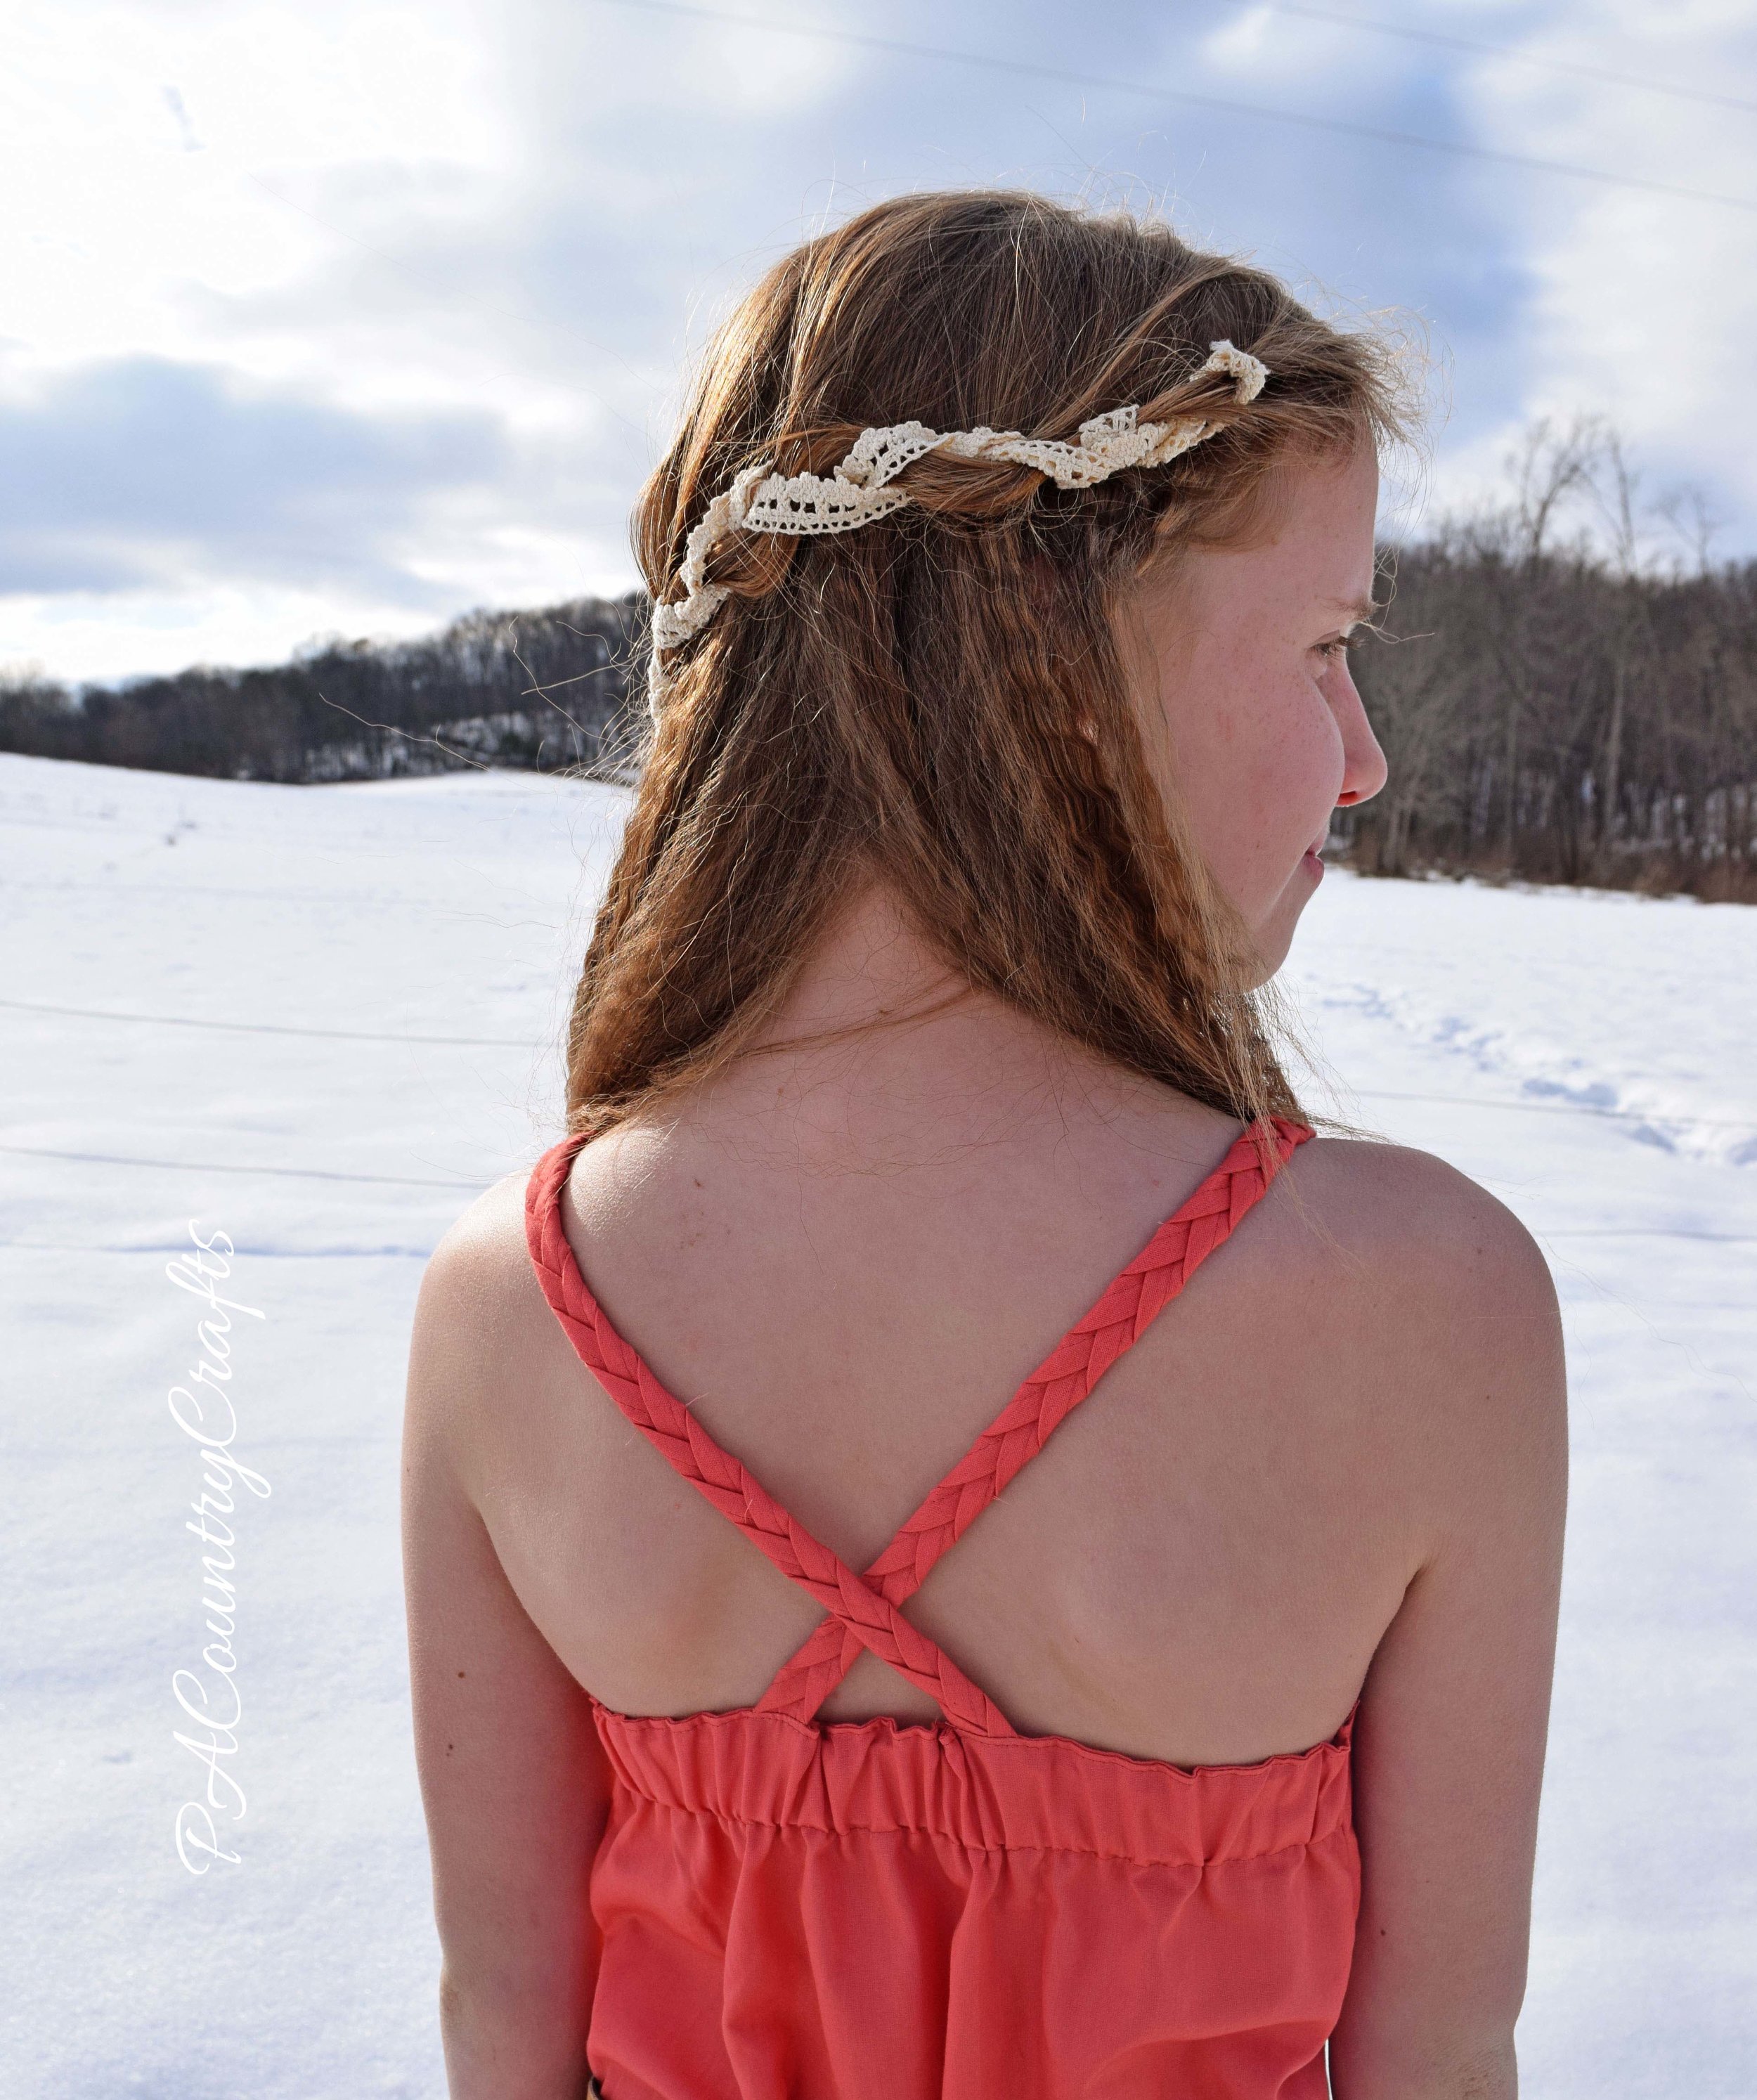
In the back, I made a Gothic, pointed arch cut-out and added soft, ruffle elastic, criss-crossing straps inside that mirror the beams in the vaulted ceilings. It closes with coordinating gray buttons, and I even hand-stitched the buttonholes because the fabric was thick and I had broken almost all of my needles earlier.

arch cut out dress back with criss cross strapsdress back cut out with crossing straps

Since the applique took so long, I missed the warm spell we had a few weeks ago and it was again freezing outside when it was time to take pictures. To try to keep my little girl warm, I made a reversible cape out of a gray velour remnant and some metallic finish blue lace.

reversible hooded cape

reversible blue metallic lace cape
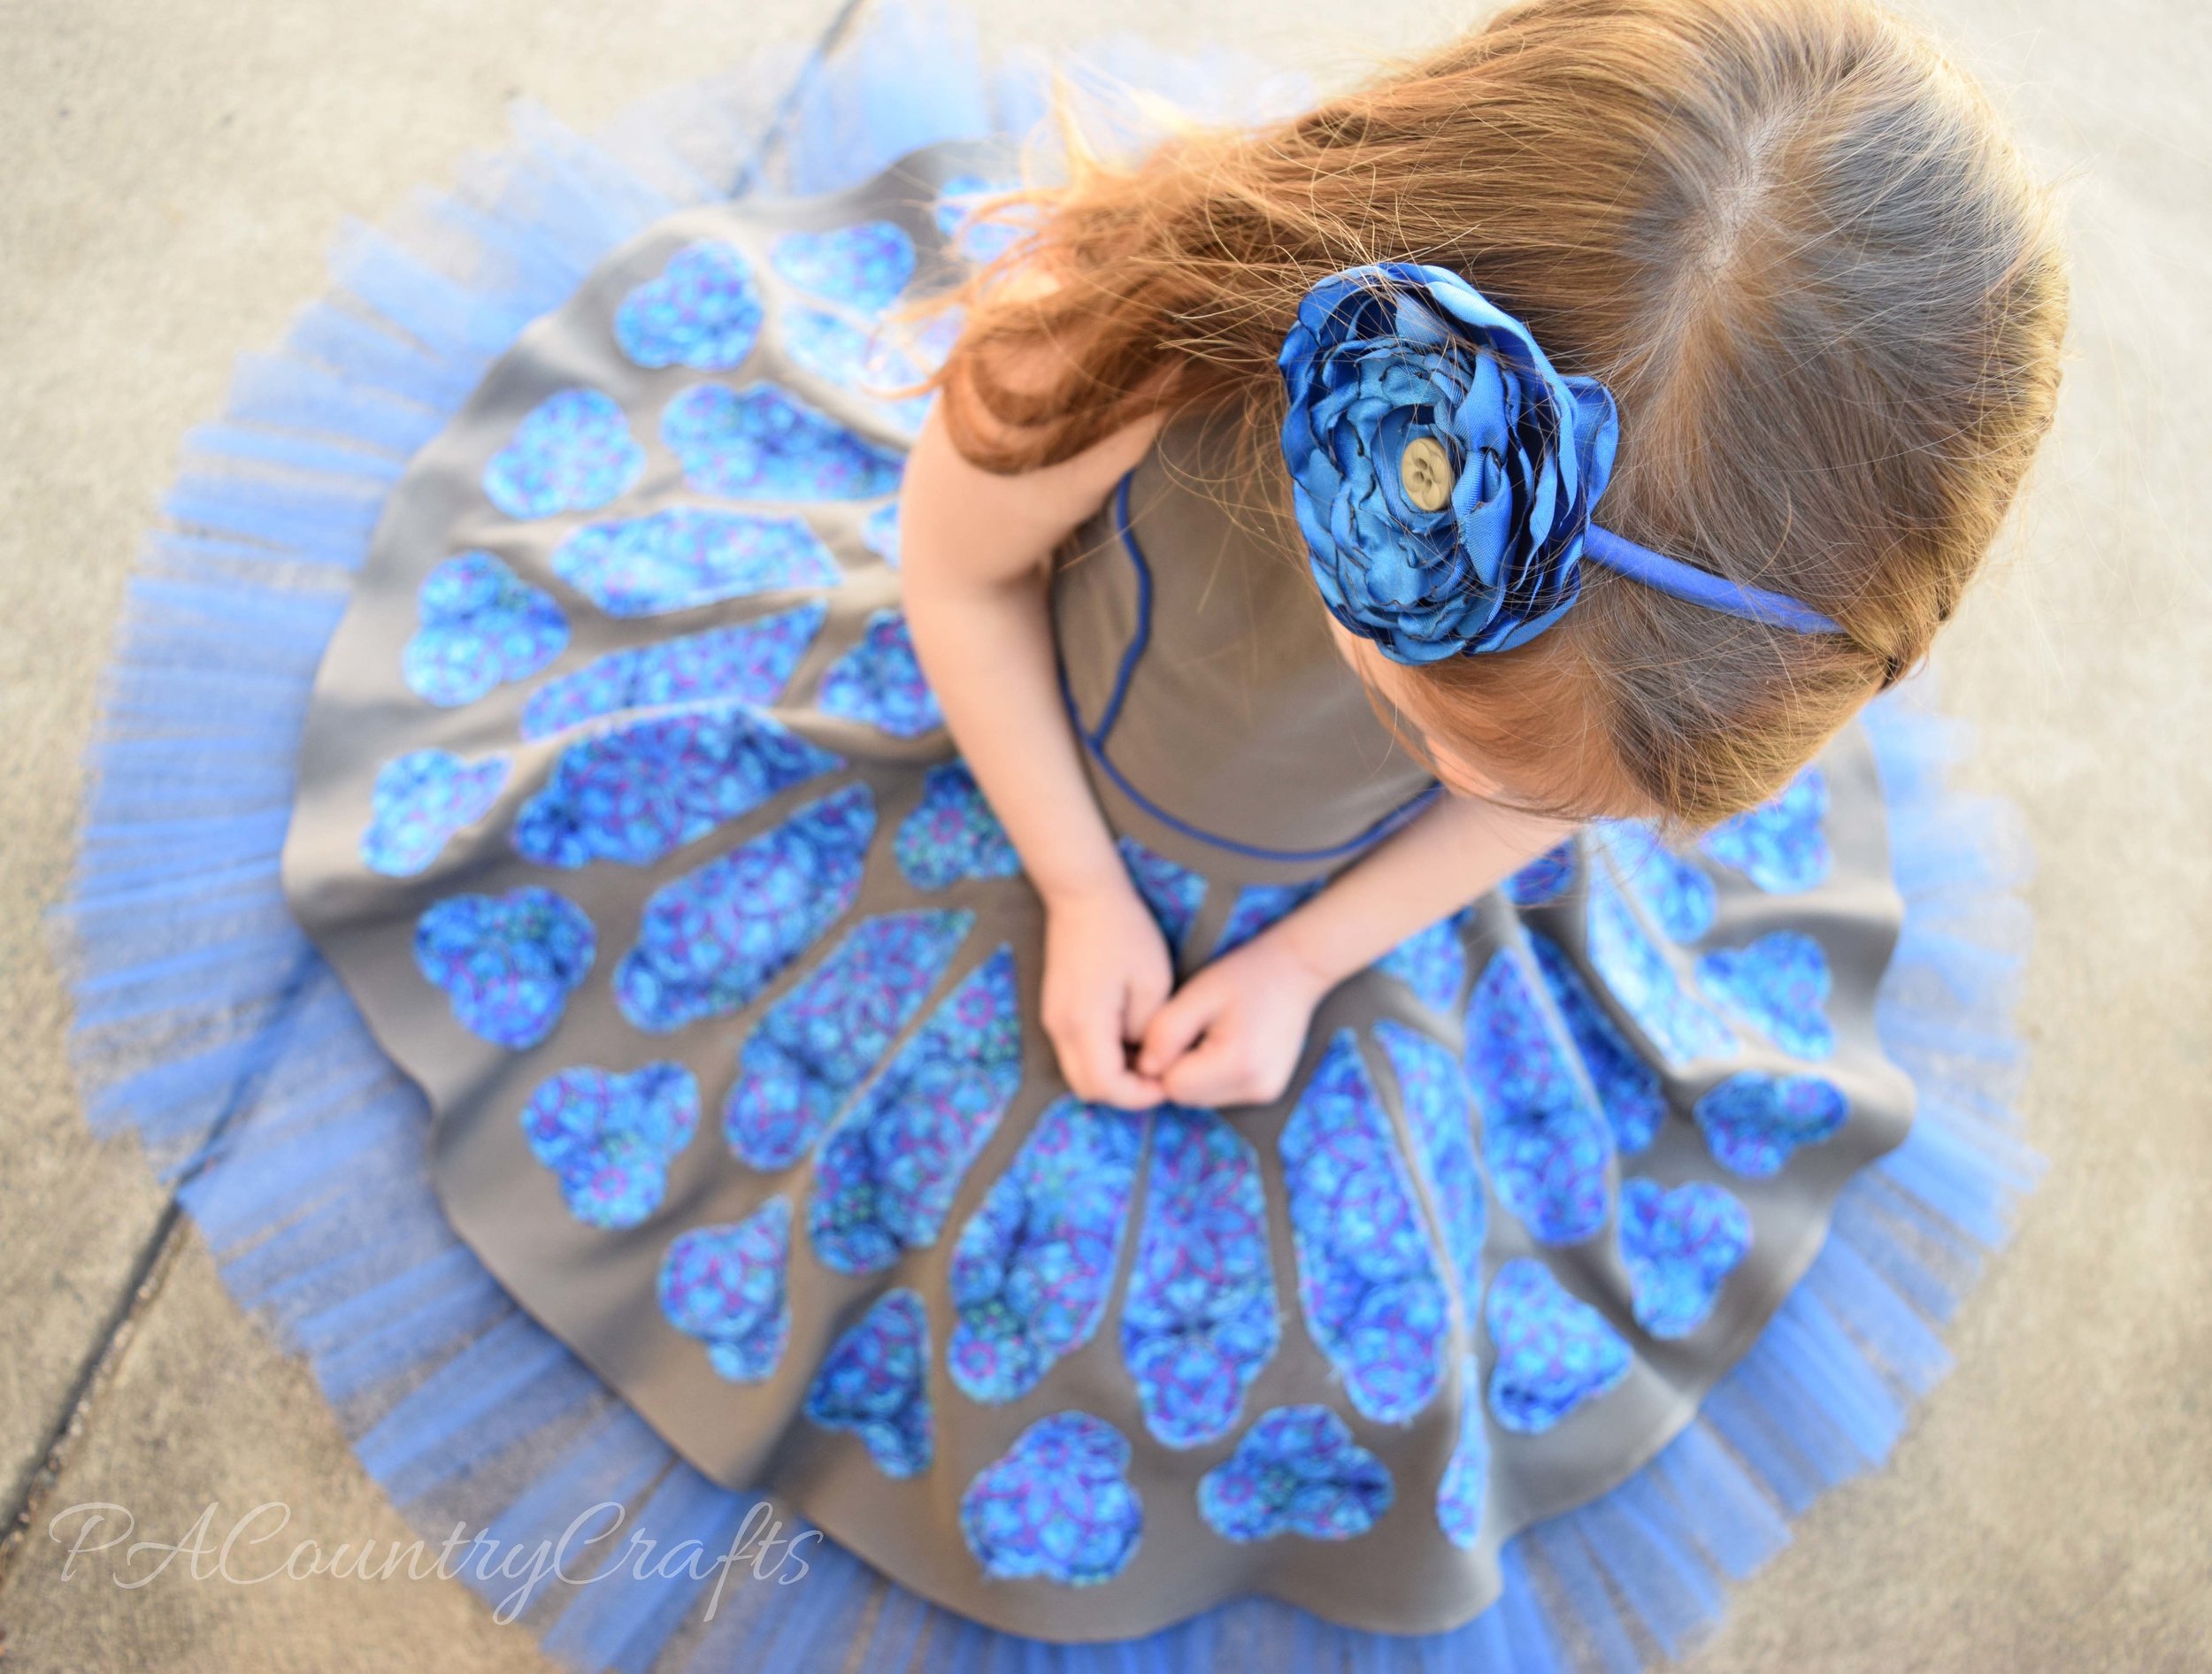
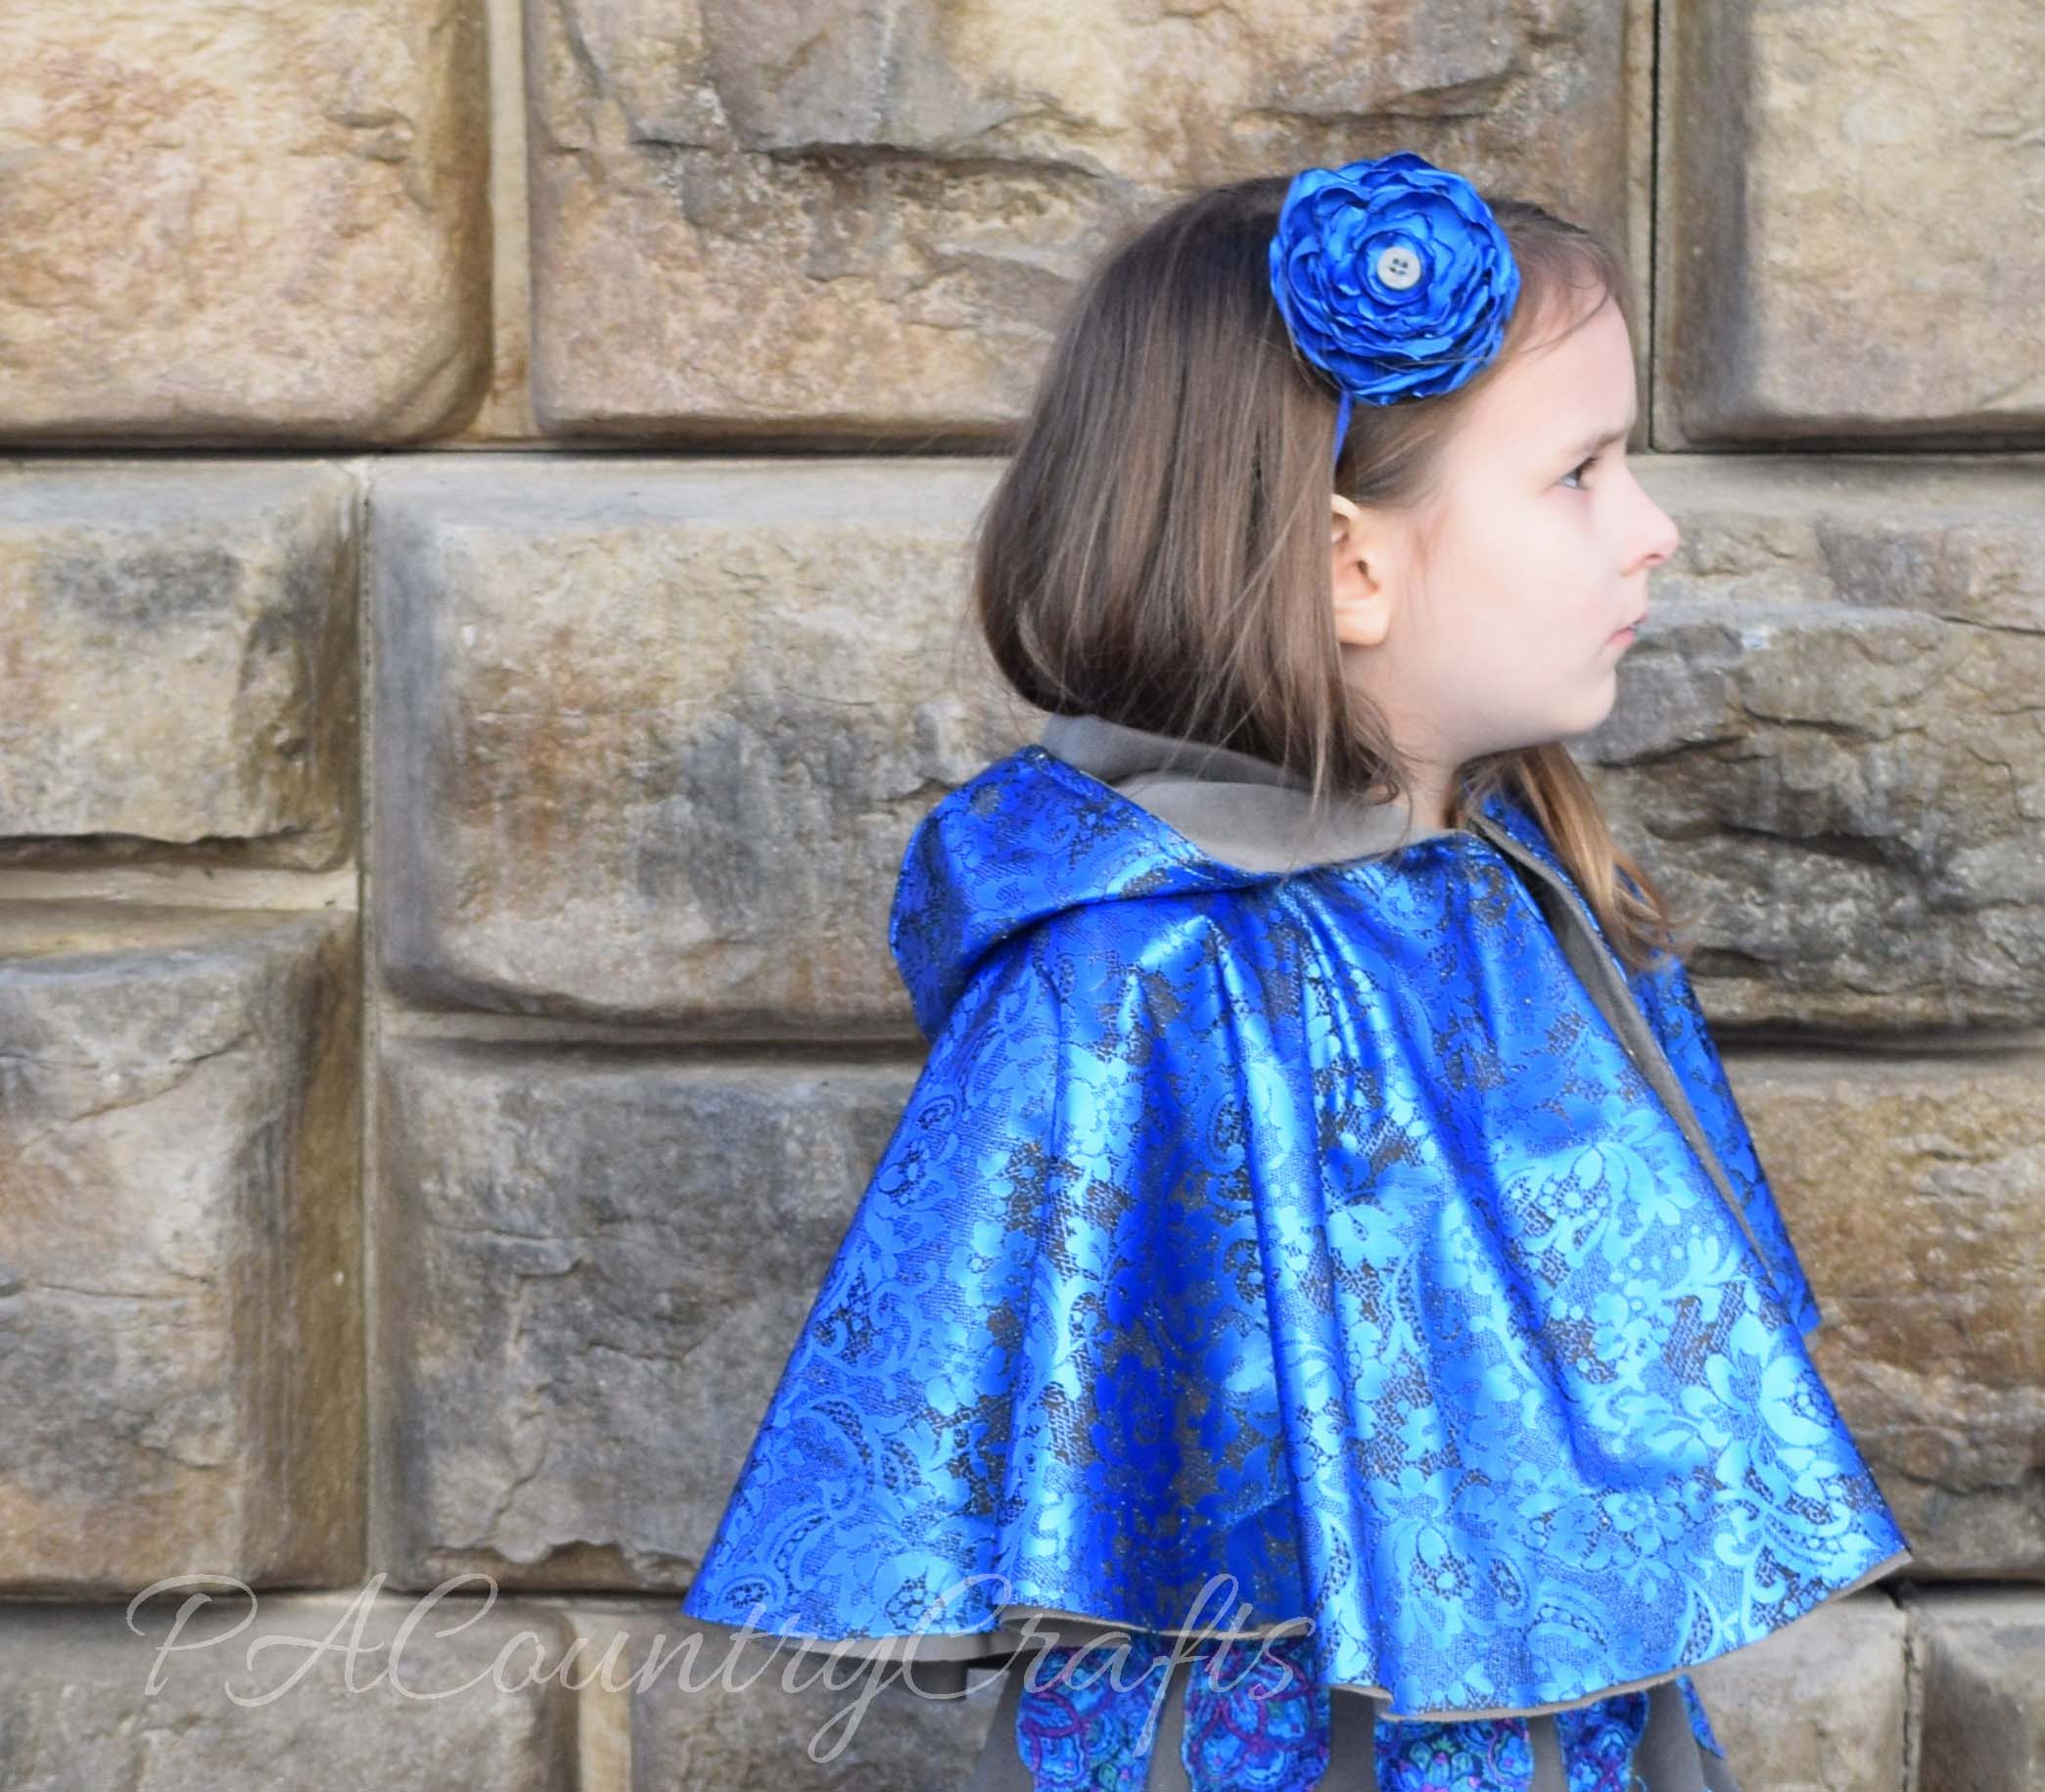
Finally, because she loves to have matching headbands, I made a blue satin flower to coordinate with the dress. Originally I was going to make something much more elaborate, but I thought there was enough going on with the dress already, so simple was best.

satin flower headband DIY

cathedral window dress
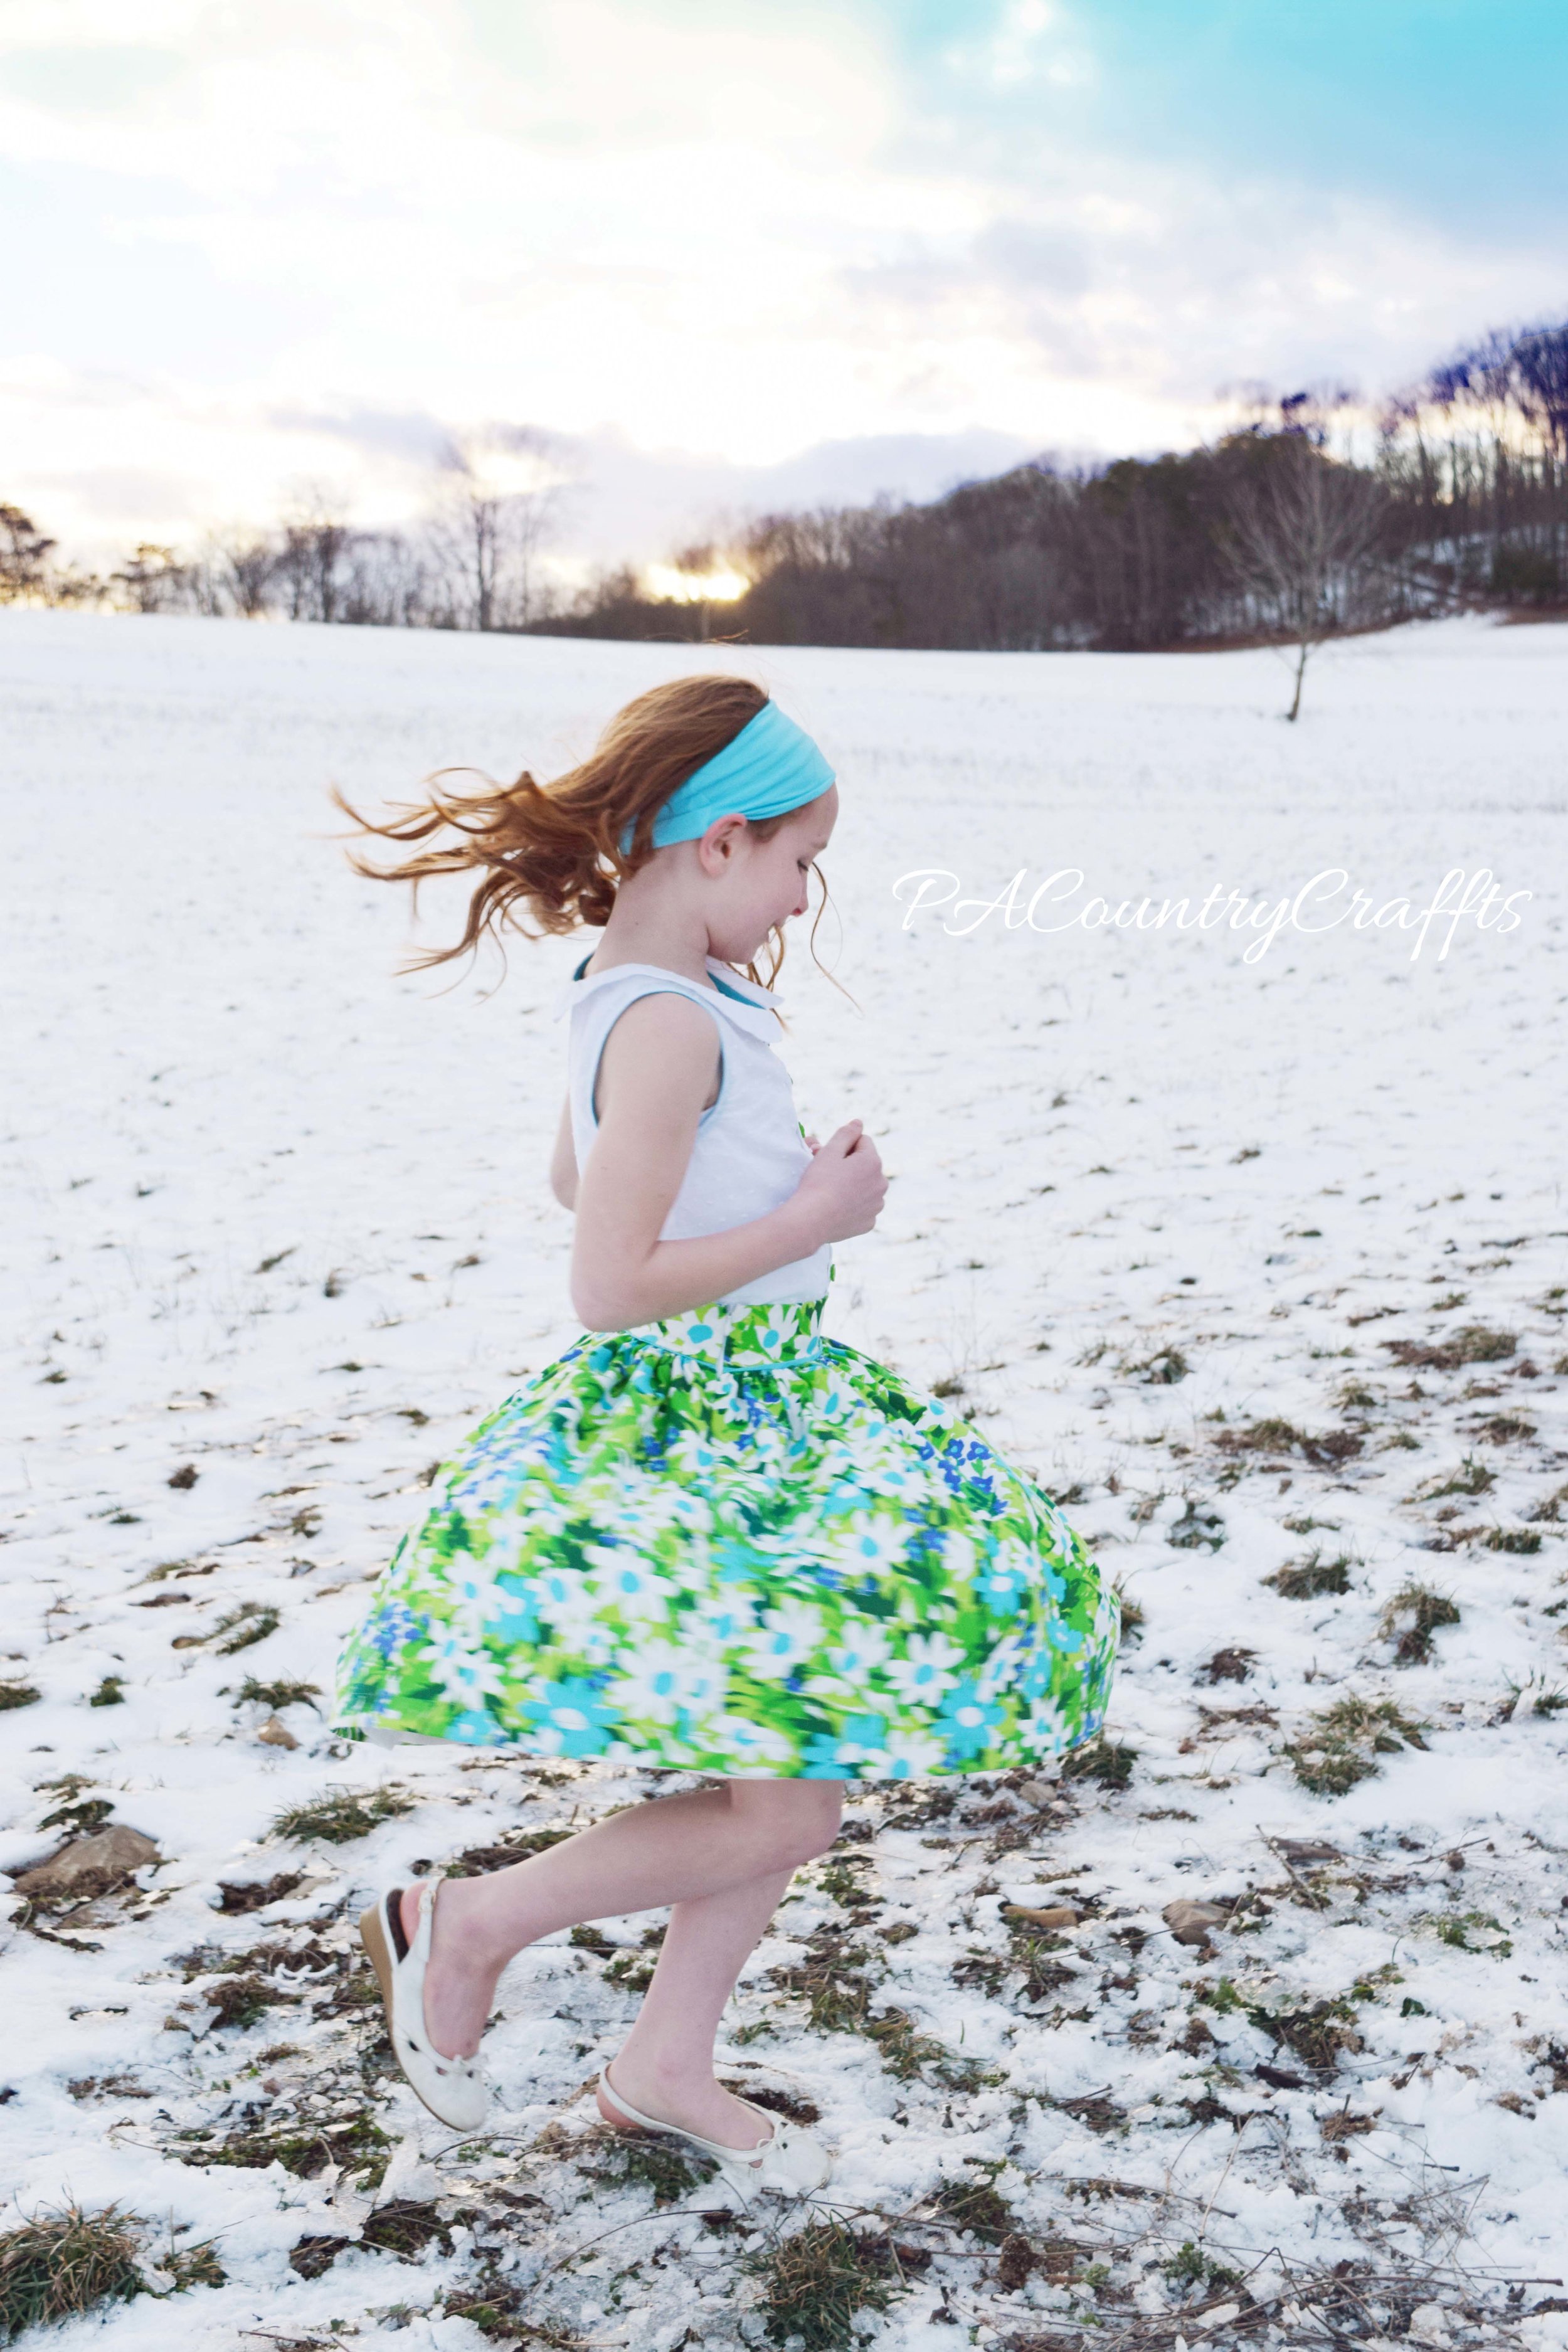
My daughter loves the outfit and she was such a trooper taking these pictures on such a cold day!

Beautiful cathedral window inspired dress

reversible metallic blue hooded cape

project run and play detsination inspired outfit

A big thank you goes out to Rita for letting us take pictures with your gargoyles and stone wall! Thank you to Bruce for letting me use your tourist pictures. Thank you to all of the friends and family who let me bounce ideas off of them and ramble on about sewing things that they don't understand. The past few weeks were especially stressful and busy, so I felt like I was scrambling to finish, but I have a lot of support and it really means a lot to me. 

You can vote for your favorite design over at Project Run and Play.

Scrappy Square Boys Quilts

This is all very unusual for me. First of all, I actually finished not just one, but two quilts!

Second, they are made for boys!

blue boys scrap quilts with lots of character fabric prints

I bet you didn't think I even owned boy fabrics. Well, that just goes to show how old these quilt squares are. Some of them were cut over 10 years ago. These are almost my oldest unfinished quilts, but sadly, not quite.

I used to make a lot of pillows from character fabrics - Toy Story, Jurassic Park, The Lion King, Rugrats, Clifford, and Bob the Builder, etc. - and these are some of the scraps. The ends are even borders from some Clifford pillow panels.

I remember one time when my son was little, he helped me to put some of these squares together. I let him arrange them and I sewed them together. I am pretty sure he is too cool for that now. So, these quilts are nearly the last of my little boy fabrics. Also, my little boy isn't little. sniff sniff

character fabric scrap quilt

toy story quilt squares

wavy line quilting

blue boys scrap square quilt

I backed them with fleece instead of using batting, so I hope they hold up OK.

machine quilting on fleece

On the smaller one, I did a little more practice with free motion quilting. I have a long way to go, but it is getting better.

free motion quilting on scrap quilt

On the larger one, I did wavy line quilting, which is the easiest way for me to machine quilt.

scrappy fabric squares boy quilt

I machine stitched the binding because of the fleece backing. That was the hardest part. I would rather sew it by hand. Hesitation to do the binding accounts for several months of the procrastination to finish these. I plan on donating the larger one to Project Linus or the local NICU, but I haven't figured out what to do with the small one just yet. I am just glad that they are finished and I hope that they will go on to bless someone else's little boy.

Cheeseburger Soup

A few years ago a friend and I traveled to Lancaster for a quilt show. It was such a blessing for me to be able to get away for a few days! It is the only time I have been able to do something like that and, as much as I missed my kids, I really enjoyed the break from being needed all the time. We stopped at a little Amish diner for lunch when we arrived. I was so excited to be able to sit down and eat a still-warm meal without feeding anyone else, playing referee, or having to go wipe that kid who ALWAYS has to go in the middle of supper. Feeling wild and adventurous by this newfound freedom, I tried something new and ordered cheeseburger soup with my sandwich. It was awesome!!! So, cheeseburger soup always brings fond memories of a good friend and a relaxing time. When I came home, I wanted to try to make my own cheeseburger soup, so I found a recipe in my Amish cookbook that we liked.

Flash forward a few years to a local Christian school's 5K and soup/chili cook-off. I sampled the winning soup- cheeseburger soup! - and she confessed to using frozen hash brown cubes to cut down on the prep time. Now, when we are out of our home grown potatoes and I need to buy them at the store anyway, that is what I get.

And, to cancel out that time saving step, I love to make homemade bread bowls to serve it in! YUM!!!

So good! Cheeseburger soup in a bread bowl

So good! Cheeseburger soup in a bread bowl

Amish Cheeseburger Soup Recipe

Amish Cheeseburger Soup Recipe

I have made a few changes to the soup over the years, and it can be a little different each time I make it because that is how I cook. Last time, I measured and took pictures so that I could share the recipe here on the blog.

Easy and delicious- cheeseburger soup!

Easy and delicious- cheeseburger soup!

I took some process photos, but my kitchen lighting is pretty awful. If anyone wants to give me the money to completely renovate it and add more windows that would be great! I will even make you some soup! ;)

Also, the pictures show a double batch because I wanted to share some and have leftovers. The measurements I am giving are for a regular batch that will make about 4 quarts of soup.

First, brown 1lb of ground beef in a pot. Drain the grease and put the beef on a plate or in a bowl or something to save it for later. No picture here, because I forgot.

Second, saute one chopped onion, 4 large shredded carrots, 3 stalks finely diced celery, and a Tablespoon of dried parsley in 2 Tablespoons of butter. (The food processor is a big time saver for this step!)

Saute vegetables for cheeseburger soup.

Saute vegetables for cheeseburger soup.

When the vegetables are tender- it usually takes about 10 minutes, add the ground beef and stir.

ground beef and vegetables

ground beef and vegetables

Add 6 cups of chicken broth, a teaspoon of salt, and a dash of ground black pepper. Bring to a boil. Then, mix in a 32oz. bag of cubed, frozen hash brown potatoes. (Shredded would work as well, but I like the variety of texture since the carrots are shredded.)

how to make cheeseburger soup

how to make cheeseburger soup

Simmer until the potatoes are tender- about 10-15 minutes.

In a separate, 2 quart pot, melt 2 Tablespoons of butter and whisk in 1/2 cup of flour. When combined, slowly add 3 cups of milk and heat until it begins to thicken. Add it to the soup and stir everything up really well.

how to make easy cheeseburger soup

how to make easy cheeseburger soup

Finally, add your cheese! Sometimes I use 4 cups of shredded cheddar, and sometimes I live dangerously and add half Velveeta. It is up to you, since I know that Velveeta is offensive to some, even if it is really creamy. If you like, you can also add some sour cream, but I almost always forget.

Cheeseburger soup served in a warm bread bowl- a perfect winter comfort food!

Cheeseburger soup served in a warm bread bowl- a perfect winter comfort food!

Cheeseburger Soup

  • 1 lb. ground beef

  • 1 large onion, chopped

  • 4 large carrots, peeled and shredded

  • 3 stalks of celery, finely diced

  • 1 Tbsp. dried parsley

  • 1 stick of butter, divided

  • 6 cups chicken broth

  • 1 tsp. salt

  • dash of ground black pepper

  • 1 32oz. bag diced, frozen hash brown potatoes

  • 1/2 cup flour

  • 3 cups milk

  • 4 cups shredded cheddar cheese/Velveeta

  • sour cream, optional

Brown ground beef over medium heat. Drain and remove from pot. Saute onion, carrots, and celery in 2 Tbsp. butter over medium-low heat until softened- about 10 minutes. Return ground beef to the pot and add 6 cups of chicken broth, 1 tsp salt, and a dash of ground pepper. Increase heat to high and bring to a boil, stirring occasionally. Stir in frozen hash browns. Simmer over medium-low heat for 10 minutes or until the potatoes are tender, stirring occasionally. In a separate saucepan, melt remaining butter. Mix in flour and gradually add milk. Heat over medium heat until it begins to thicken, stirring constantly. Stir into the soup. Add cheese and heat on low to melt. May also add sour cream just before serving.

Cheeseburger soup in homemade bread bowls

Cheeseburger soup in homemade bread bowls

Feel free to pin it for later!

Easy and delicious- cheeseburger soup!

Easy and delicious- cheeseburger soup!

Here are some more recipes you might like...

Chicken and Waffles
Pirogi Casserole
Sweet & Hot Mustard Recipe- Everyone loves this stuff and it is so easy to make!

Sweet & Hot Mustard Recipe- Everyone loves this stuff and it is so easy to make!

Felt Penguin Dress-Up Busy Bag

A few weeks ago I was talking to my sister about how to keep the kids occupied when you are trying to get something accomplished that requires a little more concentration and brain power- like taxes. One thing that I like to do is to keep certain toys and activities out of reach so that they have that novelty factor when I do pull them out. It can be puzzles, play-doh, or a box of toys with tiny pieces that I do not like cleaning up. Sometimes I also look for busy bag ideas on Pinterest. I found a cute felt penguin idea HERE so I decided to make my own. Of course, I over-achieved a little bit and made the accessories more detailed. All it took was some felt scraps, hot glue, and a few googly eyes.

DIY felt penguin dress up game

felt dress up penguin busy bag

felt penguin dress up game

Try this easy toddler felt penguin busy bag!

It is fun to mix and match, but it can also be used for color sorting.

Toddler activity- play dress-up with felt penguins.

Everything fit inside a regular sandwich bag, so I just keep it in a drawer to pull out on special occasions when I need a few minutes.

felt penguin busy bag

felt penguin dress-up busy bag

If you want to pin this one to save it for later...

Make this penguin dress-up toddler busy bag.

If you are super ambitious, I have lots of quiet books I have made that you can see HERE.

If you are looking for some easier ideas, try these...

DIY I Spy Bottles MOPS Craft

No-Sew Felt Play Mat ~ Great kids craft!

Easy Ribbon Wands Tutorial