Grace's Quiet Book- Baby & Bassinet Page

swaddledbabyquietbook.jpg
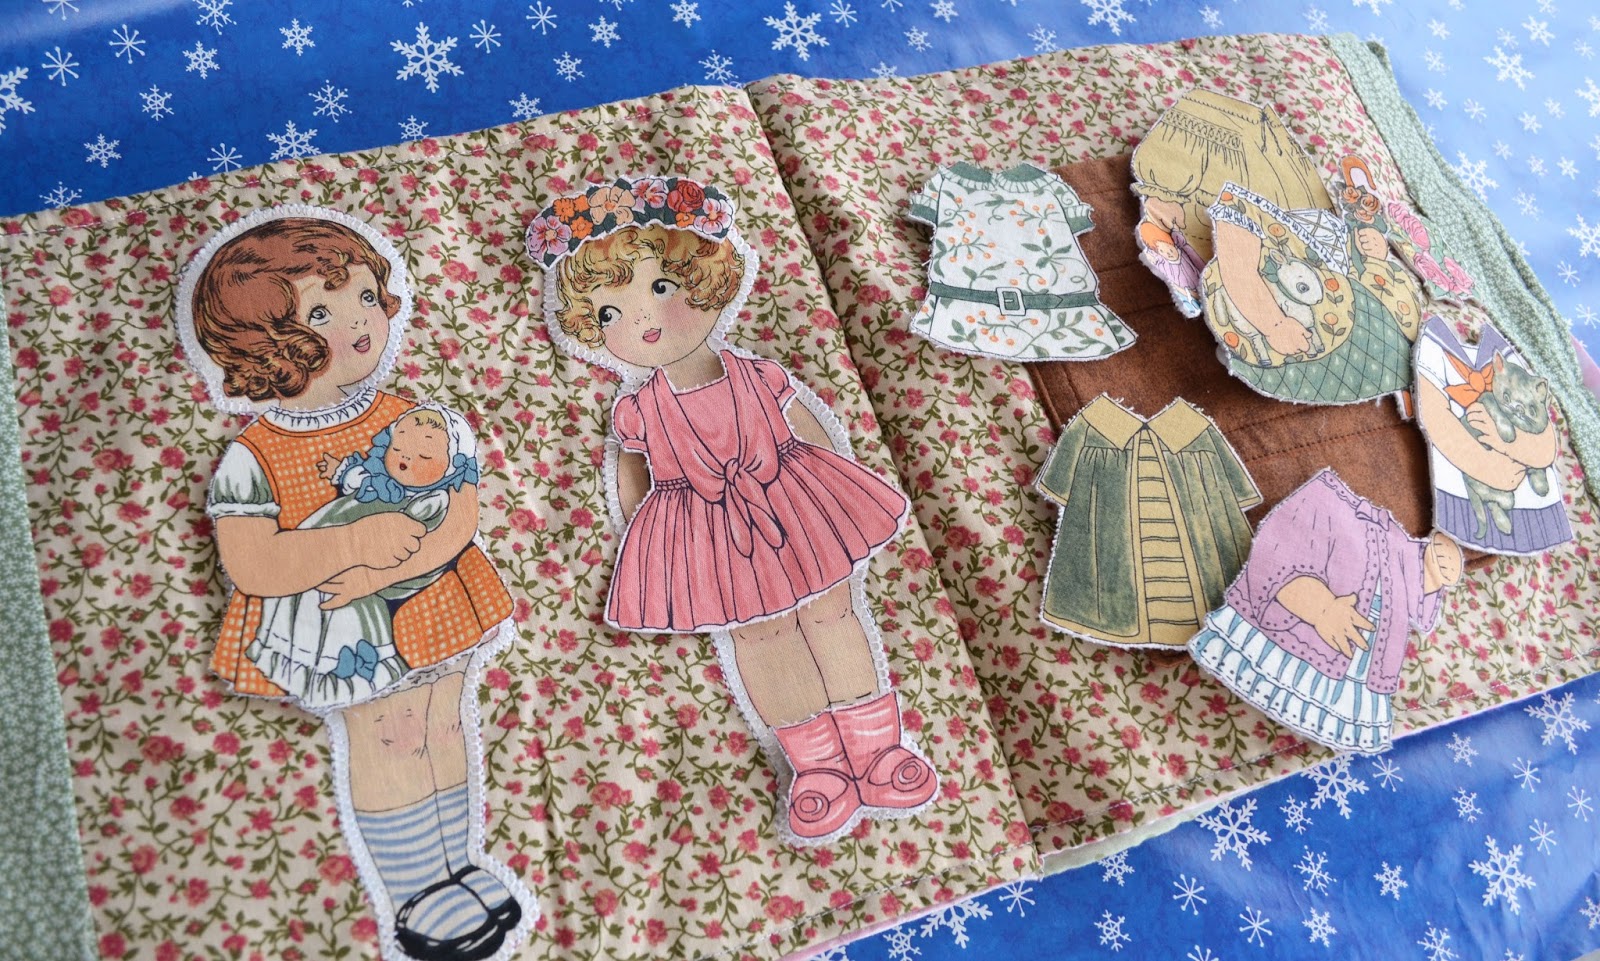
I think every little girl this age LOVES baby dolls. With 5 girls we have so many dolls in this house it is not even funny! The baby idea was an obvious choice for a quiet book page, but I still wanted to keep it simple. (Some of the other pages were wearing me out!)
I ended up making a bassinet to hold the baby. It is made pretty much like a pocket with a piece of gathered eyelet trim sewn along the bottom.
quiet book bassinet
quiet book bassinet
The baby is a miniature version of a swaddle baby. (I made one of those a long time ago and blogged about it HERE.) The concept of the swaddle baby is that the blanket is already attached, making it easier for a little one to wrap the baby up (saving me from rewrapping it every 20 seconds.)
swaddle baby quiet book page
This time I hand embroidered the face on it and used a smaller piece of gathered eyelet lace and ribbon to make a faux bonnet, which I like so much better than the original swaddle baby I had made.


swaddle baby quiet book page


Grace often wants to drag a baby doll along to church or tells me she has to go potty so that she can sneak down and swipe one out of the nursery to bring back upstairs. I thought this might help with that, but we usually end up in the nursery when I have to go feed Hannah anyway. That is just the season of life we are in, I suppose.
If you want to see all of the pages in Grace's Quiet Book you can click HERE.
If I get a moment or two, I will try to link up at these parties:


Grace's Quiet Book- Tea Party Page

teaparty.jpg
This quiet book page was another really big hit with Grace. It does eliminate some of the quiet aspect of the book, though, because a tea party is not as fun by yourself and she is always offering me tea and sweets. How can I refuse? :)
Grace's Quiet Book- Tea Party Page
When you open the page it is just a table with attached plates (less to clean up). The tablecloth is gathered and topstitched. Let me just say that I really, really, really wish I had curved it down to match the top of the table. It drives me crazy!
Grace's Quiet Book- Tea Party Page
There is a tiny piece of velcro holding the bottom of the tablecloth in place at the bottom outside corner. When you lift the tablecloth up there is a storage pocket underneath.
It hold all you need to have a little tea party!
Grace's Quiet Book- Tea Party Page
The teacups are made with blue cotton scraps fused to brown scraps and brown scraps fused to white flannel (for some "stickiness" on the cotton page.) The two double-layer, fused squares were then sewn in a teacup outline with the tops left open and cut out. (Backstitching is very important here. On the ones I didn't go over well they are starting to pull apart and will need fixed.)
Grace's Quiet Book- Tea Party Page
The tea bags are made with white cotton folded in half and sewn in a tea bag shape. I even stuffed a little real, fruity tea in there before sewing the whole way around. Seam rippers come in handy for lots of things! :) Bakers twine is sewn in to connect the tag and tea bag.
mini fabric tea bags
But, if you aren't in the mood for blue teacups, you can also use the purple set...
Grace's Quiet Book- Tea Party Page
The teapot is just two layers- cotton and flannel.
tea party quiet book page teapot
Besides being purple, these tea cups are a lighter shade of brown. I couldn't get a great shot of the inside but you can see the flannel back here, too.
inside mini fabric teacups
What is a tea party without some sweets?
miniature felt pie and cookies
The chocolate chip cookies were a pain!!! The kids destroyed my Frixon pen, so I was trying to sew from the back side of the cookie and it would shift so that I kept missing the chips I had embroidered on the front.
mini felt chocolate chip cookies
I told you to remember the pie from THIS page. Well, here is a teeny, tiny version!  I wove the little strips and laid it over the circle that was fused onto the felt. Then I sewed around the circle and trimmed the edges. Around the felt circle of the bottom crust I used pinking shears.
mini felt pie
This page has the most detail, by far. There are a lot of little pieces to it, so that may be something to consider if you don't want to clean up after your kid.


Grace's Quiet Book- Tea Party Page
There are three more pages to go and I have a page with the links to all of the pages in Grace's Quiet Book HERE.
If I get a moment or two, I will try to link up at these parties:

Grace's Quiet Book- Paper Dolls Page

paperdollsdressedup.jpg
The paper doll fabric I found two years ago started this whole quiet book thing. Yeah. I procrastinate a little.
I was totally inspired by THIS paper doll quiet book page so you can read all about it there. Stef gives a nice tutorial on how she made hers. The only thing I did differently on the dolls was that I used a blanket stitch and left some of the white edge around the dolls.
On the clothes, I did three layers of interfacing and fused them to a layer of flannel so that they kinda' stick to the fabric and they are very durable.
Also, I was a bit lazier. I made a dresser instead of an armoire. I just made a pocket out of two layers of interfaced brown fabric. I stitched rectangles on to resemble drawers and sewed on some vintage buttons for drawer pulls. In hindsight, I wish I would have done two knobs on each drawer.  Anyway, it holds all of the clothes very nicely.
Grace's older sisters are very jealous of these pages. I have a lot of the paper doll fabric left, so I may have to do something for them.


I am about halfway done with the posts about these pages, so if you want to see the rest of them you can click HERE.
If I get a moment or two, I will try to link up at these parties:

Grace's Quiet Book- Sewing Machine Page

sewingmachinequietbookpage.jpg
Grace's Quiet Book- Sewing Machine
OK, so I made this page because I like to sew, but my other daughters have shown interest and once I got the idea for this page I just HAD to go with it!
Grace's Quiet Book- Sewing Machine
I wanted to make a vintage style sewing machine and I had this black swirl fabric I had been hoarding that was just perfect!!! I drew my own template that was very much inspired by the lovely art a good friend made for my sewing area. ;) Again, I just used heat'n'bond and a zig zag stitch to sew it to the background. The "needle" is just some gray embroidery floss. It is missing a presser foot and, to be honest, that really bugs me.
Grace's Quiet Book- Sewing Machine
I debated for a long time about adding that pink button on there because it isn't quite so "vintage", but I wanted her to be able to pretend she was turning a knob to adjust stitch settings. At the top of the machine there is a piece of velcro that is used to hold the spools of thread.
Grace's Quiet Book- Sewing Machine


I made those from two layers of gray polka dot fabric leftover from THIS tie. I stitched some embroidery floss on there and then used- yeah, you guessed it- heat'n'bond to attach it to some gray felt. The felt makes it stick to the velcro and hides the ends of the floss.
Grace's Quiet Book- Sewing Machine
There are several different spools of thread so that they color can be matched to the scraps of fabric hidden in the sewing table/pockets.
Grace's Quiet Book- Sewing Machine


I just grabbed random scraps of fabric from my scrap bin that matched the floss. I cut the edges with pinking shears to prevent fraying. I think I will probably go back and trim them so that they are all the same size square. Then, she can lay them out in a pattern to make a quilt. So, that makes this page good for pretend play, color matching, and patterns. OK, and mostly for making Mommy smile. :)

Grace's Quiet Book- Sewing Machine

You can check out all of the quiet book pages in this series HERE.

If I get a moment or two, I will try to link up at these parties:

Grace's Quiet Book- Pie Page

piepagepic.jpg
Grace's Quiet Book- Weave Pie Crust

This was definitely my easiest page and only took about 15-30 minutes. It is a little too advanced for her at this age (2 1/2) but she should grow into it and it is good motor skills practice. Maybe one day she will want to weave baskets like Mommy! ;) (shameless plug for my etsy shop here.)

The pie page of Grace's quiet book was inspired by THIS one.  I used leftover blueberry fabric from THIS apron and some light tan felt.  I traced a CD for the "blueberry pie filling" and used heat'n'bond to attach it to the background. For the crust, I made the center circle a little smaller than a CD and eyeballed the wavy edge. 
Quiet Book Pie Crust Page
I cut the strips of felt using pinking shears and put them under the crust on two sides. After lots of pinning, I used a simple zig zag stitch all the way around the circle to hold everything in place. Then, I trimmed the ends of the strips to follow the curve of the crust.

Quiet Book Pie Crust Page

Felt Pie Crust
My zig zag skills aren't perfect, but it works.Now, remember the whole blueberry pie thing, because it will come back a little later in the book. :) Stay tuned... The next page is my favorite!!! 
If I get a moment or two, I will try to link up at these parties:

Grace's Quiet Book ~ Introduction

quietbookbinding.jpg
This might be the best Christmas present I have ever made! I have been wanting to make a quiet book for a long time. I even blogged about the time I found the paper doll fabric I used. It was originally supposed to be for my daughter who is now 5 and (so I thought) too old. Thankfully, I have a few more in line after her so I could still make one. I really need to stop procrastinating! :)
Grace's Quiet Book Introduction

Grace's quiet book was inspired by THIS one. I like the "shabby chic" look and I made this book entirely from my stash. The pages are all very "girly" and things that I thought she would like. I was going to put it into one big blog post, but it would be super duper long. I am breaking it up so that I can describe how I made each page and help anyone else who is looking to make a quiet book. I will warn you that they are a lot of work. It was really fun, though, and I think she really likes it.

Grace's Quiet Book Cover
For the backgrounds of all of the pages I used some fabric from my stash that had the same colors and "shabby chic," vintage look.  (A project like this would be great using a layer cake or cutting it from a fat quarter bundle.) My pages were about 11" square. The letters on the cover used fabric from my scrap bin (Oh, I used so many scraps in this book!) and they are attached with heat'n'bond and a satin stitch.  Each page was made by sewing two pages right sides together on the three outer sides, flipping right sides out, inserting a piece of batting, then sewing 1/4" from the edge all the way around the three sides to hold it in place. Then, the pages were all stacked together, in order, and sewn 1/4" from the edge. (Use a heavy needle!)

Grace's Quiet Book Binding

For the binding of the book, I just used that striped fabric to sew it on like quilt binding, but wider (although it doesn't have to be.) At the ends, I left the binding about a half inch longer than the book and folded the fabric in before hand stitching it in place so it is all neat and tidy.

So, that is a bit about the basic construction of the book.  For the next few weeks, whenever I get an opportunity, I am going to post about the individual pages. I am super happy with how they turned out and hopefully they will be helpful to someone else looking to make a quiet book. If you have any questions, just let me know!

UPDATE: You can see the first page, Weave Pie Crust, HERE.