

Easy Crochet Doll Hat Pattern
/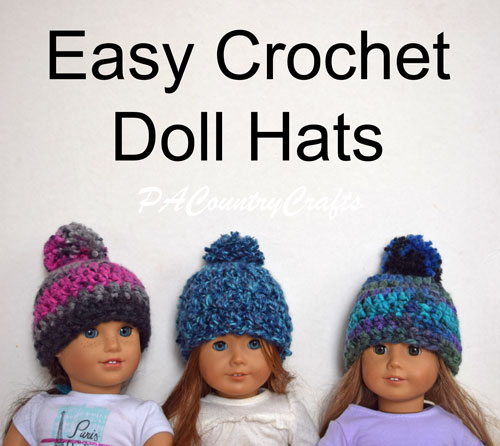
Free pattern for easy crochet doll hats made with chunky yarn. Free pattern for matching girls hats available on this website, too!
Read MoreFree pattern for easy crochet doll hats made with chunky yarn. Free pattern for matching girls hats available on this website, too!
Read More
Last fall we had a 70th anniversary party for my grandparents. My Meemaw and Pappy are just so spunky and we are so blessed to have them in our lives and in great health! My Pap makes quite an impression. He says the wildest things and tells the funniest stories. He has a knack for finding amazing deals and making a quick profit. He also makes wooden crosses in his workshop and carries them in his pocket to give away. My Meemaw is such a sweetheart and, although she might flare her nostrils at him from time to time, she tolerates his antics with a little smile. She still sings in the choir and volunteers at church. She comes to as many of her great-grandchildren's sporting events as she can. (Her senior admission card is falling apart but she is so proud of it!) She pretty much just radiates sweetness and love.

We celebrated their anniversary (and Pap's 90th birthday) with a party last fall. As an alternative to a guest book, I offered to make a quilt. I had several charm packs (sets of assorted 5" squares of fabric) that I had won in giveaways and I cut some additional 5" blocks from solid white. The guests used fabric markers to sign the squares or add a special message.
Then, after letting them sit on my desk for a few months, I finally got around to making the quilt. I just did basic patchwork, arranging the squares pretty randomly and even using the unsigned squares in case anyone wants to sign it later. I added a white border and then did free motion quilting. I am not very good at free motion quilting. I need a lot more practice. I basically just decided that finished was better than perfect.
It is just a lap size quilt. I probably could have added in some other quilt squares to make it bigger, but I kind of just picture this draped over Meemaw's couch or Pap covering up with it while sitting on his recliner. :)
I was running out of daylight to take these pics- and we had snow- but I am going to now bombard you with quilt pictures because this was a fun project and it has been awhile since I actually finished a quilt:


If you would like to pin this idea for later... I mean, it isn't anything super original, but it will get much more use than a regular guest book and the charm squares did make it significantly easier!

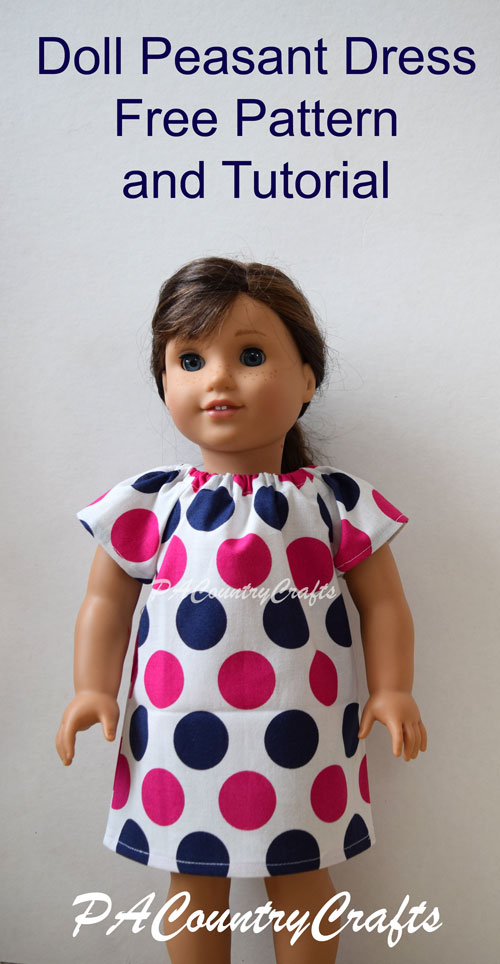
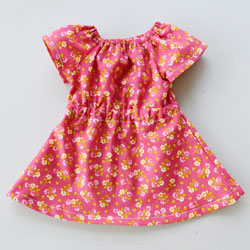
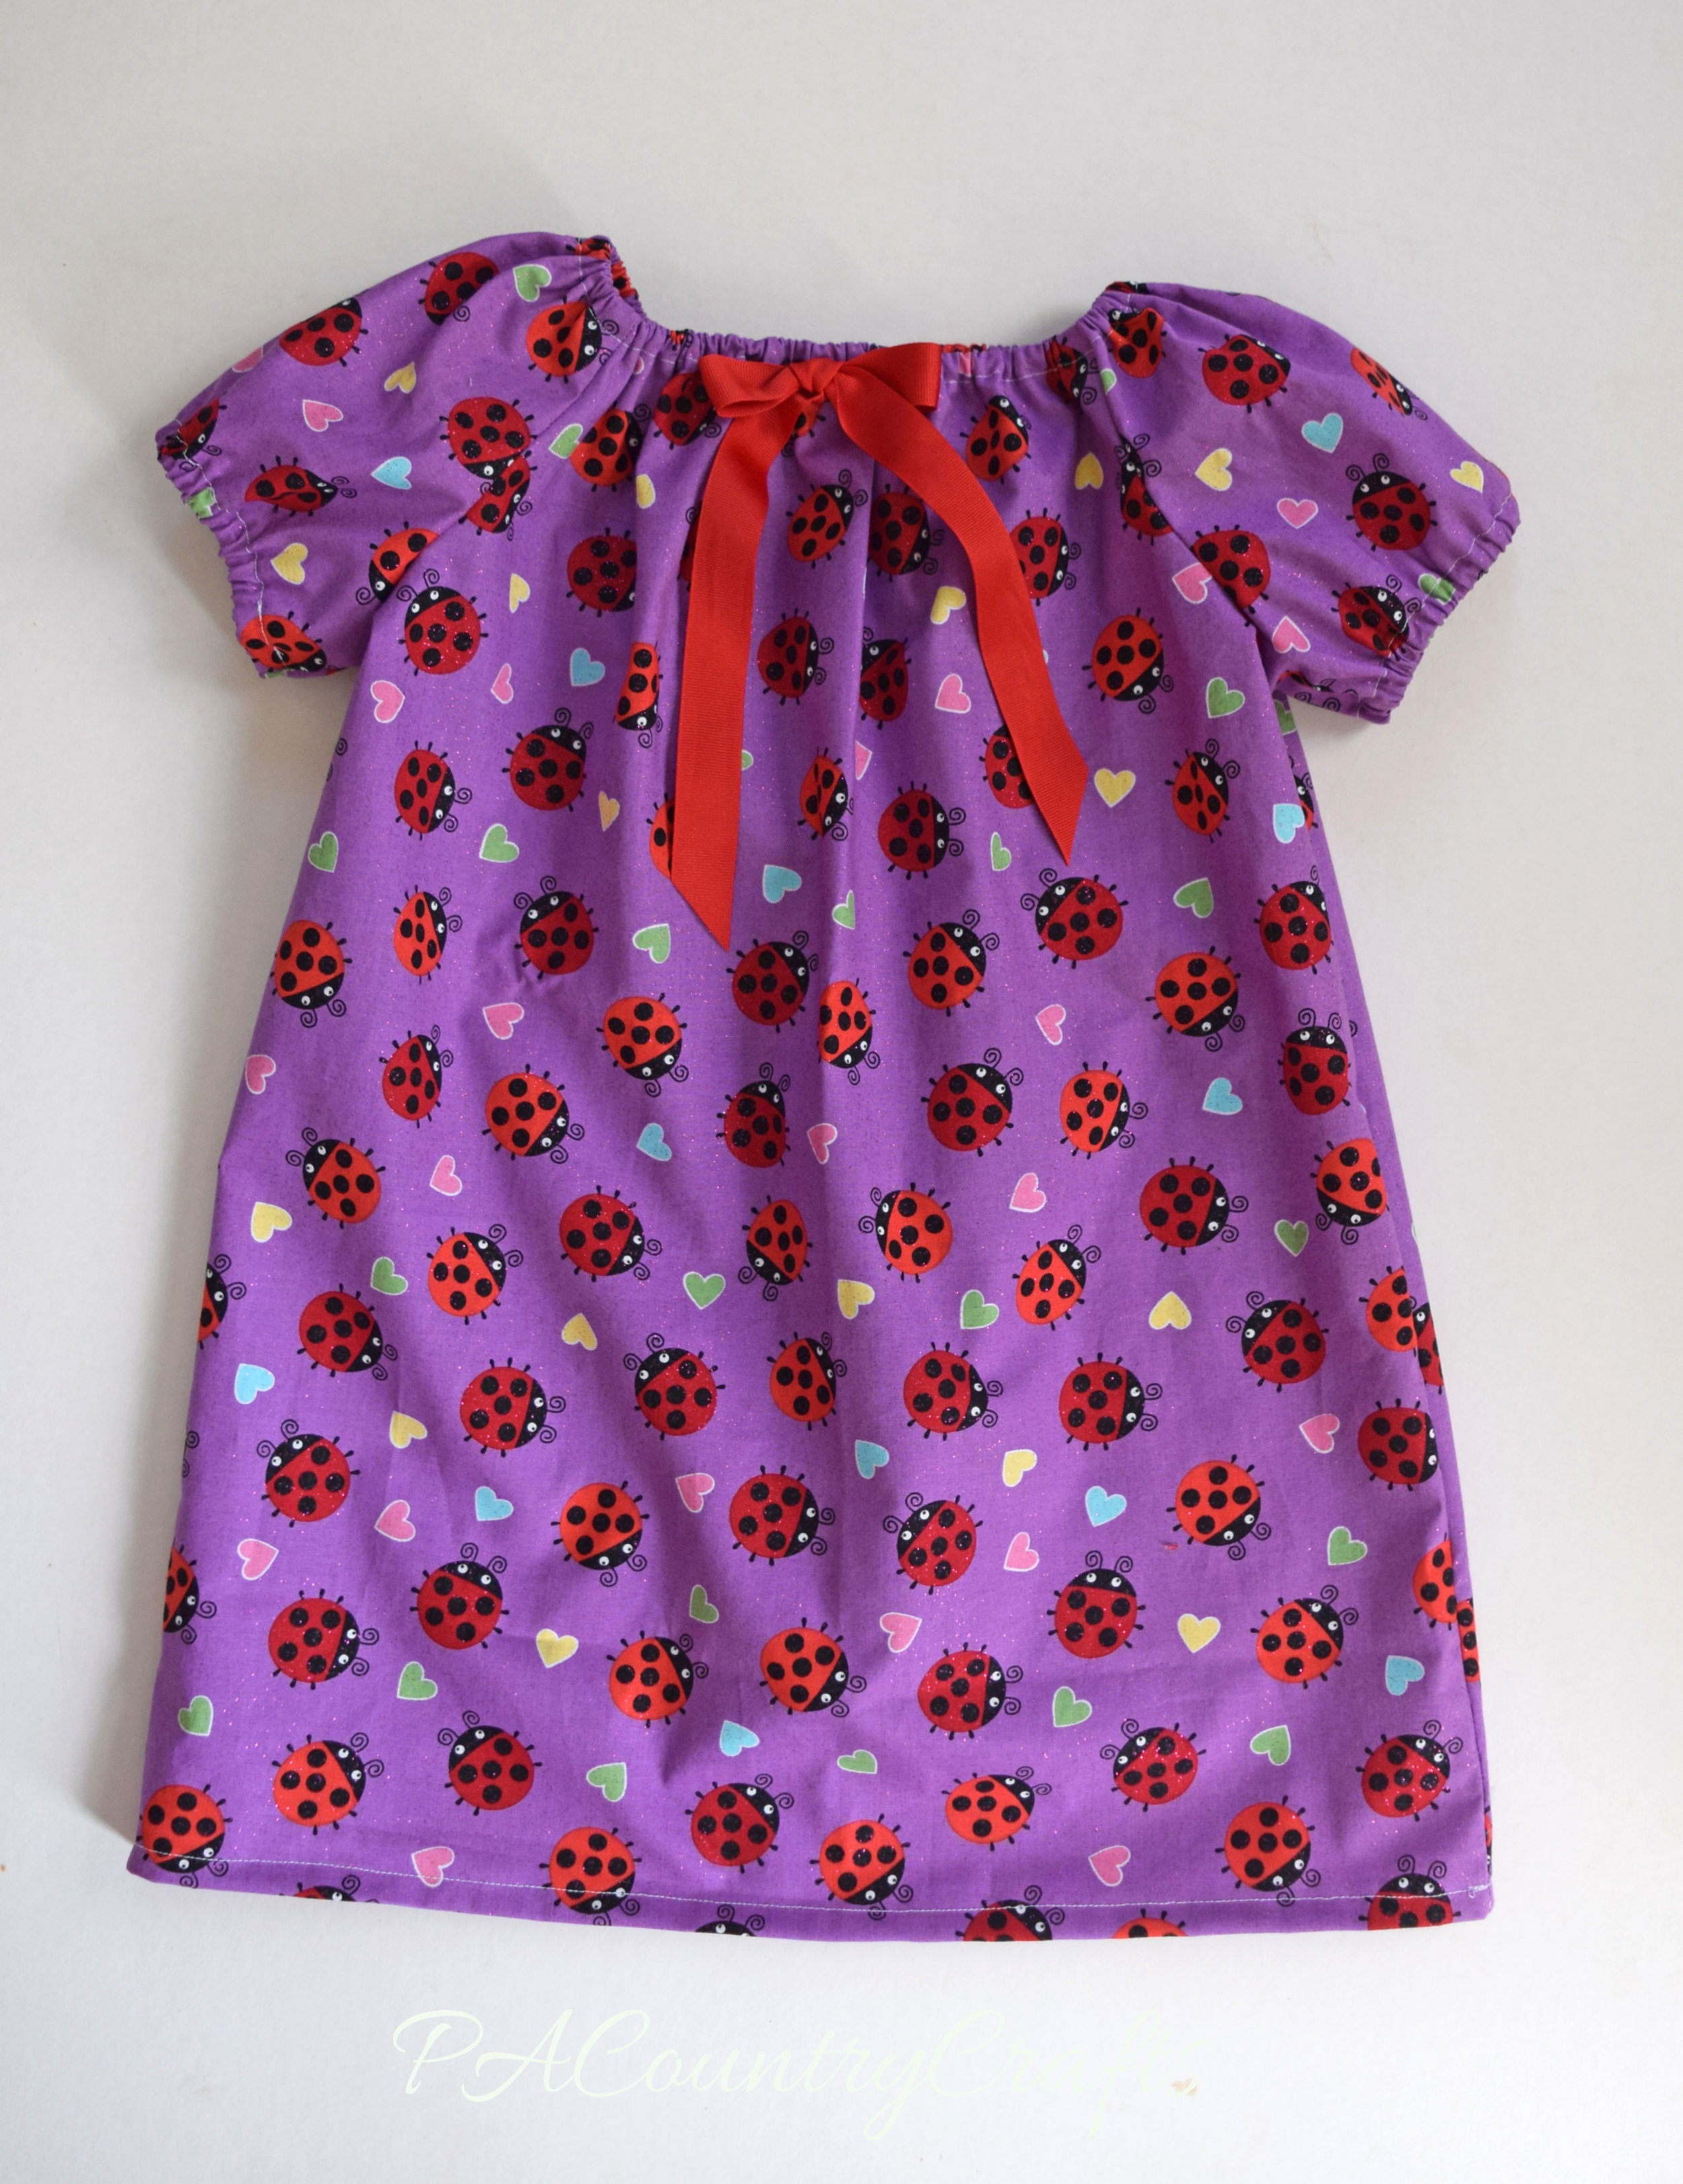
Free sewing pattern and tutorial- works as an 18” doll top or a baby doll dress. This peasant top is so easy it makes a good beginner sewing project.
Read More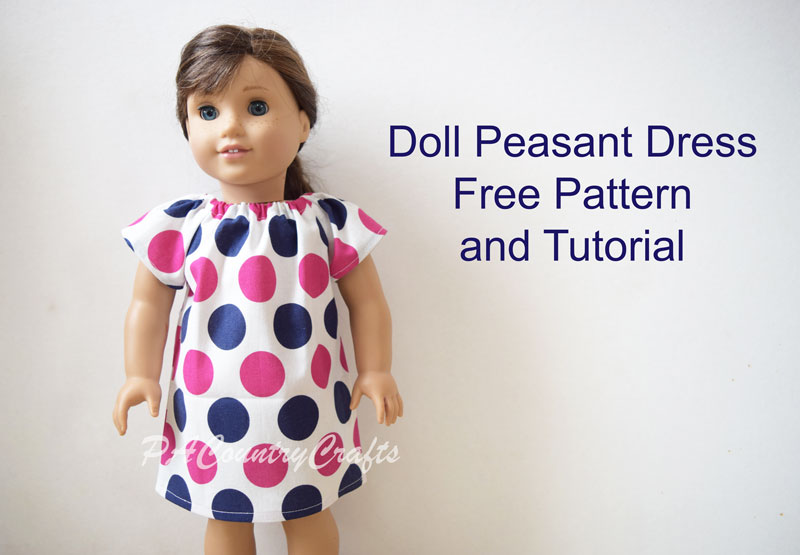
Peasant dresses are a really easy beginner sewing project. When I teach my daughters to sew doll clothes, this is our first lesson. I have to help with a few of the steps, but they can handle most of it.

After you learn how to make this basic dress, there are a lot of options to change it up for a totally different look. I also have tutorials for making peasant dresses in girls' sizes. Matching girl/doll sets are always a pretty big hit!
These dresses have a lot of variations, and I hope to expand on this pattern in the future. For now, though, I am starting off simple with a basic, short sleeve peasant dress. I have picked up some tricks over the years to make sewing them a little faster and easier.
You will need:
a fat quarter of fabric or 1/3 yard of fabric if bought from the bolt
8 1/2" of 1/4" wide elastic
thread
pins or wonder clips
sewing machine and needles
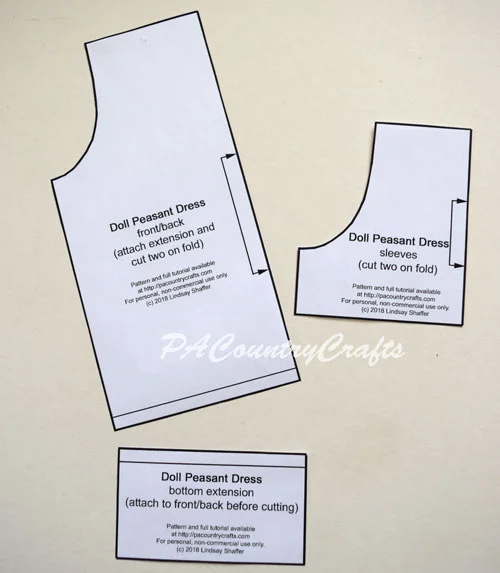
printed free pattern- available HERE
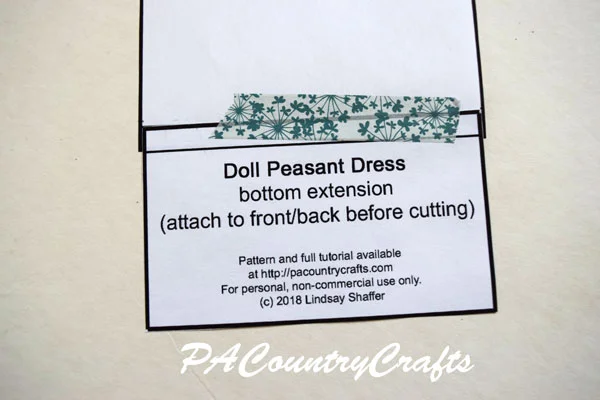
First, let's prep the pattern. Print it out in actual size and cut it out. To fit the longer main dress piece on the page, I had to do it in two pieces. So, you will have to overlap the little bottom section and tape it together. It is off a little bit- about 1/8" but I am not a professional and it is a free pattern so center it the best you can and don't complain. OK?
These dresses require very little fabric. A fat quarter works perfectly and I always seem to have a lot of those hanging around.

You want to make sure to place the width of the fabric (the direction that stretches a little more) across the width of the pattern pieces. Just fold the fabric in enough to place both pieces on top.

If you want to be really efficient about it, fold it again, accordion style, and cut two of each pattern piece.


(If that was confusing, just ignore it and cut two pieces out individually!)
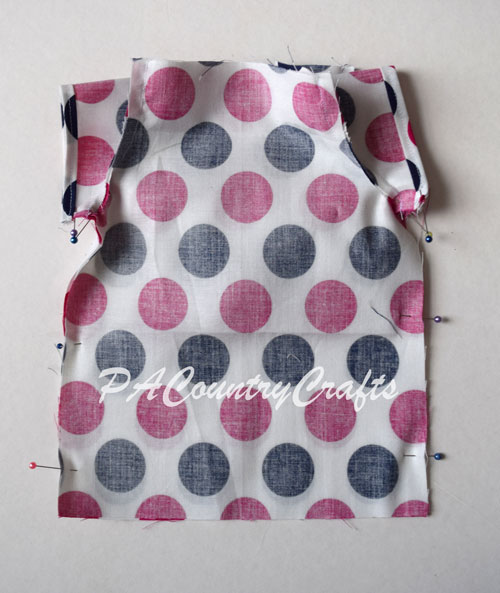
You will have four pieces total- a front, a back, and two sleeves.

One trick I learned through experience is that it is easier to hem the sleeves before sewing the dress together. Fold it under 1/4" twice and sew 1/8" from the edge. (My girls usually need help with this when they are first learning because it is such a small hem.)

Next, line up the curved edges of one sleeve and one dress piece as shown. Make sure to line up each set on the same side.

Sew the curves together with a 1/4" seam allowance. (I also use a shorter stitch length to make those curves tighter.)
Then, sew the opposite side of each sleeve to the other side of the dress. This part used to confuse me, so I will show it at a couple of different angles.


Again, use a 1/4" seam allowance. It is kind of like sewing everything together in a loop or a rectangle.

Next, fold the right sides together and line up the side seams. Make sure the ends of the sleeves and armpits line up.
(Normally, I would nest the armpit seams so that one goes in each direction. It would lay flatter and be easier to sew. However, on this particular project, I like to face both of the seams towards the dress pieces, away from the sleeve hem. I just don't want more bulk in that area. You can do whatever you like.)

Pin and sew along each side with a 1/4" seam allowance.
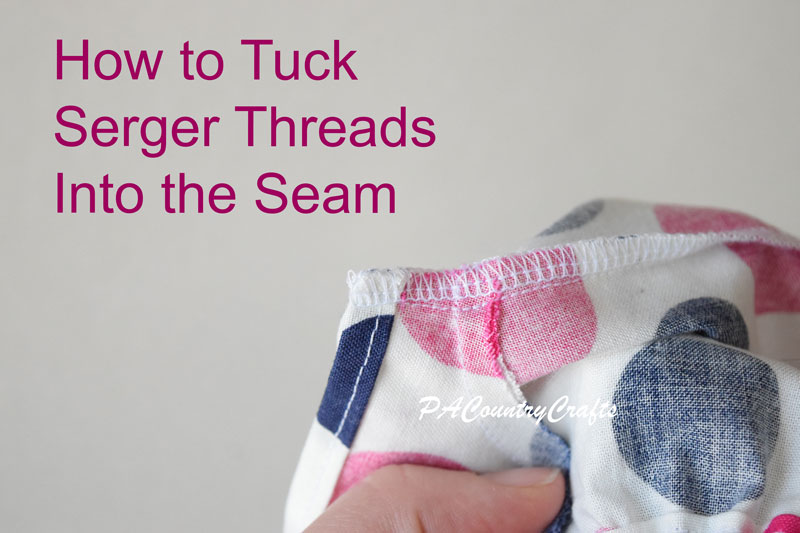
Now, I happen to have an overlock machine, or serger. If you don't have one, go buy one. They are awesome. If that isn't an option or desire for you, you can finish the seam another way- pinking shears, zig zag stitch, etc. Google it.
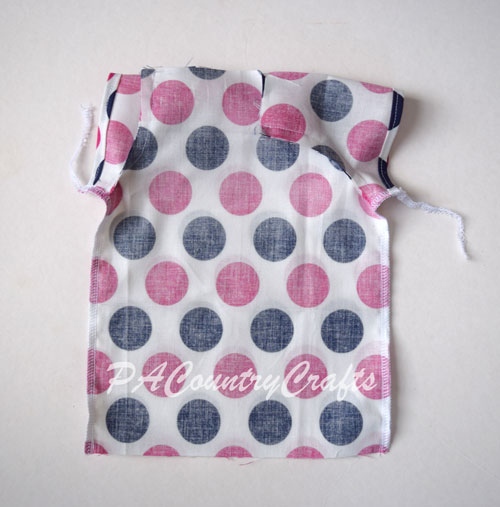
Now, I happen to have created a separate tutorial for how to tuck in those serger threads. You can see it HERE.

Next you have to sew the elastic casing for the neckline. This is the hardest part, in my opinion. It just seems to take a little practice. The most important thing to remember is this: KEEP THE SEAMS ALL PRESSED IN THE SAME DIRECTION! Did that seem like I was shouting at you? Good. I was. Trust me. It is very frustrating to get the elastic stuck at a seam and this will prevent it.

Fold the raw edge down 1/4" to the inside.

Next, fold it in 1/2" (and watch those seams!) You can iron and pin. You can use wonder clips (those rock!) You can just eyeball it up and fold it as you sew (maybe after some practice). So that I could take a picture... I pinned this time.
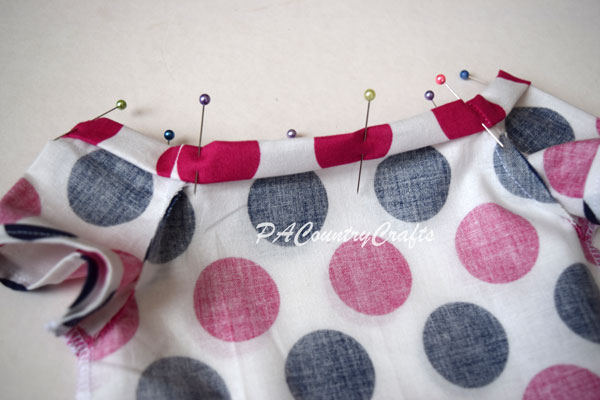
Start sewing somewhere on the back. I like to start just before a seam. Sew about 1/8" from the folded edge all the way around. I keep my needle to the left and line up the outside folded edge with the edge of my presser foot.

Do NOT go all the way around! Leave the last inch or so open so that you can put the elastic into the casing.

Cut a piece of 1/4" elastic 8 1/2" long. Pin a safety in onto each end. One will guide it through the casing. The other will keep the end from getting pulled in. (You can pin it to the dress if you want to be really sure!)

Make sure that you push the safety pin towards the seam so that everything is going the same direction.

Push the elastic all the way through the casing, being careful not to twist it.

Overlap the ends of the elastic about 3/4" or so.

Use a small zig zag stitch on the machine to hold the ends together.

Stretch the casing to pull the elastic inside. Sew the opening closed.

Finally, turn the bottom under 1/4" twice to make a small hem.

Stitch 1/8" from the edge.

Hooray! It is finished!!!

To put it on the doll you will want to pull it up from the legs, not put it over the head. They are sort of disproportional so it is easier that way. Plus, you don't mess the hair up.

Don't forget to save the printable pattern...

If you want to pin this post to save the instructions for later...

Here are some more tutorials you might like:

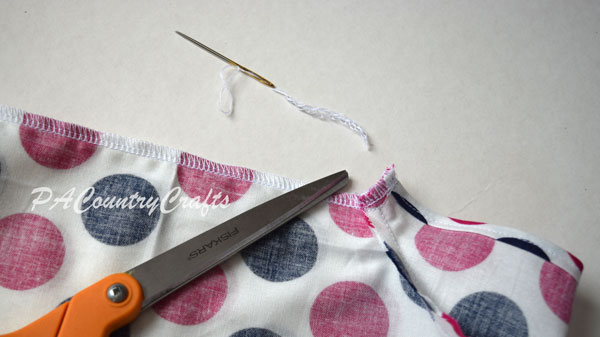
I absolutely LOVE my serger! I have the Brother 1034D, which seems to be a very popular model. I have had it for 7 years and sewed hundreds of dresses with it (FOR REAL!) Today I thought I would share how I tuck in all of those thread ends when finishing a seam with the serger or overlock machine. Maybe it is just common sense stuff that everyone who uses a serger knows, but at one point I did not. It makes everything more secure, can help even out slightly uneven edges, and produces a nicer finish.
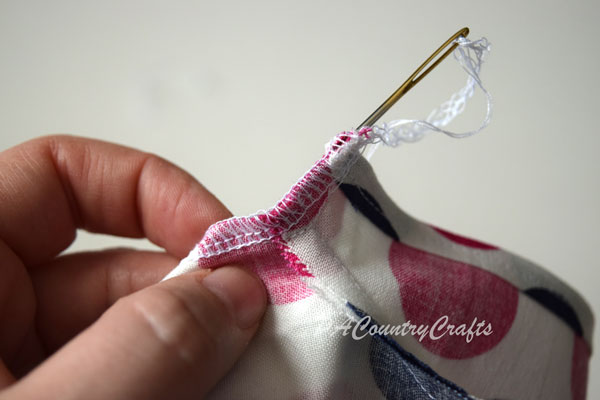
When you plan on tucking the loose ends into the seam, you have to leave a "tail" of serger threads after you sew. About 3 inches will usually work well. I start by gently sliding the threads between my fingers to even them out. The tail will start to stretch out, but two of the threads will be much longer. You want them all to be trimmed close to the same length so that they don't get bunched up. It will look something like this:

Trim off the two longer threads and thread the remaining section through a darning needle. My daughter calls this particular one the "magic needle" because it is a short needle with a wide eye. It works great!

Next, insert the needle into the seam, preferably between the fabric.
Push it through about an inch or so into the seam (more if you would like).
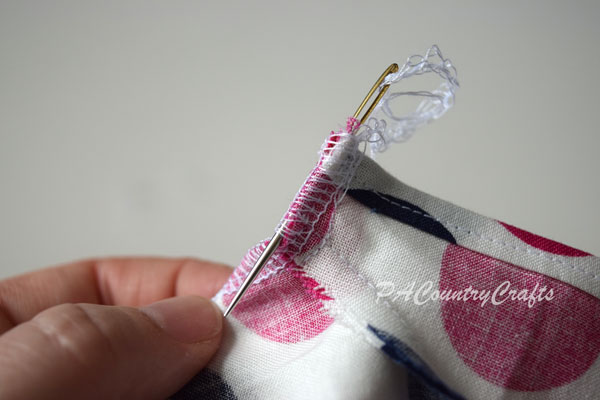
Pull the needle all the way through.
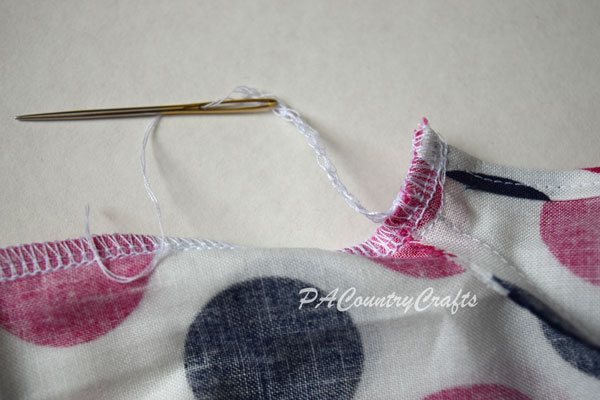
Finally, just trim the ends.
It really is a simple, little trick! It makes things look a lot neater, though!
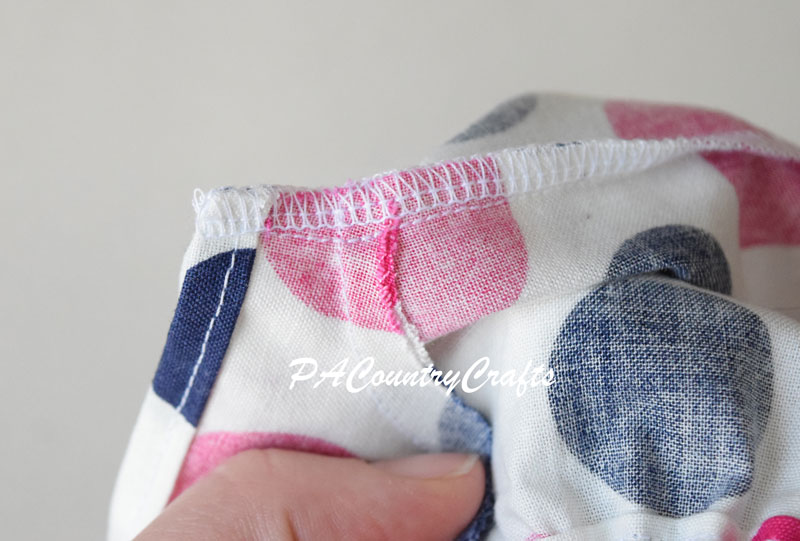
If you forget to leave a tail for tucking, don't panic. You can trim the ends off and use fray check. It is not as good of a finish, but it is better than nothing.
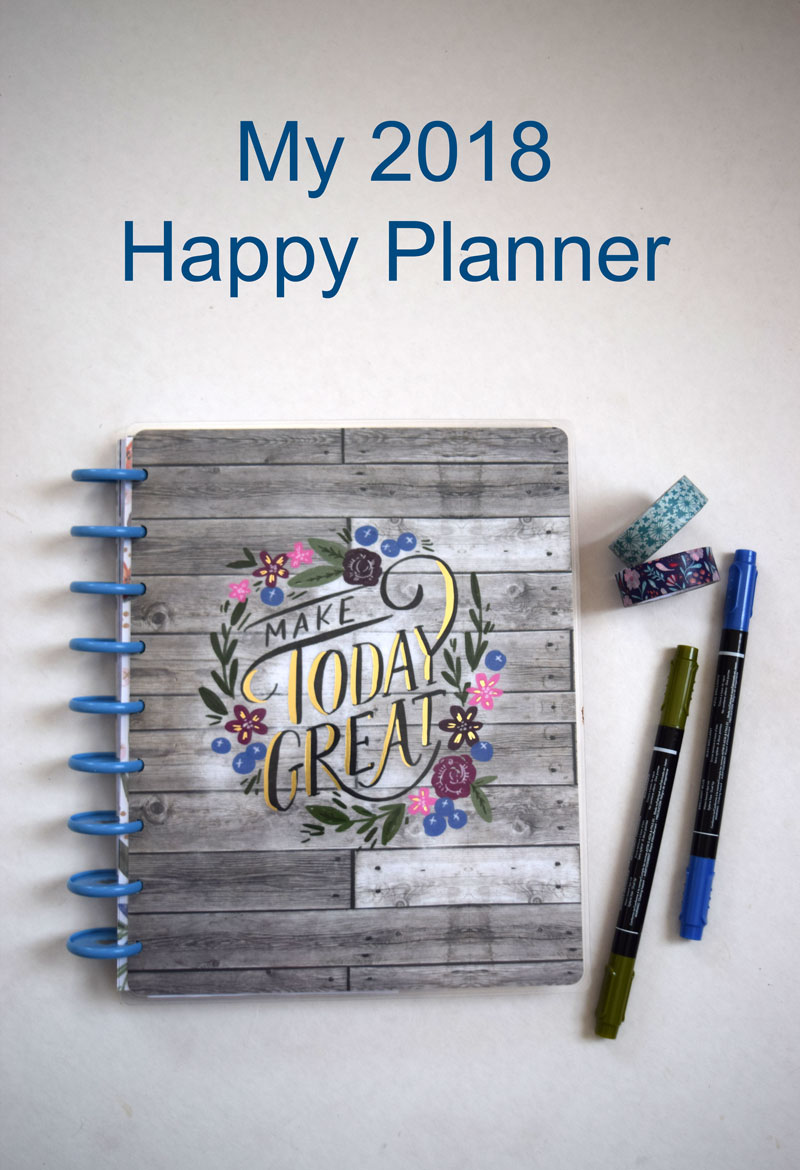
Last year I jumped on the planner bandwagon.My sister-in-law loves hers and it looked really cute! My mom always had one to keep track of all of our school stuff, sports, and activities. She called it her "brain" which made it funny when it got lost and she was looking for her "brain." :)
My wall calendar wasn't cutting it and I was having a hard time remembering everything. Something had to change so I picked up a Happy Planner at Michaels (mostly because it looked cute).

As the year went on I gradually started to try new things and find ways to make the planner more useful to me.


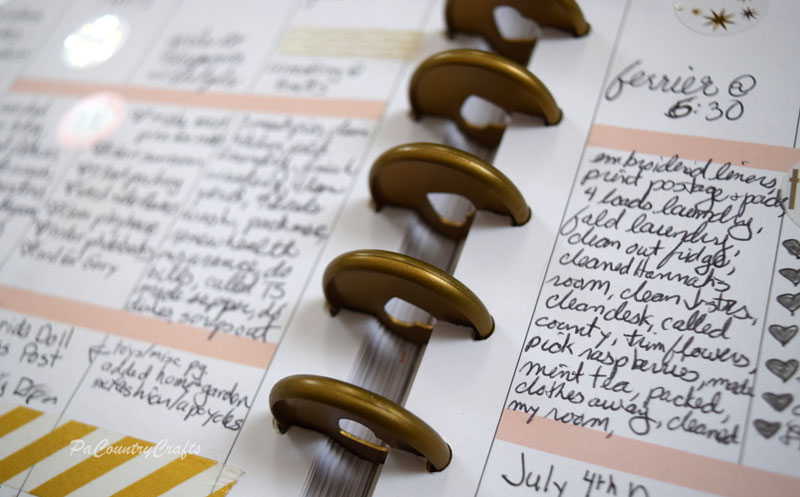
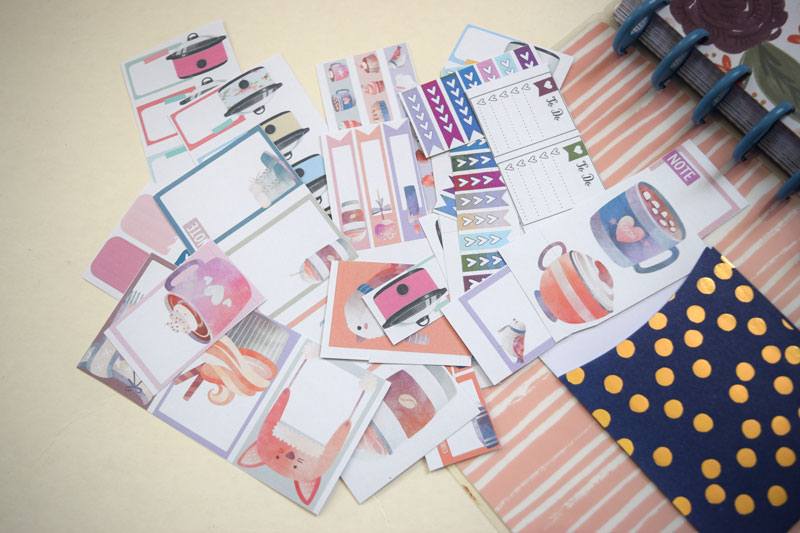
I got some adhesive pockets on clearance at Michaels and they are pretty nice for storing appointment cards, extra stickers, or little things I need to save.


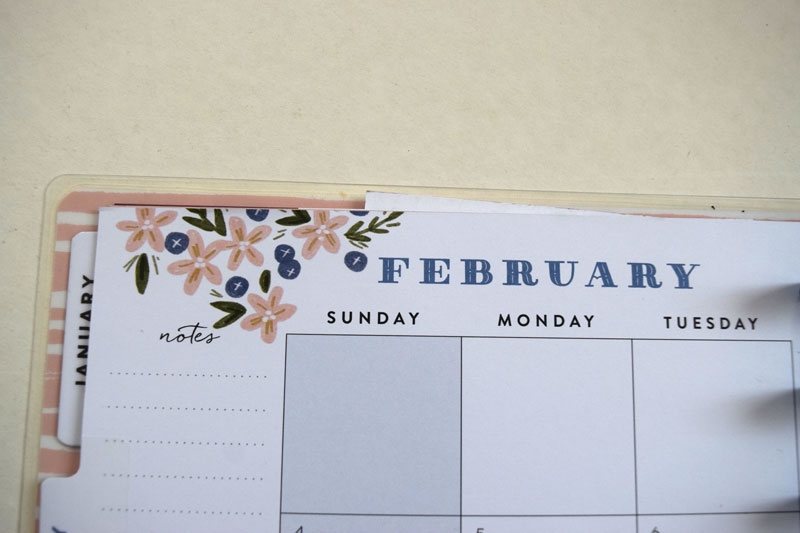
I also learned that it is a good idea to grab your new planner as soon as the store starts carrying the new line for the following year. They got really picked out and it took me 3 or 4 trips to Michaels to finally find mine. (It was like it magically appeared! It was NOT there before!) I really love the color scheme of this one, so I plan on trying to match my stickers as much as possible. (Although, I might get tired of it and change it up later- we'll see!)


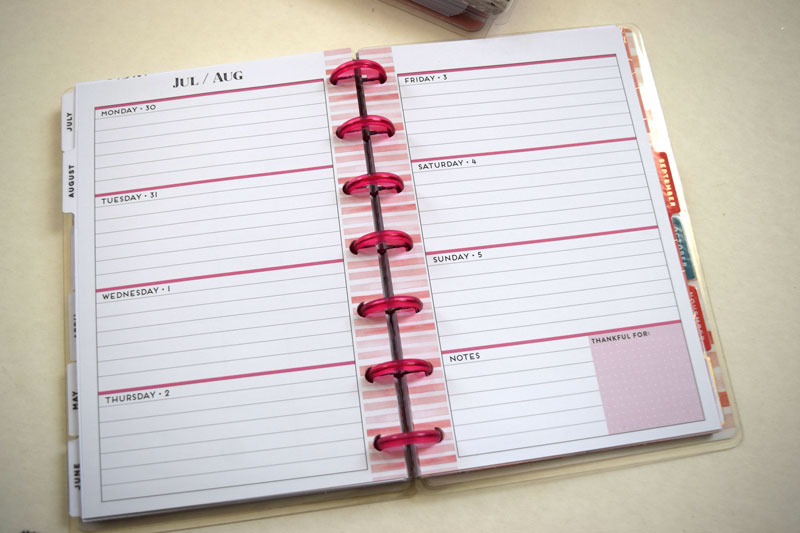
Do you have a planner? Do you have any tips or preferences? I am always looking for new ideas!
It is the beginning of January, so of course social media is flooded with diets, exercise plans, and tips to get organized. Everything promises fast results to make it more appealing. "How to Lose 25lbs in 6 Weeks!" "Get Toned Abs with This 5 Minute Workout!" "Declutter Your Entire House in 30 Days!"
No wonder people give up so easily on their New Year's resolutions. We can't expect instant results. We should, however, expect to put in a lot of time and effort to achieve goals.
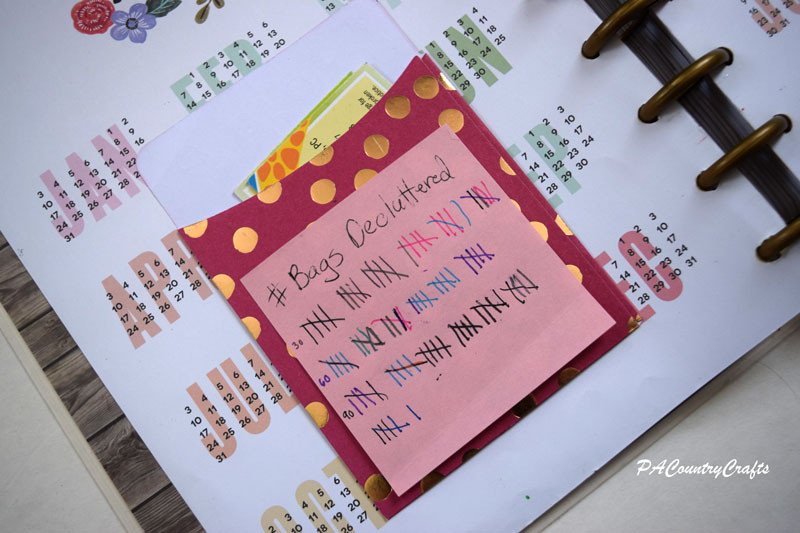
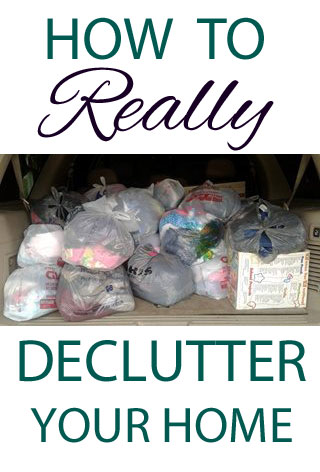
I blogged about decluttering and organizing a few times early last year, but behind the scenes it was an ongoing process all year long. I keep a post-it note in my planner to tally up how many garbage bags of stuff I got rid of and by the end of the year I had purged 96 BAGS!
Stop and mentally picture that for a moment.
Honestly, my house is cluttered, but we don't live like extreme hoarders. I still don't feel like it made that much of a difference. Quite a bit of it came from our storage shed as I thinned out the amount of clothes and shoes that I save for hand me downs. I think I do see a lot of difference there (and a lot of empty totes!) I purged a lot of fabric and craft supplies, too. (GASP!)
Anyway, I did go through some really strong decluttering sprees, especially when it was time to switch out seasonal clothes, but mostly it was a slow, chipping away at one area or another. Sometimes I was intentional about working on one area per day, sometimes I followed a list, and sometimes it just depended on my mood and/or time constraints. I also participated in a Spring Fling where we worked on one room per day for 2 weeks. It was good to have motivation and accountability, but most of my friends fell behind schedule and didn't finish.
The popular 30 day decluttering lists are a nice way to start, but they don't leave much flexibility. Not everyone has the same problem areas in their home. Sometimes life happens and we need a little grace.
I have some different ideas...
I am going to keep plugging away at my decluttering this year and I will probably share more about it on facebook, if you would like to follow along there. I know that I am not alone, so I want to try to check in with the rest of my fellow declutterers from time to time so that we can cheer each other on and lift one another up. (YOU CAN DO IT!!! The cheerleader in me never quits!)
Happy New Year!
Sewing, crafts, tutorials, recipes, and a little look at our life in the country - raising half a dozen children.

Hi! Thanks so much for stopping by! My name is Lindsay and on this blog you will find sewing, crafts, decorating, recipes, and tutorials with a little bit of honesty and encouragement.


