Pirogi Casserole

pierogi2Bcasserole2B0032B252822529.jpg

This is such a quick and easy recipe that I wanted to share it here. It is a great way to use up leftover mashed potatoes (or plan ahead and make a little extra!)

Pirogi Casserole

12 lasagna noodles, boiled
2 cups mashed potatoes
2 cups shredded cheddar cheese
2 cups shredded mozzarella cheese
½ cup butter

You can also add some chopped onions, salt, and pepper to the mashed potatoes, but I don’t.

Place 4 lasagna noodles on the bottom of a 9x13 pan. Top with half of the mashed potatoes, dot with 1/3 of the butter, and sprinkle the cheddar cheese on top. Make another layer of noodles, top with remaining mashed potatoes, 1/3 of the butter, and mozzarella cheese. Put the rest of the noodles on the top. Put the remaining butter in microwavable cup, melt, and drizzle over the casserole. You can sprinkle it with parsley if you want to. Bake at 350 degrees for 30 minutes.

This is sooooo yummy! Definitely not a diet food, but…

Butterfly Quilts

I try to make quilts for my new nieces and nephews when they are born. For my niece, Eden, I made this beautiful butterfly quilt, and I used some extra blocks to make a doll-sized version for her older sister, Anna, too.

I used only fabrics I had on hand- I didn't have to buy anything, so it was some major stash-busting! I even used up extra binding that I over-cut from the last quilt and just cut a little more.

I have made butterfly blocks before, but I was inspired by the Moda Bake Shop quilt pattern here. I changed the measurements of my blocks some, though.

I hand quilted inside the butterfly wings and up the middles, and just did X's on the empty blocks (Yes, I am getting lazy here, but that flower one did me in!)

Another finished quilt- actually two!!! YAY!!!


Sneak Peek in the Studio Friday #3

sneak2Bpeek2B32B0022B252822529.jpg

Lots of crafting this week! I am just plugging away!!! (Guess this is my version of nesting since the more things I finish the closer I am to moving my sewing stuff for Baby#5)

This pretty basket and the quilt it is sitting on (full blog post on the quilt next week when I finish its complimentary doll version)...I LOVE SUNFLOWERS! I finished this embroidery and frame for my etsy shop.
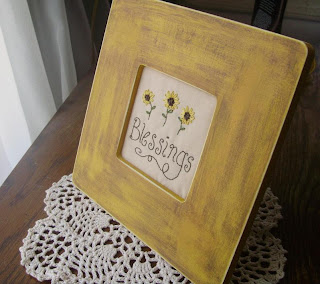
I went through a patriotic quilt phase a few years ago. Here is a little one I made and finally did the binding for. I never had navy blue to do it, and never remembered to get any. For the sake of getting something off the pile I used white. I am still thinking about tea-staining the whole thing...
Now on to the newly started things...

Some baskets for a custom order- this is how I flatten out the bottom!
On Saturday afternoon (I have been sewing on Saturdays a lot lately) I made the entire quilt top for my other baby niece (only 7 months old now), but this is all I can reveal because I don't want my sister to see it yet!
I am linking up at StudioJRU's Sneak Peek in the Studio Friday which you can find here. It is a great motivation for me to finish some things to show you all on Fridays! :)

My Buttercup Bag, Modified

faith2B0052B252822529.jpg

As promised, I am showing you all my modified Buttercup Bag. I got this LOVELY fabric like I used in my sister-in-law's purse for Christmas (I just reversed the outside and lining for mine). After making one for my daughter as a trial run, I realized the original pattern was too small for me, so I made mine a bit bigger (still a bit too small for me, but I am trying to size down from my HUGE Birdie Sling Bag). I made quite a few other adjustments from the original pattern...

I used magnetic snaps like the pattern called for this time. It was my first time using these -they are really nice! I also added a loop to hook keys or whatever onto, and added an additional pocket (on the other side) just the right size to hold a pack of tissues and my cell phone.

The biggest change I made was that I interfaced the outside and strap, and used fusible fleece to line the inside. I had to take the lining in about 1/4" to account for the bulk of the fleece, but I made sure the band and top of the lining were still the same size so that they would line up when sewing it together. It definitely made the bag sturdier, but I soon discovered that, because of the heavy fleece lining, when I filled the purse up and went to sit it down, it would flop over to one side. So, I had to add small gussets in the bottom.
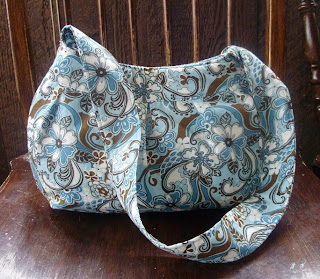
The busy print of the fabric hides the pleats, but it is still a great little bag! :) Unfortunately, I have decided that the purse is also too small because it makes my pregnant belly look much bigger! :)

(And I even look pretty small in this picture!)

Monster Cookies

monster2Bcookies2B0052B252822529.jpg

Yummmmm...

I LOVE these cookies! I like to say that they are just about everything you could want in a cookie. Oatmeal, peanut butter, chocolate chips, m&m's,...

This is a modified Amish recipe, so you might want to cut it in half! This would make about 10 dozen cookies! It took FOREVER to make a full batch Saturday night, but hubby ate a lot of dough to help me out! :)

Monster Cookies

6 eggs
2 cups brown sugar
2 cups white sugar
4 tsp. baking soda
1 cup margerine
1 cup peanut butter
4 cups Quick Oats
1 tsp. vanilla
4 cups flour
1 bag chocolate chips (or more!)
1 medium bag m&m's (I like to save some to put on top before they go in the oven to make them prettier!)

Mix in order given. Drop by spoonfuls on a cookie sheet and bake at 350 degrees for about 10 minutes. DO NOT OVERBAKE! Take them out even if they look a little underdone - if they get to be golden brown they will get hard and crunchy.

Sneak Peek in the Studio Friday #2

I am taking part in my second Sneak Peek- I was pretty busy last week, so I have extra things to show you all that I have been working on. There are other things, too, but they are either listed in my shop or I don't have pics yet.

A cute kitty taggy blaket for my neice from my pile of things started. She loves tags, but will not play with it. She even threw it down to reach for the tag on a nearby stuffed cat!
Pillows for my hubby. I made the other 2 panels into pillows for my father-in-law for Christmas.
My own Buttercup Bag, modified. A full post on what I did coming soon. LOVE this fabric!
Snowmen. With Baby #5 coming, I have to start now to be able to make any ornaments this fall. I want to have lots of them "ready to assemble"! (And see my daffodils poking up outside!)
My first ever hair bow. I just want to make some for my girls. I figure it will be a lot cheaper and I can make them to match their outfits. I had some pig ribbon cause my 2yo loves pigs!
So, this is some of what I have been up to. I will be linking up HERE!
Psst... make sure you check out this great giveaway going on HERE!

Baby Powder in the Vacuum

sneak2Bpeek2B0082B252822529.jpg

If you remember, I mentioned that my girls were into the baby powder the other week. Well, my 2yo climbed up to the top bunk in her sisters' room and created a lovely baby powder shower from there. Their box of Barbie dolls and My Little Ponies and such got "dusted." I tried sticking her head in the end of the vacuum hose, but Snow White still has gray hair. Their beds were also very "dusty," but it actually smelled pretty nice in there after I got it all cleaned up.
BUT, I used my vacuum. I have had messes of this kind before, with the same result, and I have decided that the worst part about cleaning up baby powder with the vacuum is that no matter how many times you empty the canister or clean the filters, there is still some baby powder in there somewhere.
And it causes static electricity.
Sooooooo, whenever I vacuum now, I get little zaps if I bump up against the vacuum or even the hose. I also dread having to reach for the switch to turn it off because I know I am gonna' get it!
All I can really do anymore is laugh about it (and maybe buy a new vacuum cause this one was junk anyway), so I thought I would share so that you can have a good chuckle, too. :)