The next Christmas gifts were these canvas art pieces my daughter and I made together for her to give to her friends. Since this is her thing, I am going to let her tell you about them while I go make breakfast...
~~~~~~~~~~~~~~~~~~~~~~~~~~~~~~~~~~~~~~~~~~~~~~~~~~~~~~~~
Hello! I'm Halley, and as my mom said above I will be telling you all about these "Art Pieces".
First of all, I want you to know these were easy to make, and are worth any trouble you go through to make them. We started off by finding an adorable template for the animal on Pinterest. We traced the pieces that we needed onto paper and cut them out. Of course we didn't want an all-white hippo or tiger, so we picked a patterned piece of paper for both the body and body pieces. (We used scrapbook paper, but you can use anything.)
We did a collage for the background to make the animals really pop! I suppose it would work with a single piece of paper, but it definitely would not be as cute.We picked 3 pieces of scrapbook paper that I think complement each other very nicely. We ripped them up into random shapes and used Modge Podge to make them stick to the canvas. We used the matte Mod Podge halfway through the hippo canvas then then decided that the glossy would just give it "that look".
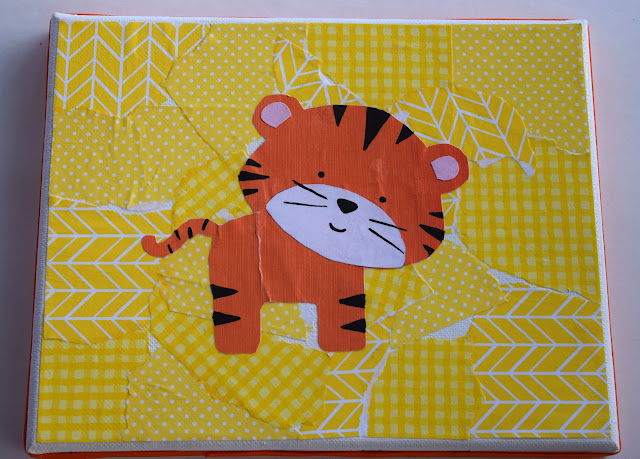
We again used Mod Podge to attach the actual hippo. Black buttons were hot glued on for eyes and nostrils. (It was very hard to let go of the hippo canvas, by the way!) We just did all of these steps again for the tiger. The face and stripes were painted on with black paint. We thought we were done, but then we realized there were staples on the side. That was an easy fix- we just hot glued coordinating grosgrain ribbon onto the sides for a clever and cute way to hide the staples.
Now, I know I'm not very good with instructions but I hope you can translate them and get results as good as ours, and possibly better! Overall this is pretty easy, and guaranteed to make the person who receives it VERY happy!
Now, back to my oh-so-crafty mom!
~~~~~~~~~~~~~~~~~~~~~~~~~~~~~~~~~~~~~~~~~~~~~~~~~~~~~~~
Thank you, Halley! I think these turned out really cute! One of her friends LOVES hippos and the other is soon getting her own jungle themed bathroom. These would be really cute for a nursery, but they are also a good kids craft, too. Besides scrapbook paper, you can use tissue paper or fabric. A friend of mine made me one of these and she used rubber stamps to add more dimension and pattern to the background. There really are a lot of possibilities. I was just glad that this was something she could make for her friends.
Link Parties where I sometimes hang out...
Sew Can Do, Monday Funday, Motivate Me Monday, Inspiration Monday, Take a Look Tuesday, Naptime Creations, The Gathering Spot, Carolyn's Homework, The Winthrop Chronicles, Handmade Tuesdays,Your Whims Wednesday, Weekly Homemaking Party,Create It Thursday, Treasure Hunt Thursday, Thursday Favorite Things, Wildly Original, Thriving on Thursday, Grace at Home, The 36th Party, Freedom Fridays, Feathered Nest Friday, Simple and Sweet Fridays, Craft Frenzy Friday, and Think Pink Sunday.