Halley's dress was not what I intended to make. It was supposed to have a yoke across the neck and ties on one side, but I just could not get it to lay flat, so I ended up ripping it apart and going to Plan B! It still has the big bow on one shoulder like she wanted, so it works.
I also found a way to incorporate some extra white into the dress so that it would coordinate with her sisters' dresses.
Here is a little tutorial of how I saved the day made it...
(Everything has a 3/8" seam allowance.)
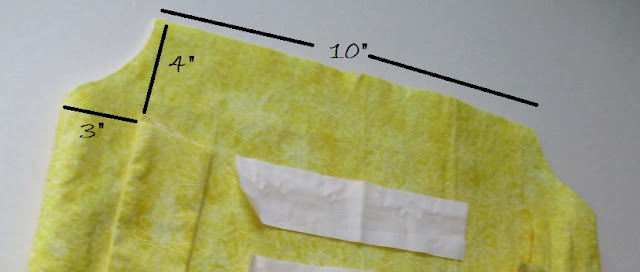
I started with the main dress piece that I salvaged from the first idea- here are the top measurements (my daughter is a size 8).
It is cut in an a-line shape to be 24" high and 24" wide at the bottom. You will need to cut two of the main fabric and two of the lining. I already had the sides sewed together since I messed up Plan A, but you can do this before or after you sew the bands on the top... whatever.
To incorporate more white, I cut top bands 2" by 7" - you need four of them.
The shoulder strap is made from a yellow piece 4 3/4" by 9" - sew long sides together, flip, press, and topstitch edges.
To make the ties for the CUTE bow on the other shoulder, take strips measuring 4 3/4" wide by 28" long, fold in half lengthwise, sew, flip, and topstitch the edges. I sewed across the bottoms of mine on an angle instead of straight across cause the "pointiness" just looked better for this style.
I gathered the tops and pinned a band to each one.
Sew the band on and then turn the lining inside out. Stick the outside into the lining and put the right sides together like this...
Pin all the way around the top, lining everything up...
Sew in place. If you flip it, now it should look like this...
But, wait! We need the straps! You probably could have put some of them in before sewing, but I figured it was enough to worry about getting everything lined up. So, turned it inside out and seam ripped a little to put the strap and a tie in like so...
I tried the dress on her first to get the angles- you can do that or just estimate from this picture.
For the back side, I did the tie the same way, but the strap I just inserted from the right side.
Then I topstitched the back to hold it in place. (Don't look too close! My totpstitching stinks!)
I added a ruffle at the bottom, too, for more length and more white to match the other dresses. It is just a strip 6 inches by about 90 inches pressed in half, gathered, sewed on, and topstitched. Kinda basic, but if you have any questions, let me know!
So, that is it! Plan B Dress in a fraction of the time I struggled with the first idea.
I also used some scraps to make her a cute, rolled rosette fabric headband. You can find tutorials on those everywhere... just do a search for it.
I hope this one is a lot more clear than yesterday's Bubble Dress Tutorial. It is a totally different style. Just like my girls.
Well, that wraps up my Easter dress posts for this year... four dresses, four colors, four styles, four sweet girls! Thanks so much for letting me show all of them off a bit! =)


