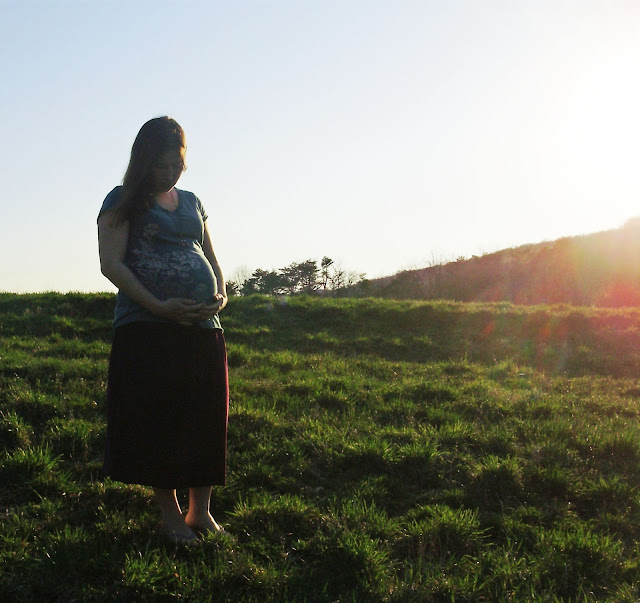
Cozy Knit Maternity Skirt

myskirt.jpg
Last week I whipped up this skirt for myself. Yes, I sewed something for myself. That was not a typo. 
I am not usually comfortable having my picture taken, but for my loyal readers I will make this sacrifice.  :)  I walked up to the edge of the fields with my oldest daughter and gave her the camera.    She did a fantastic job!
Oh, and before you think that belly is so adorable, let me put it in perspective.  I am only 21 weeks. Yup. It is gonna be a looooooong summer! Good thing this knit has a lot of stretch!
Last time I was expecting I tried to make one of these skirts and it was a giant FAIL. This time, I messed up the exact same way (UGH!) by sewing the skirt on inside out, but I was able to save it. I sewed everything on my serger this time, too.  I can, hopefully, wear this one after the baby is born with the yoga waistband folded down.  If I need to, I can easily rip it apart and take it in, and I might shorten it some, too.  It is so incredibly comfortable and you can find the tutorial I used HERE.

 I have JUST enough left over that I think I am going to make a skirt for one of the girls. However, I love the detail on this shirt (Thank you, Loni!) and I am considering trying to make a similar design on the knit using a bleach pen. Do you think it will work?

I am linking up at the brand new Project Sewn and The SewOff Flickr Pool and Make for Mom.

Easter Sewing Part 4

easter20100273.jpg

My skirt is the last in the series… I wanted and A-line, and I loved the contrast of plain white against the fabric in the other skirts, so I wanted to trim with white.

I used a pattern, sort of- because I made it myself! I took a skirt I already have and took the measurements of the bottom width and the length of the skirt and my waist. Then I took a piece of freezer paper in the same length, and marked off the half of the waist and half of the width. I drew a diagonal from the waist to the bottom marks.

Then I marked the length on the diagonal and made it curve gently from the bottom to the mark on the diagonal. Using this pattern, I cut two pieces on the fold from my skirt fabric.

For the white waistbands, I measured my waist (ICK!) and divided it in half again. I added seam allowances and cut four pieces in this length by 2 inches wide. I sewed two of them together along the long, top side and pressed them with the seam inside and repeated this with the other 2 pieces. Each waistband piece was then sewed to the top of a skirt half and the edges overlocked. I sewed the skirt halves together on the right side the whole way, and up to 6 inches from the top on the left side and overlocked again.. I put an invisible zipper in the left side and hooks on the top at the waistband.

The hem was my favorite part! I overlocked the edges, then took white double fold wide bias tape (like quilt binding) and sewed it on! This was my first time using double fold bias tape and I LOVED it! How can single fold be so awful and double fold be so wonderful! I cannot believe I have been hand-sewing quilt binding for all these years! I might have to cheat now!

It fits pretty well, although it bunches just a tad in the pelvis area when I bend and sit, but it is still the best thing I have ever sewn for myself to wear!

NOW... drum roll please...........................................

The whole collection! Now, I don't have my hair or makeup done, so ignore that- it was very tempting to use one of the other 3 pics hubby took first with my head cut off because he was so worried about getting the girls to look to see whether I was in the shot! The shirts are a little big, but I am sure they will grow or the shirts will shrink. I wanted to embellish those as well, but then I regained my sanity. I hope you enjoyed my series this week and that you may have gotten some ideas or just enjoyed laughing at my novice abilities and insane ramblings...